 Graham's Photography Blog & Technical Reviews
Digital Photography! Let's Take A New Look!

What have all the three cameras above have in common? Well, amongst many others, they were the first 35mm film cameras that I owned and in particular the Nikon FE & FE2 that I had were instrumental in getting me really hooked into photography, particularly macro photography, using reversing rings extension tubes and bellows.
What have they also in common? Simplicity!
That's not to say that they were not technological masterpieces for their time, they most certainly were, however the basic camera craft came down to just two variables that you could adjust.
These were the aperture of the lens and the shutter speed!
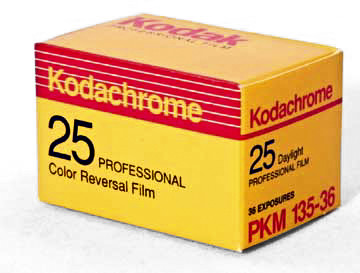
ISO, or ASA/DIN as it was then, was fixed at the emulsion speed of the film that you had loaded into the camera. For me it would normally be Kodachrome 25 for transparencies.
When you went out on a "shoot" you chose the film stock that would be most suitable for the lighting conditions that you were likely to encounter. The choice was in both terms of emulsion
sensitivity - its ISO rating - and the spectral sensitivity either daylight or tungsten balance. They were ways in which colour balancing filters could be used and would allow you to use tungsten
in daylight or vice versa however it was always at the expense of exposure. Once the film was loaded into the camera if the camera had a "electronic metering system" then you would dial in the
ISO speed of the film before using the camera.

Once you had set the "film speed" you were ready to shoot, almost!
If your camera had a built in exposure meter, and there were many variants as to how this displayed when you had the correct exposure from red/green LED's to meter needles and scales, then you could see the affect of changing aperture, shutter speed or both with the meter.
Most meters were "centre weighted" as it was thought most subjects would be centrally placed in the frame and this would be the best position for getting a reflected light reading in the camera. The Asahi Pentax Spotmatic 500, that I had, originally planned to use spot metering however final production units were modified to average metering as it was though that spot metering would be too difficult to use!
By mechanical feedback from the lens aperture to the camera body the camera could determine the aperture that you were pre-selecting. Viewing was always done at full aperture and then during exposure the camera would adjust the aperture to your pre-set value.
Shutter speed was also factored into the exposure meter so if in fact you chose to change the shutter speed the camera would indicate the amount of exposure change and you would compensate by adjusting the aperture to bring the meter back to the zero position. No exposure compensation, no bracketing, no white balance control, no scene mode, no autofocus mode; nothing except you and your camera!
So with just two variables - shutter speed and aperture - you could go out and shoot everything in sight! from intense bright sunshine to dark beer cellars! Or could you?
What they don't explain to you are the reciprocity laws of film emulsion! Film emulsion has a fairly even (albeit logarithmic) response to light for about 2 stops above and below the correct exposure (for print film) and less for reversal (transparency) film. Beyond this, and especially in the shadow region of the sensometric curve, the change in image density (after development) is severely affected.
In this region changing the shutter speed to twice as long doesn't yield an exposure increase of the anticipated yield in film density (1 EV.)
Most film manufacturers published a correction factor chart such that if you were going to use these extended shutter times in low light conditions you could achieve the correct exposure by applying the correction factor.
As an example one film with a 60 second exposure would need to be exposed for 8 minutes to achieve the level of expected film density change. Sometimes colour correction filter also had to be applied as there was a colour shift during the long exposure time.
Of course you had no way of knowing if the exposure was correct until your prints, or transparencies, were returned! Ah, the joys of shooting with film!
If your camera did not have an inbuilt light meter, or you wanted to be in total control of your exposures in manual mode you could use an exposure meter.
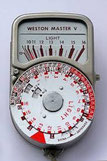
With these hand held exposure meters like the one shown left, the Weston Master V, you could accurately determine both reflected and incident light meter readings. Incident light, that measured at the subject, was determined by placing the "invercone" white translucent diffuser over the metering cell.
Exposure calculation was done by reading the EV value form the scale and then rotating the two circular dials to give you the aperture/shutter speed combination for a preset ISO value.
If you were serious about photography this meter was top priority for your camera bag!

So why is it then today that we need so many screen menus, customisable function buttons, control dials and wheels, switches and audible warning devices to help us make an image?
Ironically most of these controls etc., are found on so called "entry level" cameras!
Surely is not the process of capturing an image on the sensor still reliant upon the basic photographic fundamentals of Shutter speed, Aperture and the sensitivity of the Digital light gathering sensor of the camera?
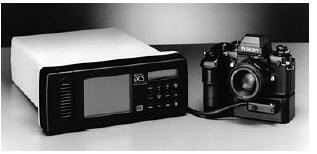
In fact the very first Digital camera that I was privileged to use, experimentally back in 1991, was the Kodak DCS1. It was in fact a modified Nikon F3 film camera.
In place of the film track a 1.3Megapixel sensor was placed and the whole electronics were tethered to a hard disk recorder/viewer.
I'll never complain about the weight of Canon DSLR's again!
So what does all this mean to modern digital photographers - especially those finally transitioning from film to digital?
Let's face it camera manufactures have to market their cameras some how. In a crowded market place how can they convince the potential buyer that their camera is the best. How would my suggestion of a light-tight box with a sensor, manual lens and just a shutter speed dial and shutter button compete with some of the cameras in the marketplace now? You're right it wouldn't stand a chance!
Consumers are now bombarded with all sorts of advertising for cameras in trade press promising the earth from these cameras.
ISO up to 125,000, shutter speeds of 60 seconds to 1/8000 sec light speed autofocus etc etc.
I know from the ten's of emails these cameras scare the new user and actually prevent them from developing their own photographic styles.
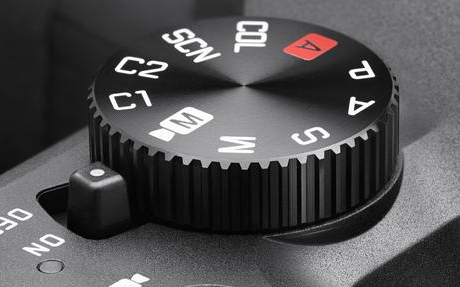
Interestingly Leica versions of the Panasonic range of cameras refrain from using the iA or intelligent auto mode instead calling this the "A" or snap-shot mode. I guess what they are hinting at is that to take your pictures to the next level, i.e. not snapshots you should be using one of the other modes. In my ideal digital camera this mode dial would just be a slide switch offering stills or video mode option only. ISO would be set at the factory to the lowest sensor sensitivity and locked there. The lens would have full time manual zoom and manual focus options (not fly by wire but good solid mechanically linked) would have manual aperture control and have focus scales and DOF marked. Essentially the camera would be in Aperture priority mode, shutter speed automatically determined from the centre weighted metering circuit. If I wanted a specific shutter speed I just adjust the aperture until I got it.
The camera would output a RAW file and an uncompressed TIFF image file and would have no in camera photostyles, no i.ISO no hdr, no i.resolution blah, blah, blah.
It's all digital sorcery and nothing you can't do in post processing! Photostyles only modify the contrast curve. Things like i.resolution add edge sharpening Let's take the nonsense out of photography and concentrate on camera craft and composition not technical merits and specifications - they only confuse users and sadly often lead to people purchasing cameras only to find out that they are not even close to their expectations of what the are marketed to deliver!
Turn your mode dial to A, set ISO to 100 aperture to F4 and go out there and take some great photos, trust your ability to recognise scenes that are not "in the normal" category and make any EV adjustment for example backlit, snow or beach scenes.
You have the LCD which instantly tells you whether you have it right or not so no excuses!
Let's go SIMPLY DIGITAL! enjoy!