 Graham's Photography Blog & Technical Reviews
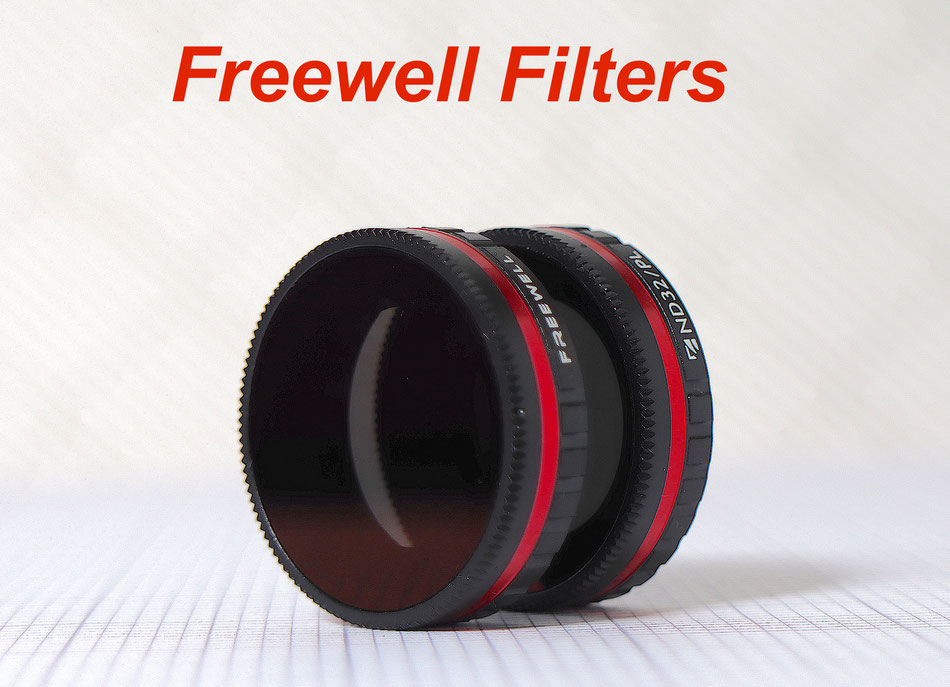
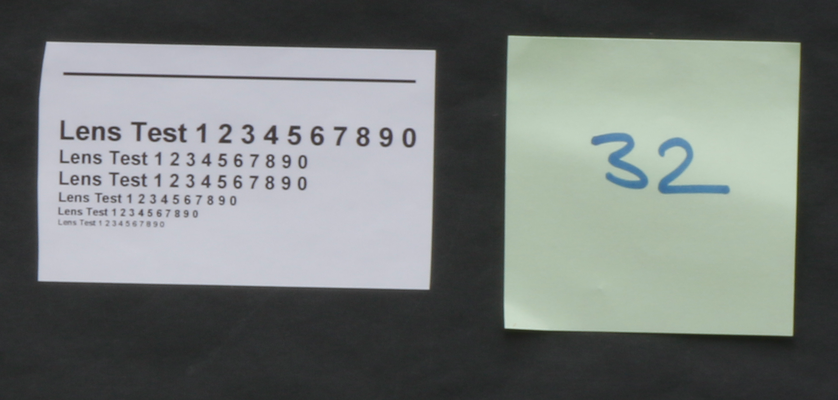
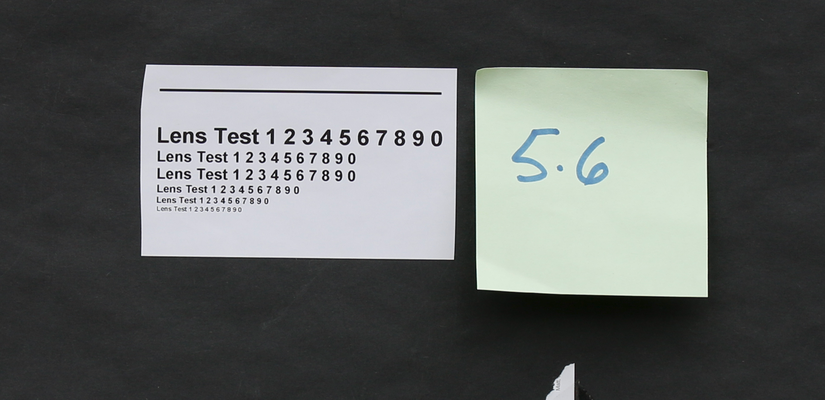
Freewell Bright Day Filter Set For the DJI OSMO Action Camera
Neutral density (ND) filters are a must-have for anyone aiming to capture smooth, cinematic footage with video cameras.
The filters allow you to reduce the amount of light entering the camera so that you can decrease the shutter speed to get the right 180 degree shutter angle.
This 180 degree shutter angle is achieved when the shutter speed is exactly twice the camera frame rate. So for example shooting at 24 fps requires a shutter speed of 1/48th second.
With the DJI OSMO action camera the lens is a fixed f2.8 lens so aperture cannot be controlled to decrease shutter speed so ND filtration is our only option here when the lower limit of 100 ISO is set.
Freewell does a complete range of filters, not only for action cameras but also drones so they are quite well suited to producing filters for this camera.
The filters have 16 layers premium multicoated optical glass and are waterproof, scratch , dust proof and hydrophobic coated. The filters carry a 10 year guarantee.
Fitting the filters to the DJO OSMO action camera requires removal of the existing lens cover. I found that on my camera this was almost impossible to do by hand. I had to use a pair of slip joint pliers and a piece of cloth (to prevent damage to the lens cover) to facilitate the removal. The Freewell filters screw easily onto the threads of the camera lens flange. The mounts are extremely well made from aluminium and finished in a nice black with red ring anodised finish.

The filter set comes with a metal protective case with a neat foam insert which restrains the 4 filters thus preventing them becoming marked and allows easy identification.

The Freewell filter installed on the DJI OSMO Action camera
As the bright day pack has a CPL plus ND filter this can be useful for reducing reflections from water, snow and foliage etc.
By turning the front element of the Freewell filter you can adjust the polarised lens position to find the right amount of cut that you want in your image/video


Freewell website https:/www.freewellgear.com and on Amazon http://amazon.com/freewell
Osmo Action Camera Review

The DJI Osmo Action camera plus included accessories
What does the Osmo Action Camera have that other action cameras don’t? Well most notably, it has a 1.4-inch colour LCD screen on the front of the camera in addition to the 2.25-inch touchscreen on the rear — a nice feature for YouTube content creators and others who would like to see exactly what they’re shooting while they have the camera pointed at themselves.
The user interface is nicely uncomplicated, with three buttons controlling power on/off, record start, and switching capture modes; hitting the shutter button once turns on the camera from standby and starts recording in a preset mode in less than two seconds. Modes include time lapse, hyperlapse and slow motion. In addition and the camera even responds to five voice commands.
An HDR video mode is available, which DJI says stretches dynamic range by about three stops, but HDR shooting is limited to 30fps and electronic image stabilisation is disabled.
Frame rates are limited by your choice of aspect ratio — 4K 16:9 shooting allows frame rates up to 60p, but 4:3 shooting is limited to 30fps. The is similar in 2.7K mode, which reaches 60p only at 16:9. This is, presumably, because 4:3 is the native format of the camera’s image sensor, while 16:9 mode crops pixels at the top and bottom to make the wider frame, reducing image-processing requirements.
4K video recording takes place at up to 100 Mbps (this is compared to a max of 78 Mbps on the GoPro Hero7 Black). In HD mode, the frame rate can be set up to a full 240fps for an 8x slo-mo effect. It’s rated as waterproof at up to 11m and said to endure temperatures as low as -10 degrees Celsius. Built-in “RockSteady” electronic image stabilisation adds gimbal like stabilisation at the slight loss of field of view. The Osmo Action camera interfaces with DJI’s Mimo app for editing and sharing photos and video. Videos and still images are saved to an on-board microSD card.
DJI report that the Osmo Action Camera’s battery can run for up to 135 minutes at 1080p and 30fps without stabilisation, about 90 minutes at 4K and 30fps with image stabilisation, or up to 63 minutes at 4K and 60fps with stabilisation. It takes about 90 minutes to charge a battery via the USB C type connector.
The lithium ion battery is specially purposed for this camera and has the additional water-sealing gasket fitted to it. When inserted there are two latches which show the correct insertion. If any of the latches are showing orange it means that the battery is not correctly inserted. This means that third party batteries may be a while before they make the after sales market.
The Osmo Action camera supports the following aspect ratio and frame rates:
4K (16:9) – 60, 50, 48, 30, 25, and 24fps
4K (4:3) – 30, 25, and 24fps
2.7K (4:3) – 30, 25, and 24fps
2.7K (16:9) – 60, 50, 48, 30, 25, and 24fps
1080p – 240, 200, 120, 100, 60, 50, 48, 30, 25, and 24fps
720p – 240, 200fps
The video quality can be chosen from either MOV or MP4.
For better audio recording when shooting video you can connect the Osmo Action camera with a third-party microphone through the USB-C port by the 3.5mm adapter However at the moment there are no third party adaptors that will work with this (not even the one for the Osmo Pocket camera works!) so we have to wait for the OEM version to come to market before we can add capturing better audio.


The camera features a facility to "linearise" the image formed by the semi-fisheye lens
Below the image without the in-camera adjustment followed by the corrected image


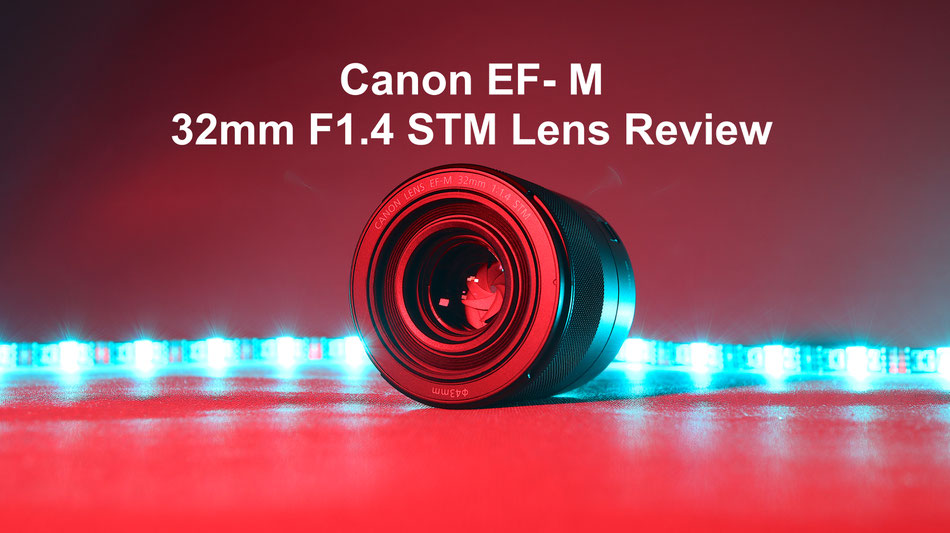
Canon EFC-M 32mm F1.4 STM Lens
This lens is the latest addition to the lenses available with the EF-M mount.
In 35mm equivalence terms this is 51mm f2.2 so is an ideal standard focal length lens.
It is not a cheap lens £499 in the UK $489 in the USA
Noteworthy features of the EF-M 32mm f/1.4 STM lens include:
14 elements in eight groups, including a glass moulded aspherical lens
Super Spectra Coating technology and optimised lens element placement helps minimise ghosting and flaring
Lead gear-type STM stepping motor to help provide smooth and quiet focus operation when taking photos, and near-silence when shooting video
Wide focusing ring with full-time manual focus capabilities
Compact and lightweight design: maximum diameter of 60.9mm, total length of
50.5mm and approximate weight of 235g
Maximum magnification of 0.25x and minimum focusing distance of 0.23m


The lens is extremely sharp even at F1.4 centre to edge definition is indistinguishable.
Stopping down just increases the depth of field. I have not seen any evidence of chromatic aberration in the shots I have taken.
It doesn't have any in lens stabilisation which is a great pity as the EOS M50 electronic stabilisation isn't all that effective.
Maybe the EOS M5 mk11 may have IBIS?
The implementation of manual focus is very smooth even though it is electronic, not mechanical. Full time manual focus is always available in AF modes.
The AF focus is very fast in stills mode and is almost silent in video mode with a nice slow transition from focus point to focus point.
Below is a sample gallery of images taken with this lens.
Double click for larger size and image details.


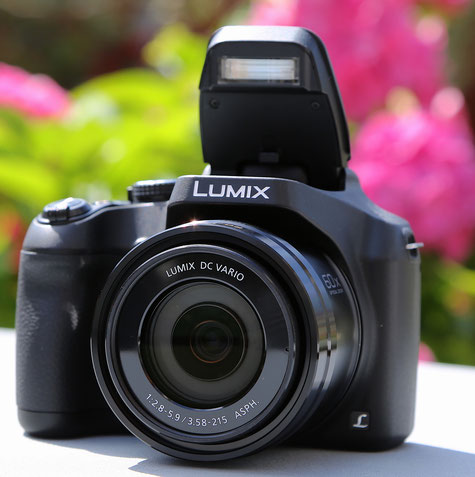
The Panasonic Lumix FZ80/82 x60 Bridge Camera
The FZ80/82 is the successor to the FZ70/72 camera, what is new in this camera, how does it perform and should you buy it.
Hopefully this review will answer those questions

Announced in Jan of 2017 the Panasonic Lumix FZ80/FZ82 is a bridge super-zoom with a 60x optical range. It updates the previous model the Lumix FZ70/FZ72. Whilst retaining the older model's 20-1200mm lens it adds a new 18 Megapixel sensor, an upgraded 3 inch 1040k dot fixed touch screen, and a more detailed 0.2in 1.7 Million dot EVF.
Also new are 4K video and 4K Photo modes, Wifi for wireless shooting and image transfer, faster continuous shooting, improved AF with Panasonic's Depth from Defocus technology and USB charging.
The new Lumix FZ80 / FZ82 shares the same optical zoom range as the FZ70/72, taking you from an unusually wide 20mm EFL to a super-telephoto 1200mm EFL, allowing you to capture landscapes or tight interiors and at the other end of the zoom range close-ups of distant wildlife or craters on Moon at the other.
The crop applied by the 4k video / photo modes, causes the camera to produce 28-1680mm EFL coverage.
In the AF macro mode there’s also the ability to focus as close as 1cm.
New to the FZ80/FZ82 is the 18 Megapixel sensor allowing the camera to film 4k video at 24-30fps and support Panasonic’s 4k Photo modes which effectively capture 8 Megapixel stills at 30fps or let you refocus after the event.
The sensor also supports an electronic shutter, extending the fastest shutter speed from 1/2000 to 1/16000, and continuous autofocus has improved with Panasonic’s DFD technology.
Burst shooting is also up from 9 to 10fps, or 6fps with continuous autofocus.
The screen remains fixed, but now has a higher resolution 1040k dot panel that’s now touch-sensitive, and while the built-in viewfinder remains small in size, it too has received in boost in detail to 1170k dot.
The FZ80/FZ82 additionally offers 1080p video at up to 120fps for slow-motion.
The camera has no external battery charger but can now be charged over USB, a useful feature allowing the battery to be topped up wherever you have access to a USB port (on a bus, cafe, power bank or laptop for example)

The control layout on the rear is little changed from the earlier model. There’s a button (LVF) to the right of the viewfinder for toggling between the monitor and the electronic viewfinder as there is no automatic switch over using eye detection sensor like found on the FZ300/330.
There is a dedicated AE/AF lock button next to it whose functionality can be set in the set up menu.
The camera has no lens barrel switches or buttons like the FZ200/300.
Below the LVF button is a button that is a focus mode selector button and below that the playback button.
The four-way controller allows selection of ISO, white balance, self-timer and drive modes, and AF modes with the menu/set button in the middle.
Below it are the Q Menu/Delete (Fn3) and display overlay buttons.

Two buttons on the top panel are assigned to the new 4K and post focus modes but can be assigned to other functions, if you wish, and so are labelled Fn1 and Fn2.

Beneath a flap on the right side of the body you’ll find a mini HDMI port for connecting to an HDTV and a combined USB/ V port for downloading photos and video and for charging the battery.

The FZ80/FZ82 uses the same DMW-BMB9E battery as used in the FZ70/FZ72 and the FZ60/FZ62, so if you’re thinking of upgrading from one of those earlier models you can use any spares that you you may have.
The BMB9E is rated at 895mAh and provides enough energy to power the FZ80/FZ82 for 330 shots if you exclusively use the monitor or 240 if you use the EVF.
Whichever you use, it’s a bit of a drop from the FZ70/FZ72’s 400 shot specification.
The flash is raised by pressing a button to the left of the viewfinder on the rear panel.
It’s hinged quite far back on either side of the hot shoe and consequently raises well above the lens, reducing the potential for red-eye and shadows on closer subjects.
In the PASM exposure modes the flash can be fired automatically when the conditions require it, or can be set to forced on.
There are also Auto/Red-eye and Slow Sync/Red-eye modes. The red-eye modes fire a pre-flash to narrow the subject’s pupils and there’s also software correction available from the Rec menu.
The maximum distance quoted for the flash at the wide angle lens setting and with the ISO sensitivity set to Auto is 14.1 metres.
The FZ80/82, like all the others in this series (FZ47/60/70) has no articulated LCD but the new screen is touch sensitive allowing menu selection and other functions to be carried out.
if I had to choose between the two features I think I’d choose touch-sensitivity over articulation every time.
As well as touching the screen to position the AF area, you can pull focus while shooting video using the touch-screen and it’s essential if you want to make the most of 4k shooting modes like Post Focus, where you can tap the screen to set the focus point after you’ve taken the shot.
On the right side of the screen there’s a small panel of touch icons which when tapped slides out to reveal more touch controls.
From here you can activate the touch-shutter feature, apply a filter effect, set the AE metering area or access any of the touch function buttons, for example to turn on Wi-Fi or access the 4K photo mode.

The Electronic viewfinder (EVF) is also upgraded with a new 0.2 inch, 1.17 million dot panel. This provides a more detailed and more stable view than the 0.2 inch 201k pixel EVF in the older FZ70/FZ72.
The viewfinder is 4:3 aspect ratio so the full area is used and there are no black areas at the edges, but it’s still quite small compared to the lcd panels used in mirrorless models and the FZ200 which has a 2.3 million dot OLED viewfinder.
The view is reasonably detailed and stable image when neither the camera nor the subject are moving but things get a little jittery when panning or following moving subjects.
One solution to this is to switch the Live view mode from its default 30fps refresh rate to the 60fps option.
This results in a lower resolution display at double the refresh rate which produces a much more stable image. Be aware it will consume more power.
The diopter adjustment wheel was very loose and moved so easily that I had to adjust it every time I used the viewfinder (a similar issue that I had with my FZ200 and had to resort to tapping it in a fixed position to prevent it from moving)
The FZ80/FZ82 has a maximum aperture of f2.8, closing to f5.9 at the telephoto end of the zoom range.
It is also compatible with Panasonic’s 1.7x teleconverter lens accessory, the DMW-LT55 converter and the LA8 conversion tube.
The FZ80/FZ82 is equipped with Power O.I.S image stabilisation which moves the lens elements to compensate for camera shake and permit hand-held shots at slower shutter speeds with a claimed 5 f-stop advantage.
Lens Performance
From 50mm EFL to around 600mm EFL the lens delivers very good resolution right across the frame and into the corners.
Optimum aperture is the widest available (lowest f-number) at each focal length thus:
70mm = f4.3, 135mm = f5.3, 400-600mm f5.6.
Video Modes
The FZ80/FZ82 has 1080p HD movie modes at 50 and 60 frames per second. New though is 4k UHD video at 25 or 30fps along with Panasonic’s 4k Photo mode – a new way of exploiting the fact 4k video captures an 8 Megapixel image up to 30 times a second.
The clever part is Panasonic equips its 4k Photo cameras with software that lets you easily capture bursts of video before scrolling through the footage and extracting the perfect frame as a JPEG image, all in-camera.
You could of course frame grab from video externally, but Panasonic has made it easy to perform the whole process in-camera.
The 4k options record Ultra High Definition video (3840×2160 pixels) at 25 or 30fps and at a bit rate of 100Mbit/s in MP4 but there’s no 24fps option to match the analogue film look.
It also records 1080p at up to 28Mbit/s in MP4 mode but you can switch to AVCHD mode and you get the same 1080/50p mode as the MP4 format, encoded at 28Mbit/s plus two further 1080/50i interlaced modes – one encoded at 24Mbit/s from 25p sensor output and a 17Mbit/s mode from 50p sensor output.
Other video features include snap movie, which records a short clip of between two and eight seconds in length. With snap movies you can set up a focus pull in advance tapping the screen to define the start and end focus positions.
You can also add a monochrome to colour fade in our out effect, as well as a simple exposure fade. There are also Time Lapse and Stop Motion modes, accessed through the main menus rather than the movie options.
The FZ80/FZ82 also has a High Speed video feature that shoots 1080p at 100fps for playback at 1/4 speed.
If you want to slow down the action even more there’s also a 200fps option for 1/8 speed playback at VGA resolution.
You can of course use editing software to convert 50/60p HD footage to 25/30p at 1/2 speed, but it’s so much more convenient to be able to shoot slow motion footage in-camera.
On the FZ80/FZ82 you can shoot in PASM exposure modes, selected either from the video menu or by tapping the exposure mode icon in the top left of the screen when the mode dial is in the movie position.
During recording, depending on the mode, can change the exposure setting including, aperture, shutter speed, ISO sensitivity and exposure compensation.
While you can use the camera’s physical controls to alter the settings the touch screen provides a slide out panel allowing you to do so silently. You can also tap the screen to pull focus during recording.
Unlike the Lumix FZ300/FZ330 and other higher-end Lumix bridge models, the FZ80/FZ82 doesn’t offer Cinelike D and V profiles (for later grading) and also lacks the option that allows you to turn off the info display to allow the output of a ‘clean’ signal via the HDMI port.
There’s no external microphone input, remote control input nor headphone socket.
Panasonic have implemented focus peaking and zebra patterns to help with focus and exposure.


Some sample images, click for larger size


The Godox 350O is a good match for the FZ80/82 offering TTL as well as manual mode.

Without any lens hood for protection I do recommend a good 55mm UV filter to protect the lens from accidental knocks

Alternatively a 55mm screw in type petal style lens hood would offer better protection and cut down on some lens glare when shooting towards the light source.
It will vignette at the 20mm end but zooming to 22mm will clear this.
I also recommend that you get a small microfibre lens cloth to keep the lens (or UV filter) clean

The camera has a facility to correct for diffraction caused by small aperture settings. It adds a slight amount of additional sharpening to JPEG images
Here it is set to ON for this doll shot with lens set to f8 at 600mm EFL.
Flash Exposure
The FZ80/82 is fitted with a hot shoe which does allow the use of external flash guns. However, flash compatibility has always been an issue with Panasonic bridge cameras and this camera appears to be the same.
For example the small compact Meike 300 or 320 do not work in TTL mode they fire at full power - just as with the case of the FZ200/300/330.
There are three Panasonic models available, the FL220, FL360 and FL500 with Guide Numbers of 22, 36 and 50 (Metres, 100 ISO) respectively however the Godox 350O is my new "go to" flash gun for the Panasonic Bridge cameras. It has a similar output to the Nissin i40 which I previously recommended. (see the following review of the Godox 650O for details)
The pop up flash can be used as a wireless flash commander which may be set to be part of the exposure or just the master to trigger, optically, other optically TTL compatible units. The Wireless flash menu is only active with the flash head raised.
Focus modes
The FZ80/FZ82 has six focus modes, Pinpoint, 1-Area, Custom Multi, 49-Area, Tracking and Face Detection.
With Face detection it can detect up to 15 faces and lock focus on one of them (the one registered as a primary in the face detection database). Multiple AF uses 49 areas to determine the best focus regions and there’s a single area AF option with a resize-able AF area that can be moved around the screen.
Additionally there are three AF styles, the usual AFS and AFC single and continuous modes are joined by a third AFF, or Auto Focus Flexible mode.
This AFF mode is designed for shooting subjects like children and pets that move in an unpredictable manner.
I think that it’s the touch screen that makes the biggest difference to focusing with the FZ80/FZ82. You can simply tap on the screen to position the AF area in single area mode.
Custom Multi mode allows you to select a subset of the 49 areas defined in a diamond configuration, a single row or column, or a user defined pattern, then you simply tap the screen to position your AF grid.
If I was to make a criticism of the touch focus operation it would be that it’s easy to inadvertently reposition the grid with your nose when using the viewfinder, particularly if, like me, you use your left eye. That said, you can always turn touch AF system off.
Manual focusing is selected with focus mode button on the rear panel which is also used to choose macro focus modes (there are two AF Macro and Macro zoom, the latter takes a crop from the centre of the frame). The focus is then adjusted using a slider on the screen or the left/right navigation buttons on the 4-way selector.
For manual focus the camera offers the usual array of focusing assistance including a distance scale, MF assist, magnification and peaking but it does not show the Depth of Field (DOF) as with the FZ200.
All of these make manual focusing easier than it would otherwise be, but it’s quite difficult to make fine adjustments which really limits manual focus to stationary, or tripod mounted shots.
Pro's and Con's
pro's:
3 inch touch screen.
4K video and 4K photo modes with post focus ability.
Greatly improved full resolution 10fps continuous shooting.
One of the best Wifi implementations around.
RAW File
USB charging.
con's:
poor EVF dioptre adjustment
EVF needs rubber eyecup
no audio input
no remote control input
tripod mount not on lens centre
no lens hood supplied
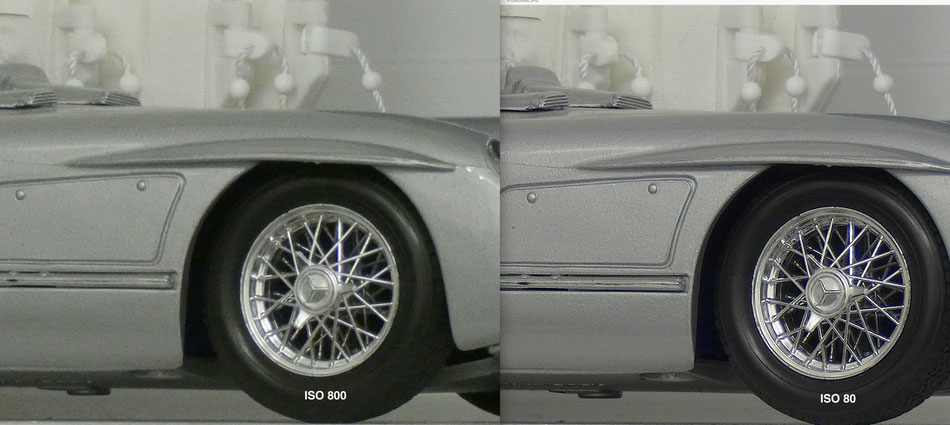
noisy even at ISO 80
No Cinelike D & V profiles for better video.
High Speed Video is not stabilised
My final verdict:
As it stands the FZ80 /82 looks amazing reading the specifications and in many respects it is amazing with a level of features never before seen at this price point.
But in practice the camera delivers too many not-really-sharp pictures, particularly at the long end of the zoom mainly as a result of subject movement because of the long shutter speeds needed with low ISO. It's a sunshine loving camera which needs quite a bit of taming if you want to use it in dull situations or long telephoto shots. For those wanting those long reach images without being obsessed by image quality then this camera will deliver those expectations. For serious amateurs you will need to modify shooting habits to get good, noise free images from it but has a lot of potential and still worth consideration.
waiting to do some more noise and video tests - will be updated soon.....22 July 2018
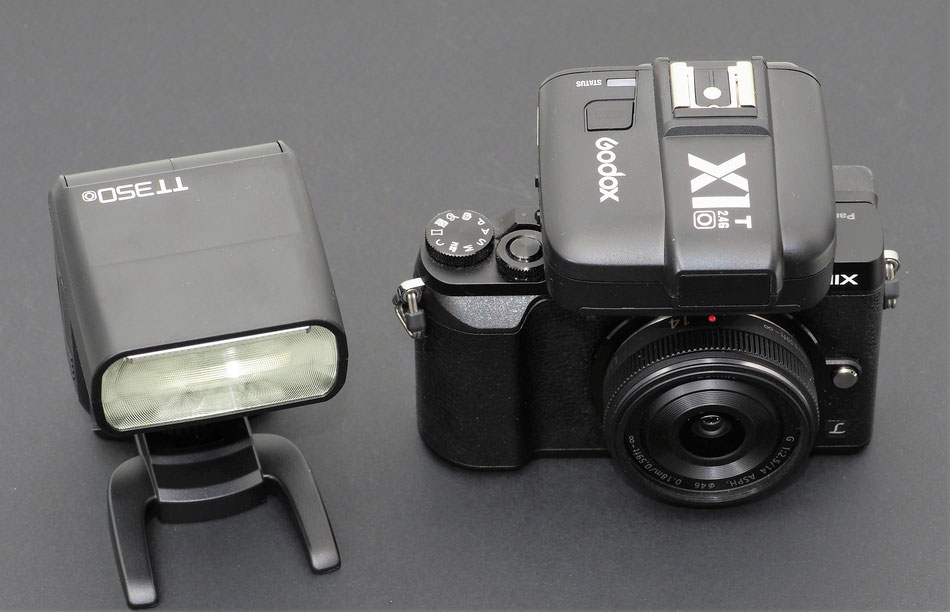
The Godox TT650-O Flash Unit Review for Panasonic/Olympus Cameras
I just received the TT685-O. Why did I order that unit in addition to the TT350? Well I was really impressed by the performance and build quality of the TT350 units.
Now my TT685-O, TT350-O and AD200 can be completely controlled by my Olympus EM1/EM5/GX8/GX85/FZ300/FZ1000/FZ2500 cameras via TTL.
That's why I can also use them on-camera for family events etc., which significantly expands their field of application.
In addition, I also use them in soft boxes and use the X1-TO transmitter to control them via TTL or from the Canon camera with XT1-C transmitter in Manual mode.
Although my Olympus & Nissin flashes also support TTL, but only by a optical methods (the flash pulses) and thus line of sight connection to the camera is a very necessary prerequisite.
This is of course not practicable when they are used in the soft boxes.
So every unit is now easily controlled via the camera, whether by manual control and HSS or even with TTL.
In terms of build quality, the TT350 and TT685 are almost the same.
The TT350 is much simpler because it does not have that many settings. The TT685-O is more complex.
One Negative point, the TT685-O the flash head is quite stiff to rotate.
When mounted in the hotshoe, I'm a little worried that I apply too much power to turn it and it could lead to failure of either the camera or flash connections in the long run.
All my other Chinese Flash Units are much easier to rotate and I must investigate why the TT685 is so hard- I have seen other reviewers also complain of this.
Mounted on camera all TTL functions perform perfectly - except flash exposure compensation with the Olympus cameras above the native camera synch speed (i.e. in the HSS mode).
One nice feature is that in the setup menu you can either have the zoom display in M4/3 or 135 equivalent so when mounted on the bridge cameras ( or off camera as slave) it can be set to 135 mode and this corresponds to the zoom scale of those cameras. This helps a great deal when adjusting the zoom position when not fitted to the expected M4/3 camera.
The TT685-O summed up:
The TT685-O is equipped with all modern flash functions!
It works as an on-camera, as a master flash for controlling other Godox flashes / receivers or as a slave;
Supports HSS, TTL and can also perform strobe flashes of 100 flashes and up to 200Hz.
It offers a wide control range from 1/1 to 1/128 power in one-third increments.
Together with the X1T-O from Godox it can be completely controlled from the camera, in HSS mode (even via TTL) even up to 1 / 8000s.
The build quality is very good except for the flash head stiffness in the rotation mode.
Update: A very small amount of "WD40" sprayed between the Upper and lower parts of the swivel head has fixed the problem with the stiff rotation of the head!
It can be made to recycle quicker by adding an external power pack. It appears to have the Canon connection and I've been using it with the Shoot CP-E4 which I have reviewed previously. A 2 second full power flash recycle time can be cut to just 1 second

This is TT685-O mounted on a FZ200 and is fully TTL compatible
Note the Wide angle panel - which sets the zoom to the 14mm position and the white catch light card.
The head will rotate 360 degrees (with a stop to prevent complete rotations) and will elevate from -7 degrees to +90 degrees vertically
Coverage is 10 to 100mm M4/3 system 20 to 200mm 135 system
Powered by 4 AA type NI-MH or Alkaline batteries.
230 full power flashes from 2500mAH NIMH batteries.
Recycle time 0.1 - 2.6 seconds
Flash Duration 1/300 to 1/20000 sec
Weight is 410 grams without battery
Colour temperature is 5600K +/- 200K
Guide number at ISO 100, Full zoom and full power 60M (190 feet)
My tests are more like 22M at full zoom and 16M at wide angle
derived from 1 metre test distance, full zoom and 1/60 sec reading on Sekonic 470 Light meter gave F22 and F16 respectively.
Camera tests show that at wide angle and full power and 2 metre flash to subject needed F8 at ISO 100 - verified by the meter again!

On camera TTL Mode setting:
Using Manual zoom here at 24mm setting
Gives a flash operating range of 0.7 metre to 9metres with the ISO set to 100 and the lens set to f2.8

Off-camera radio slave set up on channel 1 and group A
Because the automatic zoom feature does not work wirelessly yo do have to manually set the zoom of the flash unit.
Note the orange background when the unit is set as a radio slave. It is green when set up as an optical slave in the Manual flash slave mode S1 or S2

Off-camera in Manual Mode allows the selection of the S1 pre-flash or S2 pre-flash ignore slave modes.
Power can be set from 1/128 to 1/1 in 1/3 EV

The flash set up as the Radio Master Commander
The on camera flash is in TTL mode and group A of channel 1 is set to also fire in TTL mode. Group B and C are set not to fire.

An interesting feature is that the head contains an IR Led and sensor which detects when the head is away from the horizontal and straight ahead direction. So when the flash head is level or down -7 everything is normal.
Move the flash head up or to the side and an arrow appears on the display to indicate this as shown below

The indicator (over the flash unit symbol) which shows the head is not level or facing forward.

The Brand specific Godox flashes like the TT685-O, TT685-C and triggers (X1T-O, X1T-C, X1T-N X1T-F ) have the necessary hardware pinouts and protocols to electronically communicate with their respective cameras directly.
However they communicate with the rest of the system in 'Godox Speak'.
With the latest firmware all Godox strobes and flashes all know the specific implementation of the Canon/Nikon/Sony/Olympus/Panasonic/Fuji communication protocol for TTL/HSS even if they don't have the correct hardware interface.
So the brand specific transmitters (whether X1T triggers or any of the flashes which all have built in transmitters as well) act as a hardware communication signal translator for the camera to talk to everyone else wirelessly.
So if I fire using the Nikon trigger, you'll actually see an 'Nikon' come up on the LCD of both the TT685-O. Fire a Canon trigger and they'll both change to 'Canon'. It's really quite brilliant.
Technically you can, and I have used a X1T-C, on my Panasonic but you need to switch it to 'single pin' only mode and then it acts as just a manual trigger to fire the flashes in manual mode only, so no TTL/HSS. But you still get the ability to change power levels from the trigger. A really versatile system

The TT685-O with the Shoot CP-E4 external power pack
I recommend using one of these as the recycle time when using full power flashes quickly drops from 2.5 second to 15-20 seconds with freshly charged 2500mAH NI-MH cells.


The images above: Top left Original back lit image Top Right: Using TTL Fill Flash
Bottom left: TTL Fill Flash Bottom Right On Camera HSS 1/5000 sec F3.2 ISO 200
Camera Olympus OMD-M1MarkII with 12-60mm lens Flash TT685-O
click to enlarge images.
Godox X Series Wireless Transmitters and Receivers for Canon/Nikon/Sony/Fuji/Panasonic/Olympus
The Godox range of transmitters, receivers and flash units offer a very flexible and cost effective way of enjoying flash photography.
Unlike traditional wireless optical triggers usually employed by the camera manufactures which use the pop up, or attached, flash as the "commander" to send the light triggering pulses to the slave units the Godox X series uses a 2.4GHz radio system.
This obviously means that the master and slave units no longer have to be in "line of sight" of each other and the triggering distance is greatly increased.
How it works: If you consider the communication data between the Godox transmitter (designated by X1-T and then a letter for the flash type) and the receiver (designated by X1-R and then a letter for the flash type) it is a fixed "language" that each unit "understands".
What this means is that, for example a X1-T C (the Canon flash) can understand the communication from the hot shoe communication pathway of the camera convert it to the Godox language and then this is again converted into the language of the attached receiver.
So for example a X1-R C unit would decode the radio data being transmitted from the Godox X1-T C and convert this into a protocol that the attached flash unit will understand. So if you have a Canon flash attached to the receiver it will behave as though it was attached directly to the camera hot shoe!
Such is the power of the system is that the transmitters and receivers can be set to "communicate" to five groups simultaneously on one of thirty two channels.
Such a system is shown below. It is using the X1-To transmitter on camera to remotely fire the TT350o flash unit.
We have -c for Canon, -n for Nikon, -f for Fuji -o for Panasonic/Olympus and -s for Sony.
At the moment the range of dedicated X1-R receivers is limited to Canon and Nikon but the dedicated flash guns are available in all types.
(see how to expand this in the later part of this article)
In addition to the dedicated receiver units Godox also have a range of flash units which have the radio system built into them.
The flash unit can be attached to the camera as normal and used as an on camera flash in TTL or manual mode or it can be set to be a master communication flash to trigger any number of flashes on the same channel.
It can be part of the exposure (such as the on camera fill flash) or it can be just the communication source for all the other flashes.
The system supports all the usual flash operations such as Flash Exposure Bracketing, Flash Exposure Compensation, High speed synchronisation and first/second curtain.
This will depend upon the flash system but at the moment the flash does not work with the X1-TO transmitter and provide off-camera HSS / TTL control as it will only synch to 1/250sec - only works with the Olympus cameras. With the Panasonic cameras automatic zoom doesn't appear to work in the off-camera remote slave mode either.

Getting Extra Benefits: One of the problems faced by photographers is the compatibility of camera systems and accessories. If you change camera systems you are often left with accessories which will no longer work with the new system.
Flash units, costing hundreds of pounds, fall into this area.
Using the Godox wireless system it is possible to partly reclaim some of the functionality of these flash units with your new system.
As an example say you had a Canon flash system but have now moved to the micro four thirds Panasonic/Olympus range of cameras it is possible by using a X1-To transmitter on the Panasonic/Olympus camera with an X1-RC receiver on the Canon flash gun to be able to use the flash in the manual mode and be able to remotely set the parameters of the remote flash directly from the camera mounted transmitter. Use the test button to initiate the change from the transmitter to receiver. Obviously the TTL signals could not be used between the two devices as they are entirely different protocols.
Versatility: in the image below the X1T-O (Olympus/Panasonic) is being used to control three other flash units in the manual mode.
This is a common studio set up for a main light, a fill light and a hair light.
The flash units are on the same channel (1) but each group (A/B/C) can be individually set for power level from the X1-TO unit on the Olympus camera.
You can see that the Nikon flash (a TT350N) is on Group A with power level 1/4, the Olympus flash (a TT350O) is on group B with a power of 1/8 and 0.3 and the Aperlite 700C (Canon compatible) is on group C with the power set to 1/64 plus 0.7. Note the Canon flash needs the X1-RC to interface to the X series transmitter but the two TT350 units have an inbuilt radio receiver and just need to be set to the radio slave mode and channel 1 and the right group.

And Finally: To expand the system further of course you could use other units in an OPTICAL S1 configuration or use something like the Yongnuo master/Slave system to be able to set the power levels remotely and trigger that from on of the pass though contacts on a X1R device


The Godox TT350o mounted on the FZ200 Bridge Camera.
It performed perfectly where may other so called Panasonic compatible flashes fail.
The Godox TT350o Review (Panasonic/Olympus model)
I've tested this unit with every one of my Panasonic and Olympus cameras and it works perfectly in the TTL mode - even with the FZ200 which is a particularly hard camera to find a compatible flash for.
Like all of Godox’s more recent products, the build quality of this little flash is quite solid. All of the case seams feel well sealed and the overall construction feels like it could take a few knocks and bangs.
The buttons are well laid out and easy to press. Surprisingly, for the cost, even the jog dial is quick and accurate. Overall, only one complaint with the buttons: the power button only requires a quick press to turn the flash off. I would much rather have a one second press-and-hold button as I have already accidentally hit the button by mistake, thus turning the flash off.
The included plastic stand has the usual 1/4-inchx20 thread, appears to be brass and should last a while. So, if you’re mounting this on a light stand or tripod, no need to worry.
As with almost all modern flash units, you’ll get TTL, Manual, Slave, and Stroboscopic modes. Manual mode gives you 1/3 power increments from 1/1 all the way down to 1/128, with the flash duration ranging from 1/350 to 1/20,000 of a second. Two slave modes are available: one to fire immediately S2 , and one to fire after pre-flashes S2.
You also have a small bounce card and ultra-wide diffuser which sets the unit to the 14mm position.
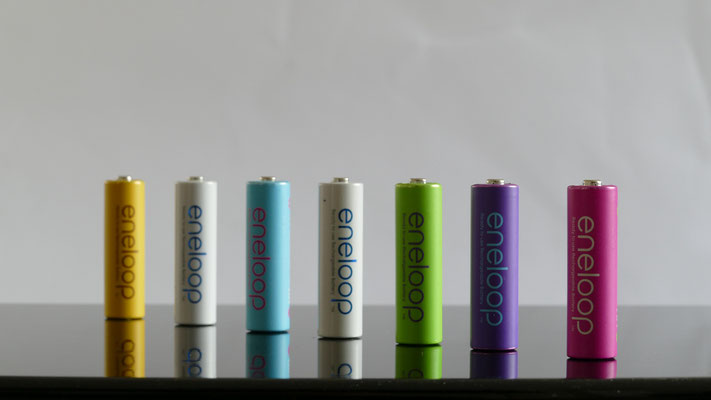
Finally, recycle times are 0.1-2.2 seconds with Eneloop type batteries.
The head of the unit swivels 90 degrees to the left and 180 degrees to the right. It also tilts from -7 degrees to 90 degrees up and down. Interestingly, the swivel is a dampened, solid-feeling turn, but the tilt has a noisy click operation.
The LCD is unusually orange, perhaps reflecting the Godox trade dress? .
Information displayed includes current mode, power, groups, channels, zoom, and under/over exposure when in TTL mode. It is easy to see what your settings are at a glance.
The Wireless System:
Here’s where the real benefits of getting this unit lie. Not only is it fully controllable from any Godox trigger or other master flash, but it can actually act as a trigger and master as well.
By using it this way, you gain access to the TTL and HSS functions we’ve all been waiting for use on Panasonic and Olympus cameras. This means that if you have a Godox TTL strobe like the AD200 or the AD600 you can now trigger that from this unit set in the master mode.
At the same time, you get access to 1/8,000 second sync speed. Of course, your Panasonic/Olympus body needs to support these.
As an on camera flash, it’s not too shabby at all. With a respectable guide number of 36 metres (ISO 100, 105mm), it puts out enough power for light day to day use.
Godox states 0.1-2.2 seconds recycle for this unit, but in my tests I found the moment of pushing the fire button to the moment the ready light came on was somewhere between 3 and 4 seconds with the unit set for 1/1 (full power). I’m using Eneloop Pro NiMH batteries, which have reduced recycle times in every other flash I have used. Using standard alkaline batteries increased the recycle time to nearly 6 seconds. But, considering there are only two AA batteries recycling the flash, this is still respectable.
One test I did do while recycling the flash was to try and invoke Godox’s overheat protection. After 50 full power flashes one after the other plus numerous multi-flash outputs at 1/4 power and 2 flashes at 4 Hz I couldn't get the unit to shut down - so normal operation shouldn't be a problem.
One thing that I don't like is the lack of any audible "flash ready" beep to tell me when it’s done recycling so I can continue shooting.
With the TT350, I have to take my eye away from the camera to check if the recycle light is on. One way to know is that it simply will not fire if not full recycled. All other flashes I’ve used will at least dump what’s in the capacitor when you trip them, even if they’re not fully recycled. Not the TT350 though.
You either get it’s desired output or you get nothing which I guess isn't a bad thing unless you are in a hurry taking your shots!
with the Olympus model there is no flash assist light, on the Fuji, Sony, Canon and Nikon units.
In Summary:
This is a tiny flash with a fair punch. It will certainly stand up to simple day to day use.
However, for wedding or event photographers looking for something that will just go all night, this probably isn’t your option.
For me, I see this as a second flash in case I need an extra light on a scene or as an alternative to providing the wireless (radio) flash trigger for my studio flash units the AD600 (manual) and AD200 (manual and TTL) instead of the X1-T if I need the camera flash to provide some fill flash.
A superb on camera flash to provide higher output power for the Panasonic FZ200/300/330 cameras.
Full Specifications:
Godox TT350o SPECIFICATIONS:
Guide No. (1/1 output @105mm): 36(m ISO 100)
Exposure control system: TTL auto flash and manual flash
Flash exposure compensation (FEC): Manual
FEB. : ±3 stops in 1/3 stop increments
Sync mode: High-speed sync (up to 1/8000 seconds),first-curtain sync, and second-curtain sync
Multi flash: Provided (up to 90 times, 99Hz)
Wireless flash function: Master, slave, off
Controllable slave groups: 3 (A,B and C)
Transmission range(approx.): 100m
Channels: 16(1~16)
AA batteries: Ni-MH batteries(recommended) or 2*LR6 alkaline batteries
Recycle time: Approx.0.1~2.2 seconds(eneloop Ni-MH batteries from Panasonic)
Red LED indicator will light up when the flash is ready
Full power flashes: Approx.210(2500mAH Ni-MH batteries) minutes if set as slave)
Sync Trigger Mode: Hot shoe,Optical triggering S1/S2 Wireless X System.
W*H*D: 140*62*38mm
Weight without batteries: 200g
Godox X1-TO Transmitter ... some issues to be aware of.
I've been using the system for a few days now and there are a couple of things to note on this version compared to the Canon version X1-TC
firstly the automatic zoom feature is not implemented in this mode. If you have the transmitter mounted on your camera and adjust the zoom lens the remote flash unit will not change its zoom position.
In the FN02 set up the AU (for auto zoom) isn't available. You can adjust the zoom position of the remote flash manually from the transmitter but it means going into the FN)2 screen to set the zoom position manually. If you are using the flash unit on camera auto zoom does work its only not implemented via the X1-TO unit!
As with all the X series transmitters having them too close to the receiver can put them unresponsive. There is a new fix for this which reduces the transmitter power and that works great.
To enable this new low power mode with the unit OFF, press and hold the TEST button whilst turning the unit on. Hold the button down until you see the status light flash twice.
When you turn off the unit the power will revert to full power the next time you turn it on again.
FN06 Can set the transmitter to just 3 groups and this saves scrolling through 5 groups if you only have TT series flash units.
Using the Olympus FL-ML3 micro flashes on the later Panasonic Cameras for Wireless Flash Control
The later range of Panasonic CSC's like the GX8, GX80, GX9 (and possibly the LX100) use an entirely different protocol for the camera hot shoe connection. It now includes a contact dedicated to providing 5volts to power up a connected flash gun. Normally this would be the Panasonic flash

This dedicated flash for the GM5 and LX100 can be used on the GX8, GX85 and other cameras which now have the brass contact for 5v power input.
It is used to provide on camera fill flash or act as the master commander for optical wireless slave systems using groups and channels

The more readily available Olympus flash can be used however it needs a little modification to make it work.
The cost of the FL-LM3 is more than the Olympus TT350o flash gun which has more versatility however if you want a compact system for optical wireless control the next section shows what is needed to achieve this.

On the front of the FL-LM3 hot shoe is a small plastic lip which must be filed or sanded away until it is flush with the face of the rest of the mount.
Even with this 1.5mm of lip removed it may not still be possible for the latch pin to engage in the hole of the Panasonic hot shoe when it is attached, however the friction fit is quite secure for such a small flash unit anyway.
Once it is attached it can be set up through the Panasonic flash menu system.

To set up the wireless flash, which will now be enabled when the Olympus flash is turned on, use the wireless set up menu.
The on camera flash can be part of the exposure (TTL or Manual)
or just act as the commander for the group of external flashes which can be Manual or TTL depending upon the menu choice. It will support high speed synch as well.
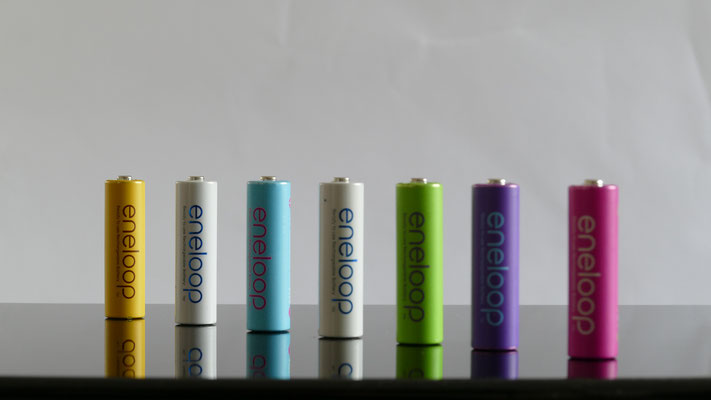
Focus Bracketing App - GsimpleRemote
With Panasonic Lumix cameras with Post Focus capability it is possible to shoot a macro shot (or close up) and use the generated MP4 file in a program like Helicon focus to focus stack up to the whole of the 49 AF points which might have been captured in the image sequence.
If you have the FZ1000 then this doesn't have either a touch screen or the post focus ability. Until I found this "app" the only way I could create a focus bracketed set of images was to use a focus slider and manually advance the slider for each shot. This method does have some complications as the "perspective" of the image set changes at each advance of the focusing slide. This makes the focus stacking of the images quite difficult as the periphery objects in the image are changing position.
With this "app" it allows a smartphone or tablet device (either IOS or Android) to control the camera via a wireless link, The "app" controls the focus motor of the camera lens and has the additional feature that allows the user to define the start and end focus positions and the step increment for each image captured in the sequence.
Below are the 9 images captured with the app and these were imported into Helicon Focus 6


In the image below is a demonstration of Helicon Focus 6 with these 9 images imported.
The first image with the front battery in focus is shown in the example
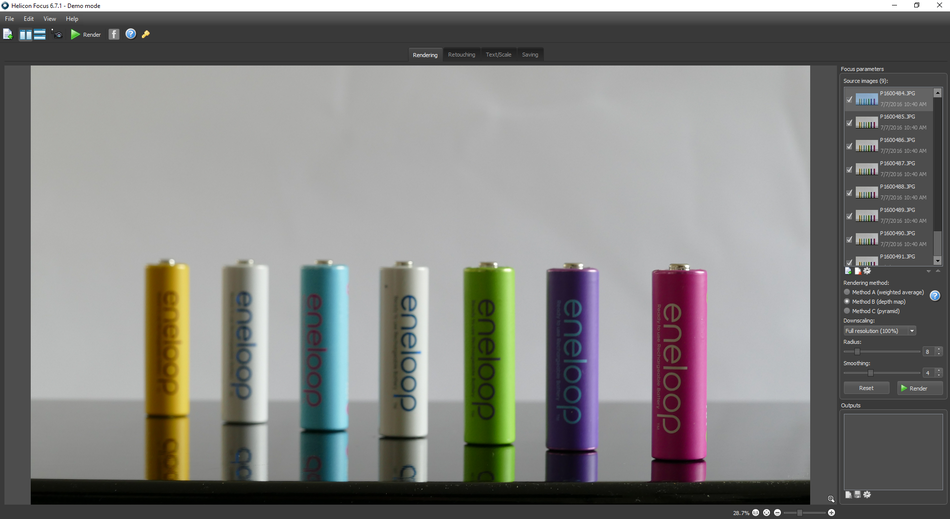
In this next image the program has run and combined all the 9 images into the final image

The program is very intuitive to use and has a 30 day unrestricted demo mode. After which if you save the image, copy it to a clipboard etc it is watermarked. For most purposes I "screen grab" this final image and that is what you are seeing here in this review.
If the licensing was for a once off payment I would probably buy it however it is only a yearly licence, and costly at that, and I don't think that I would use it that often during the course of the year to get value for money.
Below is a video demonstration of how to use this "app"

Mcoplus MCO-14EXT-C Xenon Ring Flash for Canon/Nikon

This is a full featured ring flash employing Xenon flash technology which is really necessary for good macro or close up photography. Whilst the LED units are OK they are more suited to static subjects and ideally tripod mounted shooting because of their lower power output. It is a almost full copy of the canon OEM ring flash but excludes the wireless function. With all the main features that any serious amateur photographer needs such as the ratio power control of the two flash tubes, flash exposure bracketing, flash exposure compensation, stroboscopic shooting mode and full manual control. It has a guide number of 14m at ISO 100 and has enough output power for F22 exposures at ISO 100 at normal macro working distances. E-TTL II control is available for fully automatic shooting from all the later Canon cameras and the flash can be controlled directly from the camera control menu or directly on the unit itself. Powered by 4 x AA batteries, which can be alkaline, Ni-Cd or NiMH it recharges in under 3 seconds. You can additionally extend the working time by use of an external Canon or third party battery unit. For camera without hot shoe it can also be triggered via the PC sync socket on the side of the unit (although not TTL mode!). Colour temperature is rated at 5500K and the results show no colour bias or spikes in colour output. The head swivels to allow the connecting cable to be either on the left or right hand side and the unit is provided with the usual range of 49mm to 77mm lens rings to mount the flash head to the lens. Two focus assist lights are provided as the unit will cover the camera's own focus assist LED. It is also provided with a nylon, belt mountable carry case and a flash foot. Instructions are a little poor to follow however it doesn't take long to work out what set up is required on the camera.

An example of an image taken with the ring flash using one tube at full power and the other with 2 stops difference (1:4 ratio). Using a Canon 70D in E-TTL II mode and a 24-105mm lens at 70mm with an aperture of F14 and ISO 125.

An example of an image taken with the ring flash using both tubes at full power (1:1 ratio). Using a Canon 70D in E-TTL II mode and a 24-105mm lens at 50mm with an aperture of F14 and ISO 125.
Mcoplus MP-MRF18 LED Ring Light Flash

The MCOPLUS MRF-18 Led ring flash unit provides shadowless lighting for situations where clear detail is important in the shot. Alternatively the unit can function with a half illuminated circle of light to provide some dimensional modeling effect. The unit is powered by 4 AA batteries and has a rated output from the 18 White LEDs of 5500K colour temperature, or by use of a supplied CTO filter 3200K. The LED's are focused to provide a uniform light pool at a short working distance to the unit (30cms is ideal). With the ability to control the light output from 1/128 to 1/1 in 8 discrete increments means that getting the exposure correct is very easy. The unit can be used in a continuous light mode (however only full 18 LED's illuminated) or pulsed 1/100 second burst of light from the left, right or whole light banks.
Light output is sufficient to give exposures of 1/60 sec f4.5 ISO 100 at 30cms with both banks on full power setting. The control unit uses pulse width modulation technology to drive the LEDs.
The 3200K CTO filter is useful to provide illumination in which there is already some tungsten ambient illumination. The unit comes with 8 lens adaptors ranging from 40.5mm up to 77mm covering all the main lens filter sizes.
Colour rendition is very good, however I would recommend performing a manual white balance set procedure with your camera to ensure the correct colour temperature operating point. Single +ve voltage triggering makes it suitable for most digital cameras and the extra low trigger voltage ensures no damage to your camera flash triggering circuits. To ensure the ring flash head doesn't move in angular position I would suggest you fit a small elastic band into the groove of you chosen filter adaptor, this stops unwanted rotation taking place during use.
During continuous LED light use the camera TTL metering can be used to set the exposure (using the whole 18 LED ring), during pulsed output manual exposure control and trial exposures will be needed as this unit does not feature TTL compatibility.
It is more suited to static, table top or tripod shots than say outdoor flower or insect shots which require a much faster flash duration to capture the image without motion blur.

I have around eight or so Canon lenses, both EF and EFS types with three of the lenses are also being "L" series. I have also 5 micro four third cameras and I wanted to be able to use the Canon lenses on the MFT bodies. Previously I have used passive adaptors and used the stop down and twist off the lens whilst the camera is still powered up to get a preset aperture rather than full aperture.
Whilst this has been a reliable method it suffers from the fact that you cannot change aperture, you are always in stopped down focus mode so setting the actual focus is sometimes tricky and you loose any EXIF information that might have been useful in an image (such as aperture and focal length used). Also there is no image stabilisation available.
I bought the Commlite unit as this seemed to address all the above issues (except autofocus) and a fraction of the Metabones IV unit.
Mechanically the fit of the lenses to the adaptor is very good with no perceivable lateral or rotational movement. There is a very small radial movement in the adaptor to the camera body but this does not affect the electrical coupling. Build quality is adequate, personally i would have liked to have seen 5 fixing screws around the front and rear flanges as some of the lenses that I attach are very heavy and exert quite a bit of force on the tiny screws. There is a removable tripod fixing foot which reduces this force rather than attach the camera to the tripod. With the longer Canon lenses it's best to use the Canon tripod ring for support.
In use the aperture is controlled from the camera and in video mode responds immediately to the change dialed in. You can step up and down the whole aperture range and the results don't show any problem with screen flashing as reported on some Metabones adaptors.
The "boot" up time with the adaptor fitted doesn't seem that much longer to get to the first exposure as with just a native lens and during burst mode shooting the adaptor/lens combination performed reliably.
In photo mode the camera remains at full aperture for metering and manual focus and then stops down for the exposure. I did notice a strange sequence of events when using the Panasonic GX8. When half depressing the shutter button the image stabilisation would pulse on any lens that had IS and the aperture would momentarily go to 0.0 then back to the preset value. Turning off the half shutter AF option in the custom menu stopped this from happening. As the lens does not retain AF it doesn't matter anyway. Results will be entirely dependant upon the Canon/third party EF/EFS lens.
After a period of extended testing I found that any lens with image stabilisation turned on would randomly pulse. If you were recording video at the time then this would be included in the clip thus ruining it. This happened with all the MFT camera bodies I own.
It would have been nice to have had front and rear caps supplied with the unit to protect the mounts when not attached to the camera.
Although this random pulsing of the image stabilisation of IS enabled lenses is obviously an unacceptable occurrence for video shooting handheld footage I guess if the camera is tripod mounted with IS turned off then the problem isn't that bad. In photo mode the pulsing does occur randomly but again isn't likely to be a major issue. I have contacted Commlite but as yet no response from them!
Here's my Youtube video review https://www.youtube.com/watch?v=MMZmqUTnDuc

The Commlite adaptor fitted on the Panasonic GX8 with a Canon EOS 50mm F1.4 EF lens
Canon 70-300mm EF IS USM F4/5.6 Zoom Lens
Although this lens has been out for a number of years now I have only just decided to add this to my EF/EFS lens line up. My 100-400 L Canon f4/F5.6 lens is massive and heavy and for the kind of
images I shoot these days it doesn't really justify me holding on to it much longer. I did toy with the idea of the 70-200 USM L lens but again I wanted just a little longer reach and the 100-300
IS USM L lens is just too expensive. Some reports have said this lens is very soft and others say it's sharp so I could not get any sensible conclusion after watching and reading several reviews.
I, to be perfectly honest, have never really been a fan of Canon lenses for amateur grade cameras. All the ones I have tested (and reviewed by magazines) have confirmed that many OEM lenses from
Sigma and Tokina have sharper charcteristics

The lens itself is designed as an Full Frame EF mount lens so it automatically will fit and function on the cropped format EFS lens flanged camera bodies like the 70D shown opposite. If fitted to these cameras you of course have the 1.6 x crop factor to apply to the focal length and the amount of depth of field. So in reality the lens becomes the equivalent of a 112mm to 480mm focal length lens with the equivalent FF depth of field as f6.3 to f9.0. With using it on a cropped format body camera there is an additional advantage of using the central areas of the lens thus not suffering some of the edge sharpness losses noticed when using the lens on a full frame sensor. Thus this lens covers the focal lengths that I was used to using on my 5D Mk3 with the 100-400 lens. Having tried cropping into the image of the 5D to match the 70D sensor size the loss of image quality was obvious. Thus the move to a 20.2 megapixel sensor theoretically gives better IQ.

There are non-IS versions of this lens at a quarter of the price however for hand held shots the IS is a significant advantage, in my opinion, when using the lens at longer focal lengths. Of course for absolute sharpness, especially with subjects which are moving, the established rule of 1/focal length should be used. So 1/500 sec at the telephoto end would be recommended. This will be at an aperture of f5.6 so ISO might need raising in order to get this exposure level. There is the usual stabiliser ON/OFF switch on the lens side. The Stabiliser mode switch provided mode and mode 2 operating parameters. In mode 1 the lens has stabilisation applied in all axis movements and in mode 2 the camera is stabilised in the vertical (Y) axis for landscape format and horizontal stabilisation when the camera is used in portrait format. The advantage of IS over non-IS is said to be the equivalent of 3 f-stops. The IS remains active for about 2 seconds after the shutter button is released.
The lens barrel extends about 80mm, or over 3.5 inches, on full zoom and uses the ring turning to the left to zoom into the telephoto focal lengths. At 70mm to prevent lens creep the lens can be locked at this position with a slide switch (mechanical lock) on the lens side. During Autofocus the lens focus ring (the narrower front ring) rotates. It is very easy to have your fingers in the wrong place when this happens!
FTM (Full Time Manual) focus is not provided - you must switch the lens to MF (Manual Focus) mode to manually focus the lens. To make matters worse, the 70-300 extends about 1" with focusing. To park the lens compactly you must adjust the focus to minimize the lens length. This means manually turning AF off, turning the focus ring to retract the lens and turning AF back on (so you don't forget next time you use the lens).

The 70-300 IS is not parfocal - you need to refocus if you change the focal length. Combine a non-parfocal zoom lens with a rotating front element and you quickly get frustrated Circular
Polarizer Filter users. This is a definite detraction for landscape photography - an otherwise great use for this lens. Canon's manual suggests that the front element should be held while
attaching a 58mm filter or lens hood (to prevent it from rotating).
The minimum focus distance is 1.5 metres or 4.9 feet however by use of automatic extension tubes the working distance can be reduced to allow the lens to be used for macro or close up work (you of course loose the infinity focus with the rings attached).
with a 12mm extension the closest focus at 300mm becomes 1.36 metres and with the 25mm ring the closest 300mm focus becomes 1.25 metres. Magnifications are 0.32x and 0.39x at the closest focus setting.

I tested the autofocus ability of the lens shooting a video sequence. The USM motor gives a "stuttering" transition from focus point to focus point if you invoke a "focus pull" from the touch screen enabled camera, like the 70D. With a STM (stepper motor) lens this operation is smoother and quieter.
Here are some sample images taken with this lens on the cropped sensor Canon 70D.


Sample Images Shot Using The Full Frame Canon 5D mkIII


I did a series of focus tests using my focus chart at 70mm and at 300mm. The images below represent the centre target cropped from the image at full size rendered to the same screen size and the 100% crops of the F8/F11/F16 images from the 300mm zoom setting
In summary I would say the lens takes at least until f9 to reach a point of sharpness that I like to see. This extends to about f13 or f16 on the smaller aperture side. When you reach f22 you can see the resolution fall off due to diffraction limited resolution. I have not yet tested the lens with a test chart with my full frame 5D mkIII, however test images look as good, if not better than the 70D.
Included below are the lens test charts. The first series at 300mm and the second one 70mm.


The 70mm Test Chart (crops from image with no scaling)


My practical video test using this lens is here on Youtube https://youtu.be/Ei9t2DEb4RE
Aperlite YH-500C E-TTL Flash Gun Review
This recent addition to Aperlite's line up of flash guns adds a E-TTL compatible flash gun to their entry level flash units. It builds upon the manual only YH-400 by adding communication pins to the hot shoe to allow the E-TTL communication between camera and flash gun. It is essentially the same specification and size as the YH-400 so I won't repeat the description available in that review. The E-TTL is only available whilst the camera is attached to a Canon camera, it is not a wireless optical slave unit as in the case of the flagship model the YH-700C but just E-TTL via the hot shoe. It supports the same Multi (strobe) mode and the optical slave S1 & S2 modes as the YH-400. This model supports second curtain synchronisation in the E-TTL and Manual modes which the YH-400 does not have. In this flash however the flash head now has logic which forces the zoom head back to the minimum position when the wide panel diffuser is pulled out. In this mode manual zooming is not available. This is a great feature that is not available in the YH-400 entry, manual only unit or the Flagship YH-700C There is a Nikon unit available the YH-500N


Colour rendering was very good and E-TTL exposures pretty consistent, only changes being made to subjects which had varying brightness so I guess it isn't using the distance information from the lens that is available in the E-TTL protocol from Canon which eliminates some of this variability. Here are some sample images using this flash gun.


Neewer FC-16 Radio Flash Trigger
Radio flash triggers offer superior performance over the simple optical slave flash systems. They have extended range of operation (up to 100 Metres compared to the 15 Metres of the optical units), don't need to be in line-of-sight of the transmitting flash gun and can be used in sunlight.
The Neewer FC-16 for the Canon flash system is a 16 channel transmitter/receiver system and can additionally be used as a remote camera shutter trigger as well. Powered by two AAA batteries the receiver and transmitter have the same physical profiles, the receiver not having any electrical contact on the hot shoe base whereas the transmitter has the full 5 pin configuration (I'm not sure that any of the other communications pins are used though). In the flash slave mode the indicator LED on the top of each unit pulses green and when used as the remote camera shutter release pulses red. The kit comprises all the necessary cables to connect the professional level cameras like the 1DX and %d series using the C3 cable and the consumer/pro-sumer cameras use the C1 cable. Additionally the transmitter unit can receive its trigger pulse via a PC sync port from the camera if the camera doesn't have a hot shoe. In the remote camera shutter mode the receiver is connected to the remote input socket of the camera via the C1 or C3 cable. The receiver is switched to camera position and the transmitter set to either camera for instantaneous firing or delay for the 5 second delay timer. It will work on Panasonic cameras and you can get the adaptor cable for the Panasonic remote connection.


Aperlite YH-400 Flash Gun Review
A few weeks ago I was sent for review the Aperlite YC-700 ETTL flash gun. Now I have received the less featured YH-400 flash gun for my review. Basically the YH-400 unit features just the following features.
1. Manual mode 1/1 to 1/128 power settings
2. Strobe mode
3. S1 & S2 slave flash modes
As it has only the central firing pin on the base of the hot shoe it can be used with a number of cameras but it is specifically targeted as Canon and Nikon DSLR users. Because of this the unit cannot communicate its state of charge readiness to the host camera nor can it utilise the signals from the camera to trigger things like the focus assist light.
This unit then has potential operation as either a simple manual power on camera flash unit with a high guide number of 58 metres with ISO 100 and the zoom set to 105mm focal length or as an optical slave device triggered in the S1 ( immediate) or S2 (pre-flash delay mode). Additionally it could be used with a radio trigger/ receiver device to turn this into a standalone manual power flash unit.
It is powered by 4 AA size batteries (Alkaline or NI-MH type) or it can be powered externally for the flash charging circuit with the MK_SD8A power pack which is a Nikon speedlite socket rather than a Canon type.. It has a similar head bounce and swivel adjustment range as the Aperlite YC-700 that being 90 degrees to the right and 180 degrees to the left giving a 270 degree of rotation. In vertical movement terms it can be set from -7 to 90 degrees with detents at 0, 45, 60, 75 and 90 degrees.
The unit has a pull out wide panel diffuser which will allow wide angle lenses of the 18mm focal length to be used. Additionally if using the flash in the vertical bounce flash mode there is a pull up white plastic panel which acts to provide a "catchlight" in the eyes of a portrait head shot.


The flash recycling time using alkaline batteries was a little over 3 seconds from a full power discharge, the indication of charging being the red pilot light blinking until the flash has fully recharged where it remains steady. There is no audible warning or any front facing LEDs to indicate the charging is still continuing. In the Slave modes again there is no indication on the unit to signal that the unit is fully charged and ready.
The unit is supplied with a plastic foot which has a 1/4-20 metal threaded insert to fit the unit on a lamp stand or tripod, It also comes with a black nylon drawstring pouch however it doesn't look like the waterproof pouch supplied with the YH-700C

Again in testing, as with the YH-700C, I found the flash output a little short of the stated values. Here my flash meter records F20 at 4 feet (with the flash zoom head set to 105mm as quoted) which gives a guide number of 80 feet. The guide number of the unit is quoted at 58m which should give a guide number of about 190 feet. That being the case the flash should output F48 at this distance which is about 2 stops output more than achieved. Up until near full power the metered output and the camera exposure, set to the indicated flash value, gave perfect exposure. I can only conclude the guide number is ambitious.

In use the gun performed perfectly and I used it to produce this image in a three flash set up using the YH- 400 as main light source in a reflective umbrella set at 1/2 power, one YH-700C with soft diffuser as a fill light set at 1/8 power and a YH700-C as a hair light set at 1/64 power
So in summary it does everything a slave flash gun should do, the two slave modes S1 and S2 work predictably and the manual mode adjustment is all that a manual flash gun needs. I would trigger using wireless triggers, it triggered on Panasonic and Olympus and on my Sony Q series of cameras. I would suspect, though have no proof, that being a single trigger positive voltage device it will probably work on most conventional hot shoe cameras.
Unfortunately the unit does not support high speed synch and the manual is wrong in suggesting it supports auto zoom, flash exposure bracketing and flash exposure correction - it cannot because it does not have the communication bus to the native camera
TOSHIBA FLASHAIR WI-FI CARD REVIEW

The Toshiba FlashAir card is a new generation wi-fi SDHC card which has a wireless access point and web server integrated into the card. It is different to the "Eye-Fi" card in respect that it doesn't "push" the images to the viewing device instead the images are viewed in your standard browser on your device. The card can be viewed by up to seven devices simultaneously using the wi-fi network.
Connection to the card is fairly straight forward and you can choose to connect directly to the device selecting the "Flashair" wireless access
point which will appear in the wireless settings section of your viewing device. It can also be used in the "internet passthru" mode which allows the card to be accessed via your router so you
need to be in wireless range of the router to do this. Outdoors without internet access you need to use the direct connection method. I must admit the printed instructions that do come with the
card are extremely vague and you do have to use the "help" screens which are provided in the IOS app or pc software. Without those setting up the administrative parts of the Flashair card would have been impossible.

On IOS and Android devices the application is started from the icon on the desktop.
The card must be inserted in the camera and the camera turned on. One point to note is that there is a software timer on the Flashair card which you can set between 1 and 5 minutes. If the camera is not sending images to the card during this period the wireless function of the card shuts off and you have to press the shutter button or power cycle the camera to turn it on again otherwise the card will not be seen by the viewing device!

It's possible to configure the app to list the files on the card with small thumbnails and shooting file number/date etc or by file type (can display music and video files as well as photo files) however its probably best left in the default square thumbnail view, or, if you prefer the thumbnail in the correct aspect ratio can be selected

This is the "app" on IOS device with the card "paired" and the thumbnails (square format selected) displayed. You have the option to view either the card or your camera roll on the device.
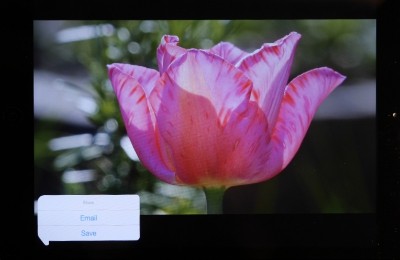
Tapping on one of the thumbnails will present the file in full preview mode and whilst this is displayed another double tap allows the option to save or email the file. The fundamental flaw of this application is the fact that you have to do this image by image!

That's why I recommend that if you get this card download the Olympus Image share app. It does have support for the Flashair card so you can use the all important "Import Photos" option that this app supports.

the first thing to set up would be the file size for images transferred to the device. If you want back up of the images the select "original size" or if you want to send them to your device at a resolution more suited to it then select one of the other options available

One you have set the import files size the tapping import photos will bring up the thumbnail views (in the correct aspect ratio) from the card.

Again a tap of the thumbnail will show the full sized preview of the image. You can then scroll though the images very quickly as they are rendered at low resolution until you stop scrolling and then the rendered at the full resolution.

To save any (or all of the images) on the card tap the select label at the top of the screen (which then turns to Cancel) tap on the images you want to save or if you want all to be saves tap "Select all"
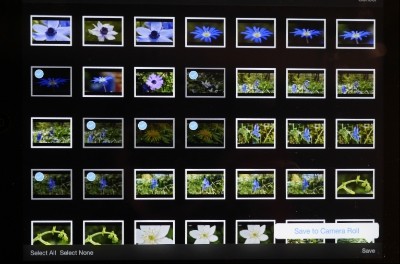
When you tap "Save" the label "Save to Camera Roll" appears and a quick tap of that starts the files transferring from the card to your device.
transfer speed is about 8 seconds per 4MB jpeg camera image so it is a long transfer if you are trying to back up a days photo shoot this way and I would recommend using the option to use an external card reader with your tablet/laptop if you are wanting to do this.
One thing to remember is the camera "hibernate" will kick in and shut down the transfer if you don't remember to turn this off in the camera power saving menu!
If this happens you will have to reconnect to the card again however the thumbnails will have been deselected and you will have
to look at the camera roll to find the last one imported to find where to begin from again!
The Olympus app does allow you to make some preset image adjustments and add signatures etc before saving them as a new copy of the image. I will look at these in a later review.
So in summary you need the Toshiba app to set up some of the administrative rights for the card however you can ignore this if you just want to use the default password supplied with the card 12345678.
The card appears to write fairly quickly in the camera and I had no issues recording 1080p video. It's great for seeing an instant preview of the image and unlike the EYE-Fi card which pushes every image to your device as they are shot with this card you select the ones to pull over to the device if you want a back up copy. I was happy to preview the images shot whilst I took a break from shooting and downloaded all the image from my card reader into my pc on return home. If you wanted to transfer and email or share an image to a social network site then providing the preview device had internet access you could do that there and then. It was not possible with mu ipad wi-fi only device out on a shoot so I couldn't test this.

If I was wanting a faster preview and download in the field I would still recommend the camera connection kit for the ipad and use the usb camera cable to connect to the card in the camera and download from there - its much faster at about 1 second per image. Of course your shooting is interrupted as you have to go into the camera connection mode and USB transfer option so it isn't quite as immediate but is another option
APERLITE YH-700C E-TTL FLASH GUN

The Aperlite YH-700C is a dedicated E-TTL compatible flash gun for Canon cameras. It adopts the same protocols and most of the features of Canon's Speedlite 580 EX (not the II model as it doesn't support external auto flash metering "E" mode). It is compatible with the E-TTL II, E-TTL and TTL flash modes of Canon cameras so provides backwards compatibility across a wide range of Canon cameras.
The unit supports the camera communication protocols of exposure compensation, exposure bracketing, AE lock, aperture preview, high-speed sync (maximum sync speed of 1/8000 s), first and second-curtain sync also features automatic focus assist function and supports automatic / manual zooming. Additionally it can be set to provide the correct zoom when used with cropped sizes sensor cameras.
The flash features a maximum guide number of 58m (190 feet) at ISO 100 when then flash head is zoomed to 105mm setting.
In practice this related to F22 at 5 feet flash to subject distance when fired at full power.
The unit covers a focal length range of 24mm to 105mm and with the pull out wide panel diffuser allows 14mm lenses to be used.
It can serve as a master or slave unit in the Canon optical wireless ETTL mode and S1 & S2 modes (i.e. with and without pre-flash suppression).
It can also be used as a manual flash unit with 8 levels of output power control from 1:1 to 1:128 power in 28 increments (1/3 EV). It supports stroboscopic firing, however this is at a reduced
power output which can also be used as a "modelling light" activated from the flash of the camera DOF preview button.
It takes only 3 seconds for the flash to be fully charged after a full-level output using alkaline or NiMh batteries (4 AA size). The number of flashes per set of fully charged batteries will
depend upon the flash power used and if high speed sync is used, however it is quoted at between 110 and 1500 flashes. I shot over 160 images over the period of a day and the recycle time was
always very fast. Charging state can be set to provide an audible status of the flash capacitor charging and you wait until you hear the longer audio beep which signifies the flash has fully
charged. This is useful if you are using the flash as a slave and off camera.
The flash head has full tilt and swivel control allowing adjustment of -7 degrees to 90 degrees in a vertical plain and 90 degree left and 180 degree right in a horizontal plain. This allows for bounce flash when used on camera and to allow the red filtered receiver window to be sighted to see the master flash transmitter's flash pulses for TTL control. The head does not have any locking facility of its position and does not (like the Canon speedlites) give warnings about the - 7 degree vertical angle or set bounce mode zoom to 50mm setting. It does not provide warning that the flip down wide panel diffuser is in place if used in a vertical bounce mode that the canon models provide.
It has a metal hot shoe but with the locking ring rather than the locking lever of the 580EX 11 model. It also does not provide the environmental waterproofing that the Canon units have.
There is PC sync socket and a socket for power packs such as the Canon CP-E3 or CP-E4 units
The unit Dimensions are 78.0 x 146.0 x 118.5 mm and it weighs 490g with batteries fitted.
The unit is provided with a soft carry pouch and a flash foot which does have a 1/4 - 20 threaded metal insert for attaching to a tripod or light stand. There is a comprehensive instruction manual that may take a little reading to fully understand the full feature set. It is better to set this unit up using the canon Speedlite menu in the camera which is part of the Canon EX flash protocol available with mid 2012 onwards cameras.
Colour temperature looks natural daylight and is quoted at 5800K.
Construction is fairly robust, the only areas of weakness may be the pull out catch-light panel, the wide panel diffuser and the battery door.
Improvements would be the inclusion of a flash confirmation LED (as on the Canon speedlites) and a longer LCD back light time as this is quite short. I, personally, would have like to see a sturdier carry pouch with a belt loop and with space for the flash foot.
Overall a very decent flash unit and well up to serious amateur level use. It's worth buying a couple of units so that the full potential of a master-slave lighting set up can be utilised.

Although the unit has dual function buttons to allow the set up of all the units parameters by far the easiest way to set this unit up is to use the new EX protocols which are in all Post mid 2012 Canon cameras. Depending upon the model the access to this setup is found in the photo set up pages under "External Speedlite control"
The flash must be attached and powered up either directly or via a ettl extension cable to provide the electronic communication needed.

The expanded menu for the flash unit control allowing the external unit to be set for average or evaluative metering and the flash sync speed when used in aperture priority mode.

In the flash function settings the camera can set ETTL, M or Multi mode, enable the optical wireless control, control the zoom, first or second curtain or select high speed synch mode. You can control flash exposure compensation and flash exposure bracketing.
(not if you use the buttons on the flash to set flash exposure compensation this will over-ride any camera set value)

When the flash is attached to the camera it is easy to set up this unit as either a master controller with or without the master contributing to the exposure or as a slave unit. If it is a slave then it is possible to assign it to one of three groups ( A,B or C) and one of 4 channels (1 to 4).

When installed on a Canon speedlite compatible camera set to the "Auto" or Program Auto "P" mode the flash unit behaves entirely automatically. It receives all communication from the camera via the hot shoe connection

In this mode, when the camera shutter button is half depressed the LCD display of the flash unit details the zoom level of the head and the camera selected aperture. The distance scale indicated the usable range that the flash can be used at. Being the new ETTL2 protocol, on supported cameras, the flash uses distance information from the lens as well as pre-flash firing to determine the correct flash exposure. This method allows easier shooting, for example wedding photography, where the subjects may have varying contrast in the form of the bride's dress and grooms suit.

The flash unit control buttons
Mode: This bigger button cycles between the 3 main modes E-TTL, Manual and Multi (strobe flash)
Light button: Turns the back-light on, a longer press enters the custom settings mode (CFn)
Arrows: Cycles the HSS mode and activates second curtain sync.
Music button: This controls the audio signal on/off
Zoom button: Manually change the zoom of the head, a long press enters the “optical wireless flash set up modes”
Central button: Pressing this lets you set the flash exposure compensation or the flash bracketing mode. Used in combination with the 4 way controller you can adjust settings in other modes.
Pilot: This fires a test flash to reflect the settings (ie strobe or manual etc). The power output is set in the CFn set up menu to 1:1 or 1:32 power

Camera set to provide optical wireless control using channel 1, the on camera master also contributing to the exposure and controlling all groups. It will also set 1/3 ev exposure compensation to the master flash in this illustration.

The LCD screen showing the flash set up as channel 1 master, contributing to exposure with manual zoom set to 24mm

When the flash is set up to be the master group controller the slaves can be set during the pre-flash communication. A and B slave groups can be set to equal power or can be set to provide a ratio lighting effect. Flash group C are set using EV units, e.g. +/- 1 EV equals +/- 1 f stop which doubles or halves the amount of light reaching the subject from that flash group.

The LCD display when the flash unit is set up for ratio control using the 3 groups where A , B and C will fire with the same power level.

Using the Flash Customisable functions menu within the camera to set the flash parameters is far easier than using the reference manual as the camera displays the code and the values for you!

When using the flash unit in a bounce style there is a pull out "catch-light" panel which helps to put a small catch-light in the eye. The panel is only effective if the flash is used with in 5 feet of the subject.

The unit supports focus assist by a laser diode firing a criss cross light matrix on the subject which the camera can use to determine the correct focus point.

The head can be rotated to allow the flash sensor window to be orientated so that tit faces the master flash transmitter.
The head does not have any locking mechanism unlike the canon speedlites and there is no warning that you may have the head set at -7 degrees or the wide angle panel in place as you have the head set up for ceiling bounce flash.

After several re-visits to the flash power being produced by this unit I have concluded that the output guide number of 58 metres is quite ambitious.
With the same flash set up parameter of ISO 100, Manual full power and the zoom head at 105mm when I set up the flash at a precise distance of 4 feet the power of the flash was F29. This effectively gives a real guide number of 116 feet or 36 metres. I repeated the test with the second flash unit and it gave an effective guide number of 100 feet or 30 metres. If you were using a flash meter to set up your shots then this wouldn't be an issue but if you were using the guide number / distance to give you an aperture value it would be very much underexposed. Similarly using E-TTL the exposure would be OK but distances may be somewhat reduced at the maximum end of the scale. At 15 feet the flash meter gave a reading of f8, from a theoretical guide number/ 15 this should have been f13 so almost 1.5 stops under exposed. using the "real guide number of 116 /15 gave the same as the flash meter f8. So the actual output of the unit is more than 1 stop than quoted and that is effectively half power!
In E-TTL mode the exposures were fine so I guess if you are using these guns manually you would be advised to use a flash meter or make test shots to get the exposure correct
A series of images taken with the flash using an ettl extension cord and with the flash set in the ETTL mode held at 45 degrees to the subject and above it to simulate sunlight.


