 Graham's Photography Blog & Technical Reviews
New Fully Compatible TTL Flash Unit for the FZ200 - The Godox TT350o
Not all flash guns that are marked for Panasonic cameras are actually compatible with the FZ200 camera. To date I have only recommended the Nissin i40 unit. However as this is a multifunction gun not all of the features can be realised with the FZ200. For example you cannot use it off camera in wireless TTL mode - it has to be in an optical slave mode . So at £150 this is an expensive gun for limited operation. Now the Chinese manufacturer, Godox, has developed a Panasonic/Olympus compatible unit which actually works with the FZ200 in the TTL mode on camera or as an optical slave unit for just £69. It is a slightly less powerful gun than the i40 having a guide number of 36 compared to 40 of the i40 but not a great deal difference here.

This is the Godox TT350o on my FZ200. The "o" designation for Olympus as it is also available as Canon, Nikon Sony and Fuji derivatives,
With wide angle panel giving 14mm lens coverage and a catch light card. The TT350 certainly packs a punch for its small size and Godox have done an excellent job at squeezing so much power out of such a small unit and making sure it is reliable and doesn’t over heat.
Unlike other speed lights in this class the TT350o has full manual mode and used in manual mode it is possible to vary the power output in the range of 1/1 – 1/128. With 22 different power settings to choose from this is a very versatile speed light.
The TT350o has TTL mode which works very well. One great feature of the TT350o is the ability to apply flash exposure compensation (of up to +/-3EV) on the flash itself so there is no need to go delving in to the camera’s menu to change the power. The LCD screen on the back of the flash makes changing the settings even easier – even in low light. The TT350o has a vertical tilting head (from -7 degrees – 90 degrees) and a horizontal tilting head (from 0 degrees – 270 degrees) which is most commonly found on the top end speed lights. To put this in to perspective the TT350o is the only flash in its class to offer this. Most of the alternatives offer vertical tilting flash heads, except for the Canon 270EX which is static. The fully rotating flash head is perfect for bouncing the light of ceilings and walls, and gives more options when using it in the field. The TT350o is powered by 2 AA batteries, and these appear to give more than enough power to provide up to 200 full power flashes, which is pretty impressive and when you consider the recycling time of 0.1 seconds – 2.2 seconds (obviously depending on the output setting) this is even more impressive.
Worried about a rattling sound from the lens with the camera turned off or a "hissing" sound from the lens?
The optical image stabiliser uses a "floating element" within the optical path to counteract camera movement during any hand shake. This element is normally floating loose when the power is off and if you shake the camera gently you can here the element as it slides in its frame. When the camera power is applied the element is held electromagnetically on the optical axis and must be maintained there to keep the image aligned with the sensor axis. Even when OIS is turned off it is still being held in this position and you can often hear the slight hissing sound as the electromagnets are keeping it central. When OIS is turned on the noise may increase slightly as the lens will also be compensating for camera movement.
These noises are normal and should not be taken as a failing of the camera.
Easy Image Collection For Focus Stacking
With more recent cameras like the FZ300/330 which have Post Focus ability whereby you can automatically capture a sequence of images using the 49 points of focus and then use these in a focus stacking program (like Helicon soft which will import the video files as frames) to create a single image with more depth of field.
I've done several tutorials on this focus stacking procedure but I thought I'd bring you an alternative way to use the FZ200 to achieve this sequence of images to create the final image.

Basically my method involves using the camera in the Auto Focus mode (AF) or the AF Macro mode however I use the facility that this camera has to automatically focus on a set point defined whenever you press the focus button on the side of the lens barrel. Which this button you set the size to the minimum area and then set the position to the furthest focus point and the fire the shutter of the camera using either the 2 second timer (or a remote wired shutter release). Then move the focus point closer to the front and repeat this move and fire sequence until you have covered the full back to front of the image.
Use the lens at the sharpest f-stop (F4) use a tripod and set the camera in manual exposure mode (to keep the exposure consistent throughout the series).
The images below show the focus points that I selected for the image sequence.


These four images were then combined using the Stack Focus option of Serif's Affinity Photo v1.5. You can use any program which will combine the images to produce the final stacked image.
Things to check when the flash won't fire.

There are a number of camera set up situations which can disable the flash firing, these are the main culprits.
1) camera is in one of the burst modes - most over looked when camera has been used in this mode
2) camera is set up for HDR multiple exposure rendering into one image
3) camera has the conversion set to telephoto (T) or close up (C)
Adding a Rubber Eyepiece to the FZ200
I was sent a suggestion by Spike Lynch about fitting a Nikon DK-20 rubber eyepiece to the FZ200 EVF ( seen fitted adjacent)
It offers great improved experience over my original foam eyepiece and although it does require a permanent fixing to the EVF if it is done properly looks like it was part of the original camera build.
here are the step by step instructions on fitting the eyepiece.

Materials needed:
The Nikon DK-20 (DK-25) eyepiece from Amazon Ebay etc
Small tube of "super Glue"

Thoroughly clean the face of the EVF and clean the lens of the EVF before attaching the new Eyepiece.
With the eyepiece on a flat surface, eyecup side down, carefully apply a very thin coating of the "Super Glue" along the 3 edges of the exposed rubber lip of the eyepiece.
Carefully position the new eyepiece centrally over the existing EVF an apply pressure to hold it in place, especially put a finger on the central part of the top of the eyepiece to conform it to the slight bow of the existing EVF surround.
About 30 seconds is all that is required for the bond to establish and it should be fully fixed within a few minutes.
100:1 Passive Attenuator for the Mic Input of the FZ200 to allow Powered Mics to be used
The mic input of the FZ200 requires just a few millivolts to provide full audio modulation. If you use devices with line output voltages of two to three hundred millivolts of use the earpiece output which might deliver a couple of volts then the input is likely to be overloaded. This results in clipping of the audio signal and the agc of the camera ramps up during quite passages causing amplification of the noise from the powered source. This simple attenuator provides a suitable reduction in input voltage and reduces this noise.
I have a demonstration video here on youtube http://youtu.be/NsOEQ-Qpmik

The schematic of the attenuator.
A 100k and 1K resistor provide the attenuator path.
The input is connected across the top and bottom of the divider and the output taken from the middle and ground connector


Latest Blog Entries
USING FILL IN FLASH WITH THE FZ200
Quite often we run into situations where the lighting contrast is too high and beyond the range of capture with the camera. We
need a method to reduce the contrast difference in order to capture good quality images. Either by bouncing light back towards the subject with a reflector or more commonly using the pop up
flash. Balancing the exposure between the ambient light and the fill flash is made more easy with the FZ200 as the camera utilises TTL exposure metering for the flash as well as ambient light. In
the example below the statuette is heavily backlit casting the face of it into deep shadow. I set the camera up to provide a reasonable exposure for the ambient light and trying to keep some sky
detail. The ambient exposure was 1/2000 at f3.5, ISO 100. The camera was about 3 meters (10 ft) away from the face of the statuette. I popped open the flash head and with the flash power output
level set at 0 EV I made the second exposure and as you can see the flash added sufficient light to give a very useful image.


As with ambient light exposure if you find that the flash is overpowering the image, or is lacking in power you can use the Flash Output adjustment menu to decrease or increase the power, or increase the aperture ( but this will also effect the ambient exposure as well. The scale is +/- 2EV with gives +/- 2 F-stops exposure adjustment. If you find that you haven't enough flash power adjustment then you have to get the camera nearer to the subject. The flash output is always at full intensity, just the duration is changed to affect the exposure. At maximum output the flash may "burn" for 1/200 second and at very close range it may only fire for 1/2000 second. If the flash duration is needed to be longer than the ambient light shutter speed then the flash will not have fully illuminated the subject. If you need a lot of light to fall on the subject you need to be looking at exposures of 1/200 to 1/500 to allow the full burn time of the flash to affect the image.
Exposure Value Compensation and Manual Exposure Mode Scales Explained
From a few emails regarding the use of manual exposure and how to set exposure compensation it is clear that these areas are generally being confused. Exposure value compensation is usually applied in semi automatic modes (PAS) or indirectly in the iA+ mode. It is there to correct exposure metering errors when smaller (or larger) areas of different brightness are affecting the exposure metering. Typically in backlit scenes, snow scenes or beach scenes the meter is likely to provide underexposure resulting in dark images. Here we would typically click in the back control wheel and then dial in some +EV number to brighten the scene. The camera does this in the case of Aperture priority mode by lengthening the shutter speed.

Here in this example the camera is set for Aperture priority mode (the RED A shows this mode) and aperture of F8 is dialled in (shown in yellow) and the exposure compensation scale shows 3 division to the minus end of the scale which is -1EV or -1 F-stop. The increments are in 1/3 EV units. So whatever the meter dictates is the correct exposure the -1EV will bias the shutter speed 1 f-stop shorter exposure time to make your manually applied correction.

In comparison when we are set up in the Manual exposure mode (indicated by the RED M) both the shutter speed and aperture are independently adjustable (select by clicking in the back control dial). In real time as you adjust either (or both) of these controls the meter scale (as it becomes in this mode) indicates how close the exposure is being to correct. If it has divisions indicated to the left then the meter is telling you the scene is underexposed and you most open up the aperture or lengthen the shutter speed and conversely if there are divisions showing to the right then the scene is overexposed and you must stop down the aperture more of reduce the shutter speed. here in this illustration the meter is indicating you are 2/3 f-stop underexposed in this scene.
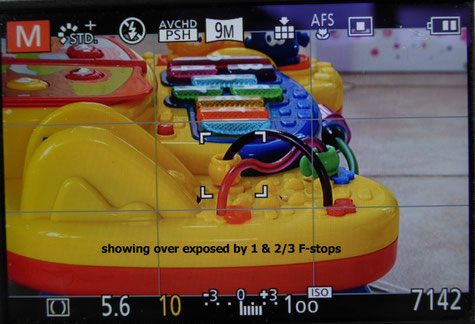
Here in this illustration the meter is indicating that the scene is 1 & 2/3 f-stop over exposed.

It's often advantageous to switch on the exposure scale when working in manual mode as it will indicate the range of exposure times/aperture combinations available for the given amount of lighting in the scene.
Here in the illustration the correct exposure is 1/40 sec at f5.6
Which element should you change in adjusting the exposure meter to the 0EV position? Well the EXPOSURE TRIANGLE may help you to decide.

In the exposure triangle, shown above, the entire relationship is shown for the inter-relationship of ISO, Aperture and Shutter speed.
In the centre of the triangle is the perfect exposure which will show as 0 EV on the camera exposure meter. If we make modification to one element of the exposure we have to make an opposite compensation to one or both of the other. e.g. if we decrease the aperture for f4 to F8 ( 2 complete Fstops or “EV units” - remember this reduces the light entering the camera) we need to increase either the ISO by 2 EV or to decrease the Shutter speed by 2EV (or we could change each by the 1EV by increasing the ISO by 1EV and reducing the Shutter speed by 1EV)
In the triangle we can see the effect of changing any element.
Changing ISO results in more noise if you increase it
Changing Aperture affects the Depth of Field (DOF) - smaller apertures giving more DOF.
Changing shutter speeds affects both camera and subject blur, longer exposures introduces more blur, shorter exposures freeze action.
UNDERSTANDING PANASONIC'S EZ (EXTENDED OPTICAL ZOOM) AND I.ZOOM FEATURES
These two features that are implemented in a number of Panasonic's camera line up tends to cause a lot of confusion and can be the source of some of your image quality problems that you might notice from time to time in your images.
Let's look at the EZ (extended Optical Zoom) feature first. First this applies to only semi automatic modes (PAS) and manual mode and without the RAW file addition. For example in the 4:3 aspect ration you will have the following choices 12M / 8M EZ / 5M EZ / 3M EZ / 2M EZ / 0.3M EZ (If you selected RAW + JPEG you will not see the EZ part of the file size).
At full 12Megapixel file size ( 4000 x 3000) there is no "extra zoom" available, however if you select say the 8 Megapixel file (3264 x 2448) then you will notice that the zoom scale with reach beyond the normal x24 to x29.4 . If you chose the 3M file size (2048 x 1536) you will notice the zoom extends to x49.6.
So what is happening here? A Little graphic might help here.

In this illustration I've displayed a 16:9 HD format image at the maximum resolution for that group. Within that area I have outlined the other resolutions available with the EZ set to the full scale zoom in each of those resolutions. Firstly by choosing a lower resolution image size the field of view remains unchanged if the zoom is not extended beyond the x24 setting ( 600mm EFL) but the resulting image size is decreased to the size determined by the value for that resolution setting. You can see in the thumbnails below the FOV remains the same only the file size dimensions change when the camera is set to x24 zoom. The camera is effectively downscaling the highest resolution image in that aspect ratio set to the new pixel dimensions set by the EZ file selected. So in practical terms the 4000 x 3000 12M file in the 4:3 aspect ratio set is downscaled to 3264 x 2448 in the case of the 8M file size.

So if we consider the 8M EZ setting at x24 zoom setting we start with the same pixel count as at 12M but downscaled to the 8M EZ resolution, but if we consider physically cropping into
the 4000 x 3000 pixel area to any point up to 3264 x 2248 ( the 8m EZ resolution) we are selecting the equivalent magnification from x24 (at 4000 x 3000) to x29.4 (at 3264 x 2248). { the
x29.4 comes about if you divide 4000 by 3264 and multiply it by 24}
In the images below the thumbnails of the 12M EZ, 8M EZ, 5M EZ and the 3M EZ with the zoom at maximum.
This cropping of the original sensor pixels relating to the actual physical dimensions of the selected file size now give the impression of an extended optical zoom of the lens and the quality remains the same as we have not done any software enlargement of the image as in the case of I.Zoom.
So the statement that Panasonic claim that there is no loss of image quality is correct in the sense that the original sensor pixels are downscaled to the new EZ file size dimensions and not enlarged or interpolated.


So if your particular use of an image can utilise an image with smaller pixel dimensions then you can effectively increase the apparent optical magnification of the image, however the depth of field remains unchanged by doing this. Here is the 3M EZ file of this image set.
Looking at this in practical terms the gallery below shows the sections from the full resolution 9M image scalled and cropped in Photoshop CC to the exact dimensions as the out of camera JPEG file at the full EZ setting for that resolution. The first of each set (with the red border) is the photoshop image and the second is the unprocessed jpeg from the camera. There is some suggestion to me that the OOC image is as good, if not better, than the photoshop crop and may well be improved by adding additional sharpening in post production. There is a slight lighting change due to clouds passing as the shots were taken as quickly as possible to try and maintain equal ambient lighting but I don't think that detracts from the test too much. The full 9M image is the one at the top of this entry with the crop outlines.


Now let's look at the case of I.Zoom or Panasonic's "intelligent zoom feature" In this mode of operation the image dimensions always remain the same 4000 x 3000, 3264 x 2448, 2048 x1536 etc for the 12M, 8M and 5M file sizes however in this mode the magnification is achieved by cropping into the image from the sensor and then re-sizing it to the original dimensions in software. This is pure and simply Panasonic's implementation of Digital Zoom and does result in some loss of image quality. The amount of zoom that you are willing to tolerate will determine just how much digital zoom you can apply. The maximum allowed is x2 which shows as x48 on the zoom scale. I have used x 1.5 ( x30 on the scale to good effect) but as I previously stated if your image size requirements can tolerate a smaller pixel dimension then EZ is the most effective way of getting increased zoom/image size. If you combine EZ and I.Zoom at the 8M size you can get x58.8 zoom. There is a third option of Digital zoom which adds another x2 to all these ranges however unless under desperate circumstances I wouldn't enable it at all.
Here are the thumbnails for the I.Zoom images for the 8M, 5M, 3M and 2M sizes. showing the magnification achieved.


In this illustration I have shown the 3M I.Zoom image at full zoom, you may be able to notice that noise is also being enlarged as well as the image through this process.
So in conclusion, if you use of the image is such that the EZ image resolutions provide enough pixels for that use ( divide image width by 300 for print width size in inches or consider any image with greater than 1920 pixels wide will scale to that dimension when displayed on ost TV's and modern computer screens supporting a HD display) thaen this is a better option. If you need the higher pixel count and image magnification I.Zoom iis better however in my personal opinion don't go beyons x1.5 or x30 on the zoom scale. Finally don't use the Digital Zoom facility - its essentially I.Zoom on steroids and allow x96 magnification - however you have to be really desperate to use the image at this enlarged size because of noise.
USB CHARGER FOR BLC-12E BATTERIES

One of the things I often miss when I'm out with the FZ200 is the ability to recharge the battery with a portable power bank. This is something I routinely do with TZ usb charge enabled cameras and my portable audio recorder.
I recently discovered the USB charger cradle for the BLC12E battery which the FZ200, G5, G6 and GH2 cameras use. It is very inexpensive £5 or USD $7.50. It is available with or without the wall outlet charger.
It has a 600mAH charge output and so will recharge a fully depleted battery in just 2 hours from a suitable power source.
The internal components allow an intelligent charging in order to protect the battery from overheating or overloading. The cradle also shows the charge status by changing the colour of the display LED. It is available on Amazon UK and on Ebay.
YONGNUO FLASH SYSTEMS

The Yongnuo speedlites are relatively inexpensive manual electronic flash units, (£50 .. $78) available from Amazon, and pack quite a punch for their size. They have a guide number of 58m (ISO 100, 105mm) and have Flash Modes M, Multi / Slave function: S1, S2, RX.
The flash heads have manual motorised zooms: 24, 28, 35, 50, 70, 80, 105mm and support a Vertical Rotation Angle of -7~90 degrees and Horizontal Rotation Angle of 0~270 degrees.
The flash Colour Temperature is 5600k and the flash Flash Times are 1/200s~1/20000s
There are 8 Levels of output control (1/128~1/1), 29 levels of fine tuning (1/3 stop increments)
Wireless triggering distance: 100m / 328 feet (2.4G wireless);
Optical trigger control range 20-25m / 65-82 feet indoor and 10-15m / 32-49 feet outdoor.
Additional Features: sound indicator when charged, automatically saving setting, PC port, power saving mode and over heat protection.
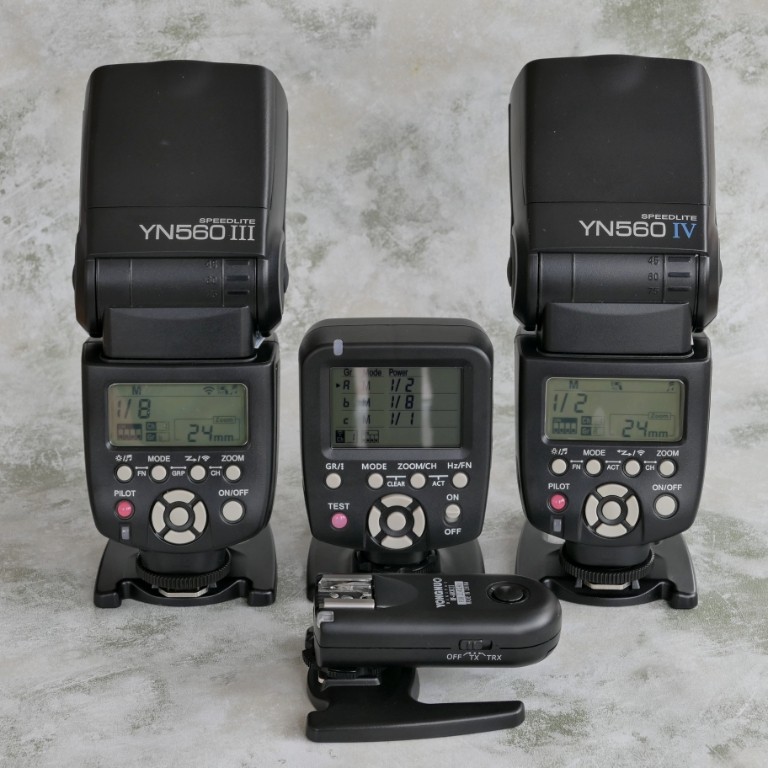
Because of the variety of triggering modes with these flash units they give great flexibility in their use. To maximise the control of the units there is an option transmitter controller the YN560 TX unit (£31 ... $49) (shown centre in the illustration above) which allows you to control the power of each of the flash guns in any group you set up. in the above illustration one gun is set up as group "a" the other group "b" and the stand alone RF603 receiver as group "c".
The power level and zoom position can be set from the commander place don the camera hot shoe. This saves having to walk to each gun to adjust its power and is especially useful if you have one of the guns inside a soft box for example where it might be hard to adjust.

The units can also be fired using the less expensive RF603 transceivers, which are sold in pairs, however they act as just triggers and you cannot set things like power level or zoom like you can with the YN560 TX unit. The advantage of these units is that apart from being wireless flash triggers they can also be used as remote shutter triggering devices if you use a Pixel connecting cable (CL- RS1 £7 .. $12) with this device. Normally the triggers come with either the Nikon or Canon connecting cable however I discovered the Pixel cable worked fine with all my Panasonic cameras with the 2.5mm remote socket. With one unit mounted on the hot shoe and the cable plugged into the remote socket of the FZ200 you can use the other to wirelessly trigger the unit (put both units in the TRX mode). It's a shame you can't use both the remote flash and shutter trigger simultaneously (but I'm trying to find a workaround for this).
So if you want to expand your flash capability for amateur studio set up then I can really recommend this set up as it costs considerably less than using TTL units (which you cannot use wirelessly with the FZ200 anyway) or other third party flash guns or wireless trigger systems.
There is a cheaper flash unit still available the Yongnuo YN560 II (£40 ... $69) however this is not RF wirelessly triggered so is either used directly on camera, with a flash extension cable or with wireless triggers (like the RF603 .. so it's best buying the YN560 III version which has the inbuilt RF receiver if you have the RF603 triggers already)
You can use either Canon or Nikon units as the centre flash trigger is only used by the FZ200
For my simple home studio (very basic) I have built up the following items which I can recommend if you want to expand into this field using the most cost effective way and not purchase gear that whilst suitable for pro photographers is hardly justified in my opinion for amateurs.
In addition to the Yongnuo Manual flashes I have bought:
2 light stands and flash gun holder/integrated flash brolly holder
1 silver reflector flash brolly
2 shoot through white nylon flash brollies
1 6ft x 4ft collapse-able background with black/white sides
If you are thinking of purchasing any of these items please consider using the links below. It won't cost you any more but the ad revenue generated from the sale will help to offset the costs of running my websites.. thank you.
On AMAZON.COM (USA)

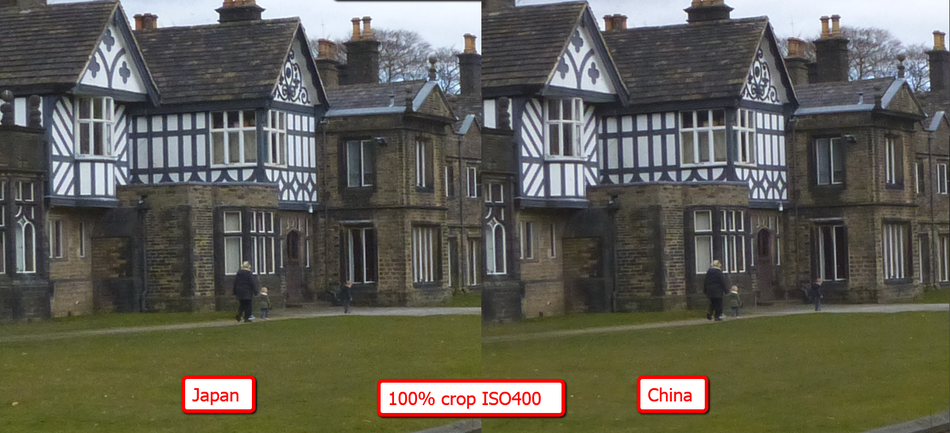
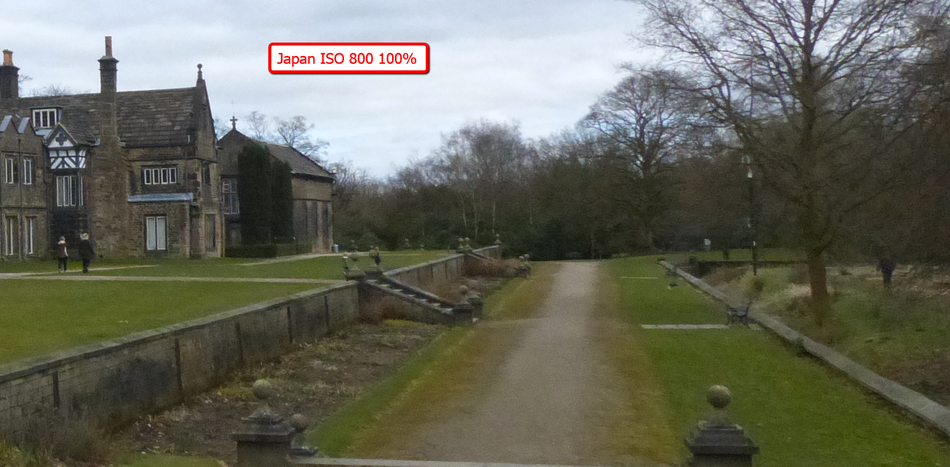
Is there such a thing as the China FZ200 Syndrome?
Well comparing my original Japan made model to the newer China made one there is a discernible difference between comparisons of the same image but only when viewed at greater than normal screen sizes. The difference appears to get worse as the ISO increases. At ISO 100 normal image viewing conditions it goes un-noticed.
At ISO 400 you can see the China image is more noisy when viewed at 1:1. I think unless you have the two images side by side you wouldn't argue with either image. It is probably within "normal" tolerances and another model may in fact give better image quality.
Both cameras were set back to default factory settings and no adjustments to the photostyles or post process editing what you see here are the out of camera Jpeg images.


F11 Stills with the FZ200?
For macro work depth of field becomes a real challenge. Even with the enhanced depth of field gained by the lens and 1-2/3 inch sensor combination over similar apertures on full frame cameras there never seems to be enough.
The smallest stills aperture of the FZ200 is F8 and technically it's well into in the region of diffraction limited resolution and hence sharpness is beginning to fall off. In video mode the smallest aperture is F11 and it does appear to be a physical aperture rather than, in some cameras, achieved by addition of a ND filter switched into the optical path.
Could this F11 aperture and its potential extra depth of field be useful for macro work, or any other image where extended depth of field might be an advantage?
Well the first step is to actually set the camera so that F11 is available in creative movie mode. You can set it in Aperture priority mode and exposure will be controlled by the iso/shutter speed combination if you have auto ISO set. It will be controlled only by the shutter speed if you have a manual ISO set. Ideally the macro (other images) should be shot using iso 100 so the only control would effectively be the shutter speed and the amount of light available.
If you have bright studio lighting or sunlight you may be able to achieve reasonable exposures for hand held however a tripod is always recommended for this type of photography.
If you cannot achieve the exposure with the minimum shutter speed of 1/30 second in the macro AF mode then you meed to switch to the Manual mode within the creative video mode and also switch to manual focus. You will now be able to use shutter speeds down to 1/8 second if you have a static subject. beyond that you will need to increase lighting, if that is possible, or increase the ISO.
So what video mode should be use to capture the highest detail MP4 or AVCHD?
I ran a series of tests comparing the depth of field and image resolution with an F8 ISO 100 still to that of a still extracted from both MP4 and AVCHD files, where the aperture had been set to F11, using the facility in camera during playback or using Photofunstudio software.
Here are the three images for comparison. (click the image for full size view)


The first thing to notice is that during video shooting the image is slightly cropped to allow the OIS to function so we lose a little of the image. Even though the exposures (as indicated by the camera exposure meter) were the same for all three clips the video clips are a little darker. I cannot visually see a difference between the AVCHD and MP4 still image extracts in resolution terms nor any appreciable increase in the amount of depth of field gained.


When enlarged way beyond the 1920x1080 native file size the 9M still image has more detail available compared to the two still image extracts.
So in conclusion there is no discernible difference in image quality from a still extracted from AVCHD compared to the MP4 file and when the F8 image is viewed at the same image size ( as viewed at 1920 x 1080 screen size ) as the F11 image there doesn't appear to be any real increased depth of field to be gained by using this method for macro. I will investigate further with some landscape shots.
Implementing Back Button Focus on the FZ200

On DSLR cameras from Canon, Nikon and Sony etc you usually find what's referred too as a Back Focus Button (BFB).
This button allows you to separate the focus acquisition and exposure during the shutter release operation. With this method enabled the shutter button only starts the metering and fires the
shutter. Focus has been previously set using the BFB.
Using this method allows you to set the focus point, acquire it by pressing the BFB and then recompose the scene, by moving the camera, and then take the picture using the shutter button.
As the camera no longer has to go through the focus stage it means the exposure can take place faster and there is no variability in the focus position as might be the case when using AF
methods.

On the FZ200 you have the option to set the functionality of the AF/AE button on the rear of the camera. It can provide both locks to Exposure and Focus, to Focus only or Exposure only.
Setting it to lock focus only might seem the most obvious method for implementing back Button Focus however it does have one major disadvantage - it requires two button presses to set a new focus point - one to cancel the first and then another to acquire the second one. This might, or might not, be an issue for you depending upon your shooting needs. There is a way to overcome this and is my method for implementing this useful feature.
I developed an alternative method when using the FZ200 to overcome the need for these two operations of the AF/AE lock button and found it to be worth sharing this with you.
Basically I use the Manual focus method of the camera (by sliding the lens switch to the Manual [MF] position) and then using the Focus button on the side of the lens to force the camera to acquire focus.

The side focus button, when used with the lens set for manual focus, causes the camera to acquire focus based on the target that you can define the size and position of.
By being able to set the position and size of the target used for focus is a great advantage for this method of shooting.

The position of the target is changed using the navigation keys and the size is toggled from small to medium sized by clicking in the back control dial.
Both of these can be accessed only after you have entered the manual focus screen by rotating the back control dial one click either way when the MF is shown in Yellow.

If the MF icon is not shown in yellow press the control dial inwards to toggle through the three options that this button provides ---> MF --> F stop --> EV compensation. Once MF is shown highlighted in yellow just rotate the dial one way or the other to gain access to the manual focus display screen. Within 1 second of entering this screen if you press the Menu/Set button it will allow you to adjust the position using the 4 way cursor and toggle the size by pressing in the back control dial. If you miss this 1 second access just rotate the back control wheel by 1 click and it will re-open the access screen
So once you have set the size and position of the focus acquisition target area (you might want to set this centrally as most subjects are found near the centre of the frame) you can now use the side focus button whenever you want to change the focus distance if your subject has moved. Take the picture using the shutter release button as normal. The camera will just meter the subject and take the picture without first needing to acquire focus!
Back projection techniques for table top pictures.


The two pictures above were created using the good old fashioned way of back projection to create the background to the image.
Unlike in photoshop where you have to carefully select and cut out the foreground and paste in onto your background this method does away with that complication. By varying the sharpness of the image on the HD monitor behind the subject and by selecting the distance from the subject to the background you can get the desired out of focus effect for the shot. Just match the lighting angle of the subject to that in the background for best illusion.
Here for the polar bear I used artificial snow, polystyrene sheet and two small plastic models.
By setting the camera on a tripod it is easy to get your final composition correct.
Festive Lights and family group pictures - getting the correct image.
This time of year we like to take family group pictures which may feature our Christmas tree or other festive light display. If we use on camera direct flash the people will be correctly exposed however you will lose the ambience of the festive lights as you can see in the first picture

Here the direct flash has correctly exposed the group however the Christmas tree has lost that magic light bokeh in the background.
To overcome this we need to change the way the flash is fired. We do this by selecting what is called the SLO SYNCH method. This method allows the camera to make an exposure allowing the ambient light to register correctly in the image. Quite often the exposure times will be quite long and you may want to set the camera up on a tripod or place it on a surface which will allow you to take the shot.

This is the SLO SYNC mode we want to select on page 4 of the REC menu. You can only use this method in the non iA mode

The same picture but shot using the SLO SYNCH method. You can see how the ambient light has now registered correctly and the flash has still illuminated the subject with the correct amount of flash.
FOAM EYEPIECE MODIFICATION
If you are a spectacle wearer and worried that the plastic eyepiece of the FZ series cameras will scratch your lens, or you just want a more comfortable eyepiece then this modification is for you.
Things you will need/
1. My template - available in my download section as jpeg and png formats
2. thin black eva foam 2 - 3mm ( 1/8th inch) is probably the best thickness, from a craft supplier
3. broad double sided adhesive tape
4. sharp craft knife and a cutting mat or other material to protect the underneath surface from cuts!
5. scissors
The making process

You can download and load into your photo editing software the template
and either print out on plain paper or if you have suitable self adhesive labels this is the preferred way. If you print on plain paper you will have to add a step and apply some of the double sided adhesive tape to it.

stick your printed template onto your sheet of foam

on the reverse side cover the template area with the broad double sided self adhesive tape (leave the backing paper on the exposed side)

Using a sharp craft knife, first cut out the yellow section from the middle of the template (you may need to turn the template over to cut right into the corners of the backing paper of the double sided adhesive tape)

You may find it easier to use a pair of sharp scissors to cut around the black outline of the template or you can use the craft knife if you prefer.

Remove the paper template and the backing paper from the double sided tape and position the foam over the outside edge of the viewfinder as shown.
Guard Ring to Prevent Unwanted Operation of the WB button
Quite often i was finding the "fleshy" part of my thumb was inadvertently operating the White Balance button making it impossible to take an image just when you want to. I came up with the idea of a guard ring around the navigation buttons which meant that the buttons had to be pressed with some determination and hence solved the problem. The material I chose was a 22mm fibre sealing washer (3/4 inch) which was sold in packs of 5 in a large DIY store as replacement sealing rings for brass pipe fittings.

The fibre washers

The ring needed sanding slightly to make it a perfect fit around the central ring of the navigation button. You can abrade the material very easily and applying a very slight shamfer will ease the construction.

after sanding to the correct size, rub over one side with a black felt tipped pen.

Using a clear silicone based adhesive apply a SMALL bead of the adhesive around the washer and then place it over the navigation button ring and allow to dry.

The finished "guard Rail" in place.
Shooting 3D images with the FZ200

Select 3D from the SCN Mode on the top control dial.
To capture the 3D image, press and hold down the shutter button and pan the camera slowly for a distance of 10cms or 4 inches (replicates our eye spacing!) taking about 4 seconds to complete the pan
3D image generation is usually performed optically with 2 lenses creating 2 distinct side by side images however in the Panasonic Lumix FZ200 achieves this by analysing a burst of images taken while moving the camera and using parallax to generate depth information.
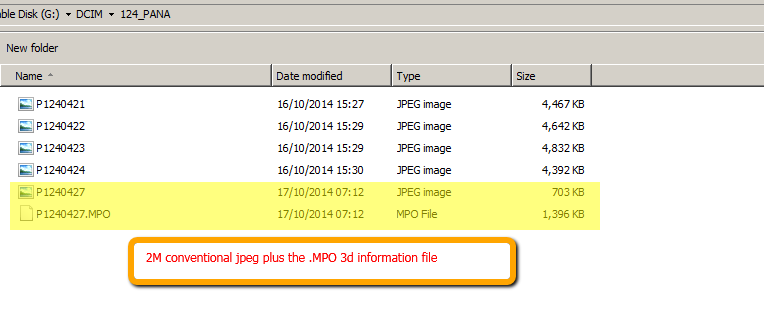
Two files are subsequently created and recorded on the sd card: a conventional JPEG for normal viewing and is 1920 x 1080 size and about 2MB in size, and an .MPO file which contains this depth information.
When you connect the camera over an HDMI cable to an 'MPO-compatible' 3D-TV both files are interpreted into a single 3D image. However unlike commercially produced 3D content, the images appear only to extend behind the subject and not in front of it as well.
Panasonic's 3D mode requires you to simply move the camera horizontally in a straight line and they recommend a movement of about 10cm (4 inches) and taking about four seconds to complete this small movement for the best results.
The FZ200 only takes the two of this series of images to generate the 2D image and .MPO depth information file.
When viewed on a 3D TV, you can peer around objects to a certain extent and there's certainly a convincing impression of depth conveyed. The amount of success is very much subject dependant and lighting contrast does help to generate the illusion of more depth to the image
Dealing with Highlights, how to go about retaining as much highlight detail as possible

With cameras like the Panasonic Lumix FZ200 employing the 1-2/3 inch sensor (blessed that it is only 12 megapixel) capturing and recording a large range of tones (called the dynamic range) is quite challenging. Particularly sensitive to image data loss are the highlight details in an image. When trying to capture an image which has inherent high contrast, or one which is being lit to such a way that it is forced to be high contrast it is essential to take care of this overexposure situation if highlight detail is lost (often called "blown highlights"). In the scene above, which is being lit by 3 lights, a main to the left, a fill to the right on reduced power and a top light for the hair, I deliberately chose the dark background to further stress the camera metering.
Uncorrected, the camera set the exposure based upon my centre weighted pattern setup and the resulting image shown below.

As you can see from the image the mid tones are acceptable as are the shadows, however because the camera has taken into consideration the dark grey backdrop it has caused overexposure to take place. the result is loss of detail in the hair. This detail is gone forever, no amount of post processing can bring it back.
If you are not aware of it there is an extremely useful setting in the setup menu called HIGHLIGHTS and this setting will cause any parts of an image which is overexposed to "blink" when reviewed on the LCD screen (even during the
2 second preview) as seen in the image below

Once you are aware of these areas you can apply EXPOSURE COMPENSATION to correct this. Also worth mentioning here is the use of the Photostyle settings. Those which add contrast such as the VIVID, LANDSCAPE and to a smaller degree the STANDARD one can cause the highlights to be exagerrated. With high contrast images dialling back the contrast to -2 can rescue some of it. In camera processing such as i.Dynamic set to HIGH can also constrain the highlights but this boosts the shadow section as well. Image noise is also increased. My own preference is to turn this off and correctly set the highlights to peak properly.
In the image below dialling in exposure compensation of - 1 and 1/3 EV units stopped the clipped highlights.

If you notice in the histograms, the overexposed image has large counts of white pixels ( those on the right hand side - hard against the edge of the graph). These counts are disproportional to the actual amounts of highlight pixels in the scene. In the second image the distribution of pixels shows a lower number of pixels in this region. The shadows are being compressed at the lower side, however it is preferable to the blown highlights. post processing using curves adjustment can expand some of this region if needed, as shown below.

Determining the Shutter count on the Panasonic Lumix FZ200
I was asked recently if I knew a way of determining the actual shutter count of the FZ200 camera.
This is the method to access the service screen to give you this information.
First you need be quite dexterous as you have to handle 3 buttons simultaneously, but here goes.
1. Set the Mode dial to P and insert a memory card in the camera.
2. With the camera OFF, press and hold the red REC button down and at the same time hold down the ISO button
3. Now turn ON the camera and allow the lens to extend
4. Now Hold these three buttons down Menu/set, left navigation key and finally the REC button
You should bring up the zoom sensor screen, release the three buttons.
5. now repeat step 4 again to bring up the info screen and you will see SHTCNT as the second item in the list.
If you want to see when the camera was first ever turned on press the SHUTTER button and this will take you to page 1 of the info screen ... 1st: is the power on date.
To exit the service screen just power off the camera.
Don't access any other screens as it is possible to render the camera unusable with incorrect parameters set!
Preventing Unwanted Button Presses on the FZ200

A few subscribers have asked about the ring that I have fitted around the navigation buttons on my FZ200 camera. I dis this because the lower part of my thumb was always catching the WB control and preventing me from taking exposures when I wanted to.
The ring itself is a fibre washer used in some brass plumbing fittings to act as a seal between the two mating surfaces. I purchased it as a replacement spare part from a DIY chain store in the UK (B&Q) and it is 22mm size. In the USA this will probably be 3/4 inch. I needed to just shape the inside edge of the ring to match the shaped profile of the D ring control with a small piece of sanding paper. Once the ring was sanded it allowed the face of the ring to sit flat on the camera body. I just used 3 pieces of double sided adhesive tape to hold it in place, trimmed so as not to show behind the ring. To make the ring less obvious I coloured it black using a black felt tipped marker pen. No more inadvertent WB presses now!
Camera Tripod Mounting Ring for Panorama Shots and Teleconversion Lenses - for FZ200


This replacement tripod mounting ring "D" for the Canon 100mm f2.8 macro lens (IS version) or the EF 180mm f/3.5L Macro USM or MP-E 65mm f/2.8 1-5x Macro Photo fits the FZ200 lens ring perfectly and when pushed all the way to the back, positions the tripod mounting hole directly underneath the lens node. This gives the ideal position for panoramic shots as the lens pivots around the central node makeing overlapping shots perfectly aligned. It also gives valuable support for the camera when using the LA7 conversion tube and a heavy teleconvertor lens like the LT55E. it allows quick and easy rotation of the camera from horizontal to vertical mode just by slackening the clamp screw and rotating the camera body. It requires no additional padding material to allow it to fit the lens barrel.
It's available on Amazon. To purchase just click the appropiate link below. Review on Youtube shortly
