 Graham's Photography Blog & Technical Reviews
Constant Aperture Lens - What is is and why it's important.
Shooting Using A Light Tent
Using a light tent to capture images without distraction images caused through reflections on shiny surfaces etc is a good way to display images of articles for sale on Ebay etc.
I have a very old tent which was really poor quality and I gave up using it soon after I purchased it.
As we all need some challenges in these times I decided to try using it again to photograph a highly reflective chromium plated figurine.
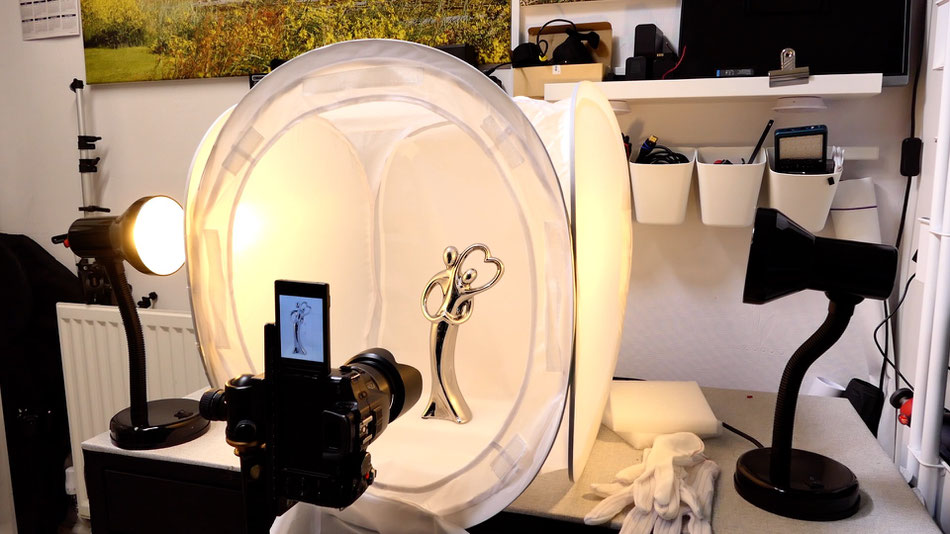
So this was the setup using this light tent.
Two 5w LED light bulbs were used in the table lamps and placed on either side of the tent.
The camera lens is placed inside the tent through a slit in the front cover of the tent.
I had to raise the height of the figurine otherwise the camera was too high giving a distorted view at this wide angle setting.
With the level of whiteness inside the tent it is likely that you will need to use +ve exposure compensation to keep the whites, white.
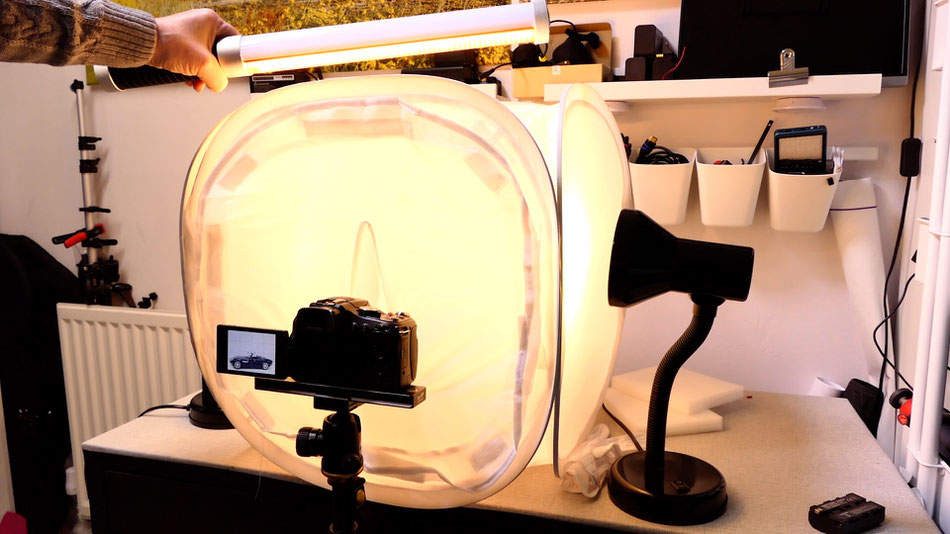
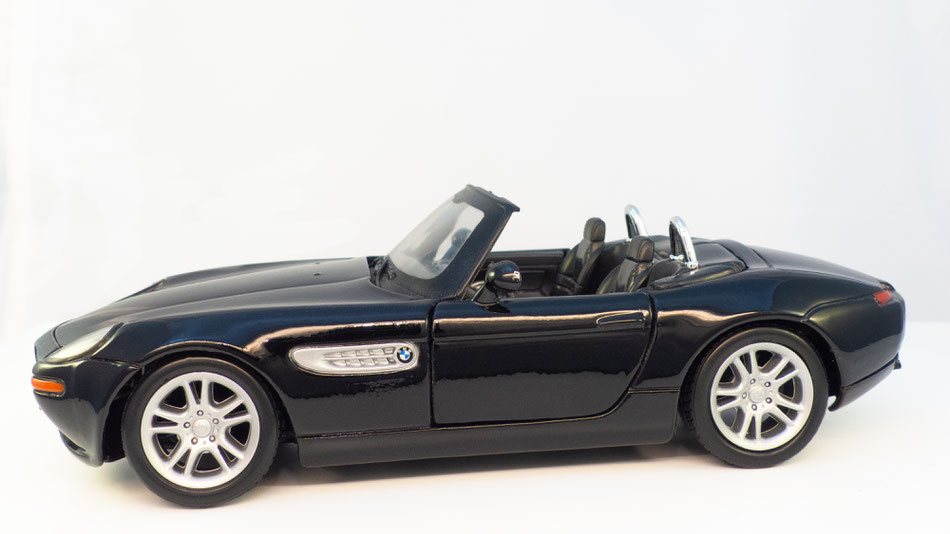
The second image was a black model sports car. To add the contour lines I added light above the lent using a "light wand"

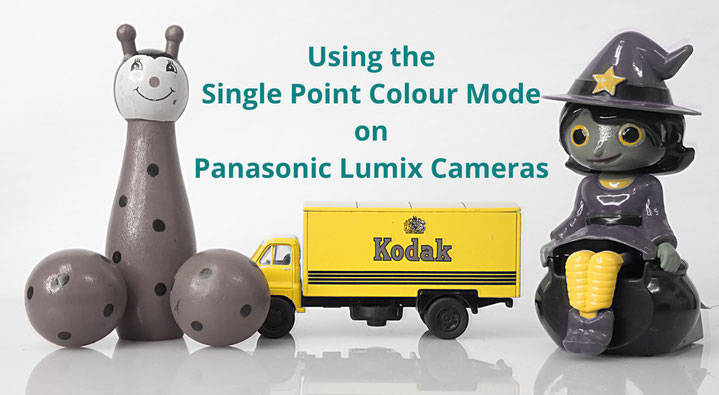
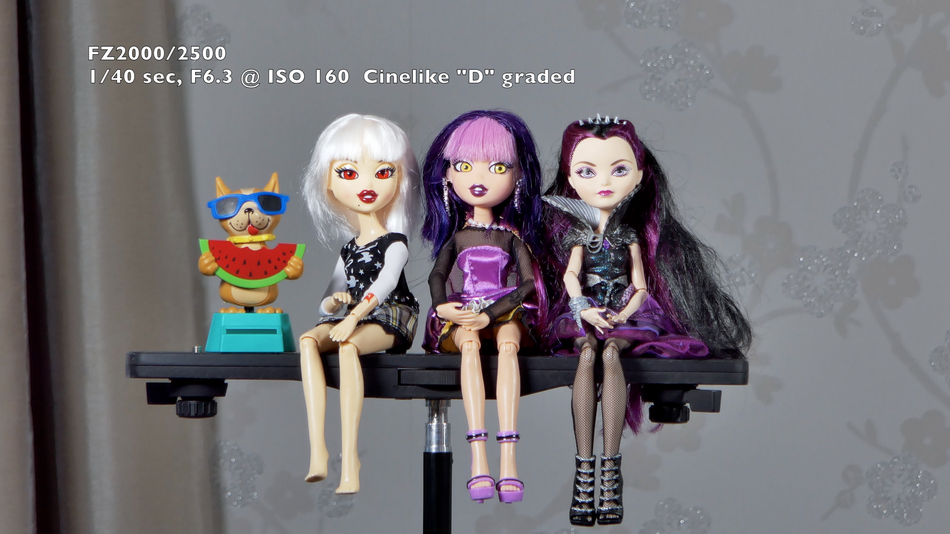
The One Point Colour Mode on Panasonic Lumix Cameras
This in camera JPEG operation allows you to select a single colour and isolate it from the image which will be monochromatic.
It can be used for both stills and video recordings.

An example of an image created using the single point colour mode with the colour set to the red hue of the ladies coat.
Al full video review of this operation can be found on my YouTube channel
https://www.youtube.com/watch?v=QiEJLtE7QRQ
The process of using this mode begins with turning the top mode dial to the creative filter position (artists palette symbol).
The next step will depend upon whether the camera has a touch screen or not.
With touch screen cameras when this mode is engaged the touch screen shows a "fly-out panel' with the necessary stages of colour selection (pipette symbol), colour depth (artists palette+), aperture control (landscape/portrait icon) and exposure compensation (+/-)
Cameras not having the touch screen use the Fn1 button to select the colour sampling mode and using the menu /set button to select it.
The WB (right navigation button) is used to adjust the colour depth and the back control wheel is used to adjust the aperture and exposure compensation (alternate on clicking inwards.
Video recording can be done by pressing the red video record button.
This is a JPEG only operation - any RAW format images that are shot as part of RAW + JPEG option will be full colour images.
Creating Background Blur with Small Sensor Cameras
When shooting some subjects it is often desirable to throw the background nicely out of focus. In other cases where we want to, say, show a plants environment we need to create a very large depth of filed.
With small sensor cameras (type 1inch and 1/2.3 inch sensors) creating the blurred background can be quite a challenge as the inherent DOF of the lenses on these systems is quite large.
If we consider the equivalent apertures compared to full frame (35mm) cameras we can see part of the problem.
The crop factor of the 1/2.3 inch sensor cameras is 5.6. This means that the equivalent aperture at any focal length is 5.6 times the aperture of the small sensor camera like the FZ300/330 or FZ80/82. If we consider the widest aperture of f2.8 on these cameras they render the same depth of field as f11 to f16 on a 35mm FF camera system!
The type 1 inch sensor cameras (FZ1000, FZ2000/2500) fair slightly better with their 2.7x crop factor. So the f2.8 lens renders the same depth of field as the f8 lens on a 35mm (FF) camera system.

With these cameras we have to use the physics of the optics of the lens to help us produce this nice out of focus background.
If we use the long telephoto optics of these cameras we know that the depth of field decreases as we increase the focal length.
If we also decrease the camera to subject distance then the zone of focus also decreases.
If we add the final component into the equation of using a large aperture then we have the best possible conditions to create a blurred background behind our subject.
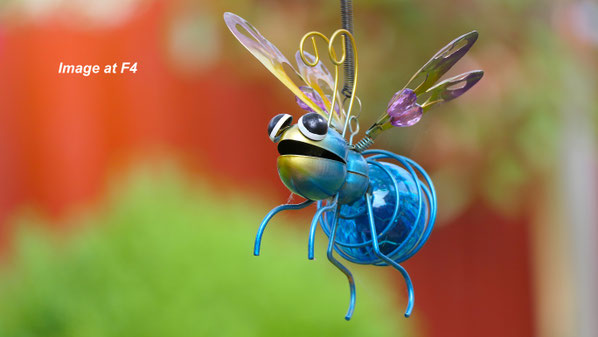
The image (left) was taken at 400mm EFL, F4 with the FZ1000 camera at a distance of 1 metre from the subject
At 400mm EFL and an aperture of F4 at a distance of 3 metres you can the depth of field created by the 1 inch sensor FZ1000 is only a few centimetres deep. Ideal for creating an out of focus background to isolate our subject from its background.
So in summary to create this blurred background keep the camera set to the widest aperture, the lens towards its longest focal length and try to shoot at a distance of 1 metre to the subject and keep the subject as far away from the background as is possible

Enabling and Using EX and EX TELE modes on Panasonic Systems Cameras
All of the G, GH, GX and LX series cameras have the option to use the EXtended optical zoom and the TELE converter function yet I suspect a few user's don't know that the modes exist and how to use them.
As covered in the next section EX zoom isn't a true optical zoom it is achieved with a combination of sensor-cropping as well as down-sampling that is used to derive the Medium ("M") and Small (S) picture size, it would seem to me to be very likely that the Bilinear re-sampling algorithm is what (due to processor resource and exposure time constraints) is used in digital cameras - whereas post-processing editors (like Photoshop) commonly provide options to use Bicubic, Lanczos, and other notably higher quality re-sampling algorithms.
The TELE mode take the advantage of a direct crop from the sensor using the fact that there are more pixels than are needed for creating a video clip.
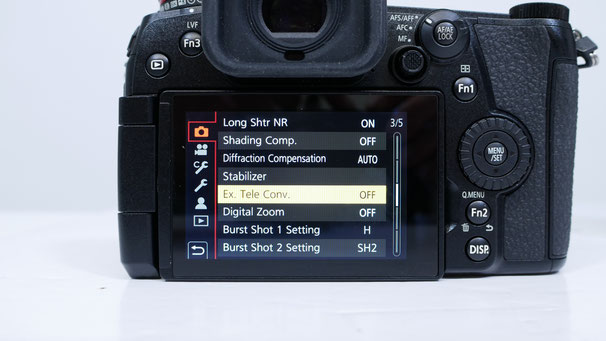
The EX Mode is enabled for stills photography in the REC setup screen and can be TELE CONV or ZOOM mode
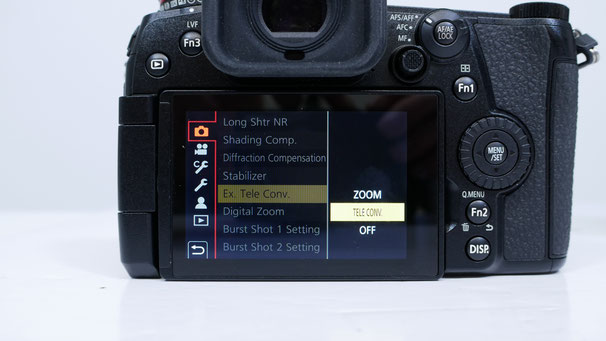
TELE CONV provides a fixed x 2 zoom and the Zoom mode gives a x1 to x 1.4 zoom
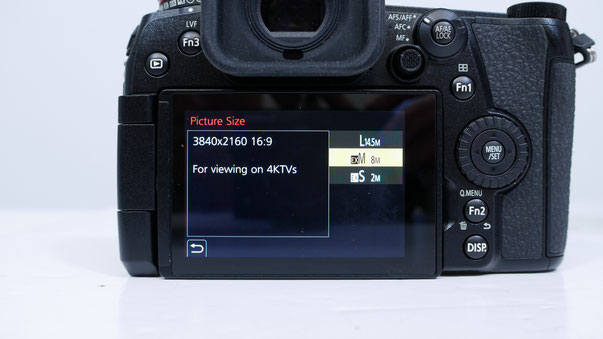
Once the Tele Conv or Zoom mode is enabled, in the picture size scene you will now see EX modes have appeared against the M and S size settings.
Note if you have set ant RAW formats the option will not be available as this is a JPEG option only.

Use the "fly out" panel on the LCD screen to access the feature of T _ W to adjust the zoom ratio when using the ZOOM mode/
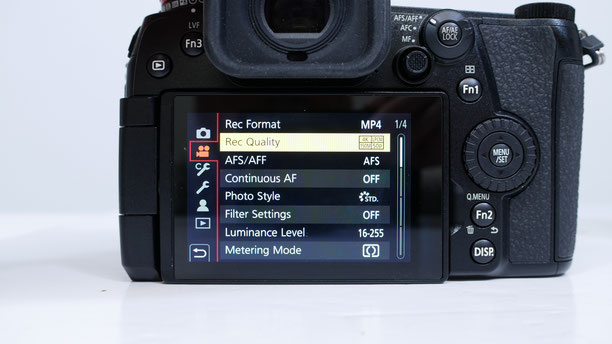
The TELE CONV function can be used in the video modes as well. Be aware that in the GH3 the 50/60p mode in FHD cannot be used - only in the 25p mode. To achieve the same effect in 50/60p use the Digital x2 xoom instead.

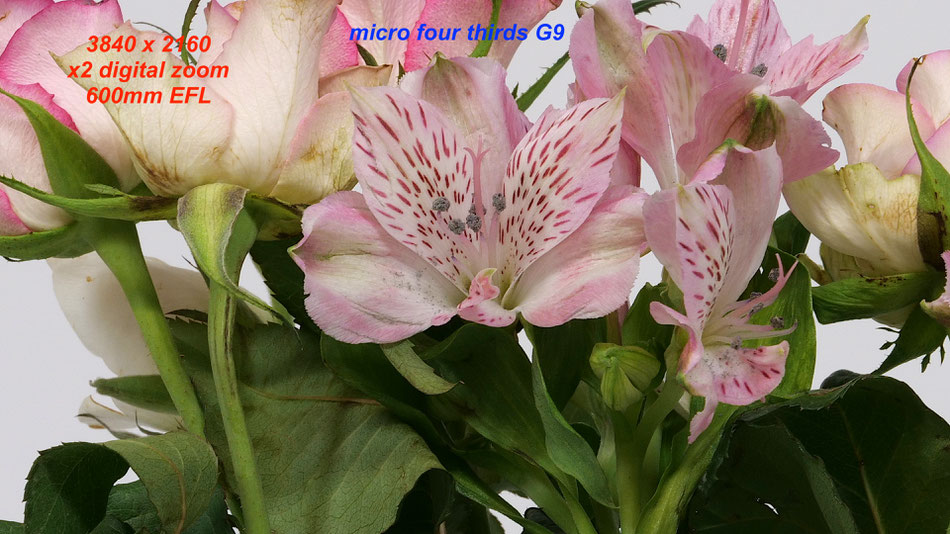
Panasonic EX Zoom, i.Zoom and Digital Zoom on the FZ1000/2000/2500
I know that I have covered this topic before on the FZ200 but I wanted to look at any changes that Panasonic may have done to these operations in the type 1inch sensors where, technically, we should be able to see some better results due to higher resolution and better noise control of higher ISO images.
Let's begin by looking at the much misunderstood EX Zoom or as Panasonic call it extended optical zoom with NO loss of quality.
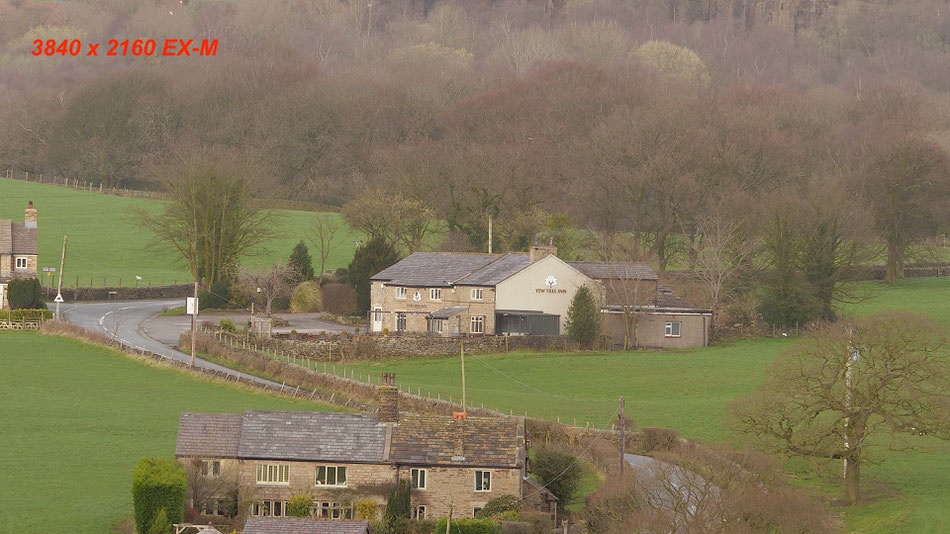
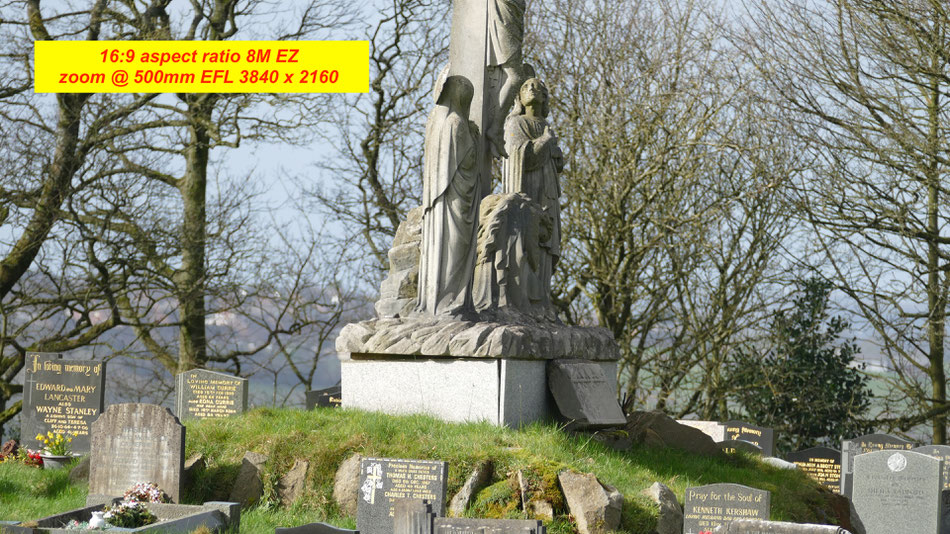
So at x1 zoom or 25mm EFL we have 5472 x 3080 pixels and at x16 zoom or 400mm EFL we have exactly the same 5472 x 3080 pixels. Now if we select the 8M EX image size at 25mm it gives 3840 x 2160 and at x16 or 400mm gives the same 3840 x 2160 pixels. Now as we increase the zoom beyond the x16 marker we find we can get up to almost x22.4 zoom. If we look at an image created at this magnification it is still 3840 x 2160 pixels. At any intermediate zoom from x16 to x 22.4 the image dimensions remain the same 3840 x 2160 pixels.
What is happening? Well at 25mm the RAW to JPEG processor is taking the 5472 x 3080 pixels are applying some down sampling to give 3840 x 2160 pixels. Similarly at the end of the x16 optical range of the zoom it is applying the same degree of down sampling to still produce 3840 x 2160 pixels. Now the magic begins! Go beyond the x16 and the JPEG processor is taking less area of the sensor pixels and still down sampling this to 3840 x 2160. This downsampling of the sensor image continues until we reach the physical 1:1 image crop of 3840 x 2160 which is the 8M or 4K video frame size. So it looks like we have zoomed into the image yet still kept the same image pixel dimensions. Easy to believe that you have extended the optical range of the lens! At the full extent of the zoom lever travel (x22.4) it is the direct 3840 x 2160 pixel crop of the sensor that the camera is using.
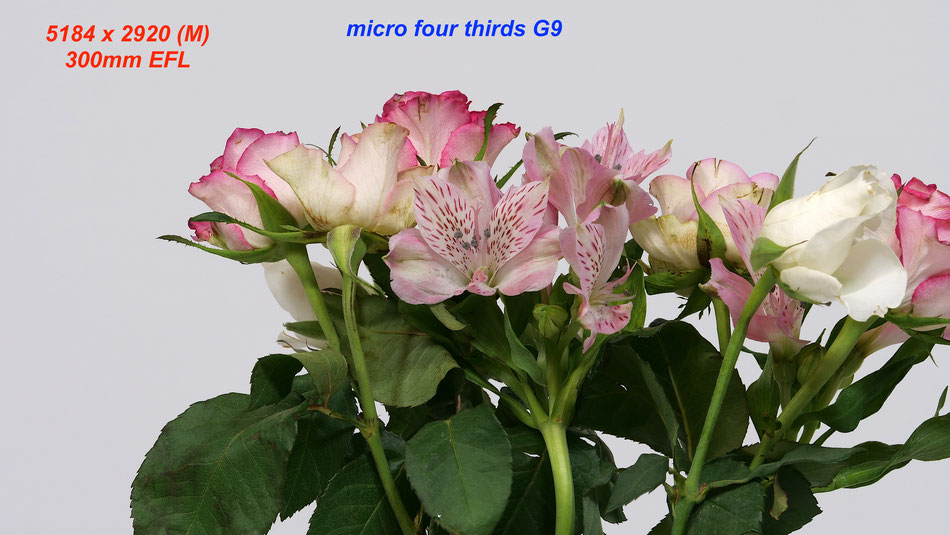
But wait, all is not bad here! There is a beneficial advantage of using down sampled images from the camera. Firstly the down sampling adds extra sharpness in the image. the more the down sampling the stronger this effect appears to be. Secondly noise is also reduced by the processing giving a cleaner looking image. I hear you saying why buy a 20 megapixel camera and use only 8Megapixels! Well yes it's true by using the lower image dimensions the ability to produce big enlargements or crop into the image is a little reduced but for the usual 6inch x 4 inch print or HD computer display we only require 2M images anyway and the 3840 x 2160 image is the perfect match for 4k displays!
So what happens with the i.Zoom operation?
Well up to the x16 zoom position the situation is exactly the same, the pixel dimensions remain constant.
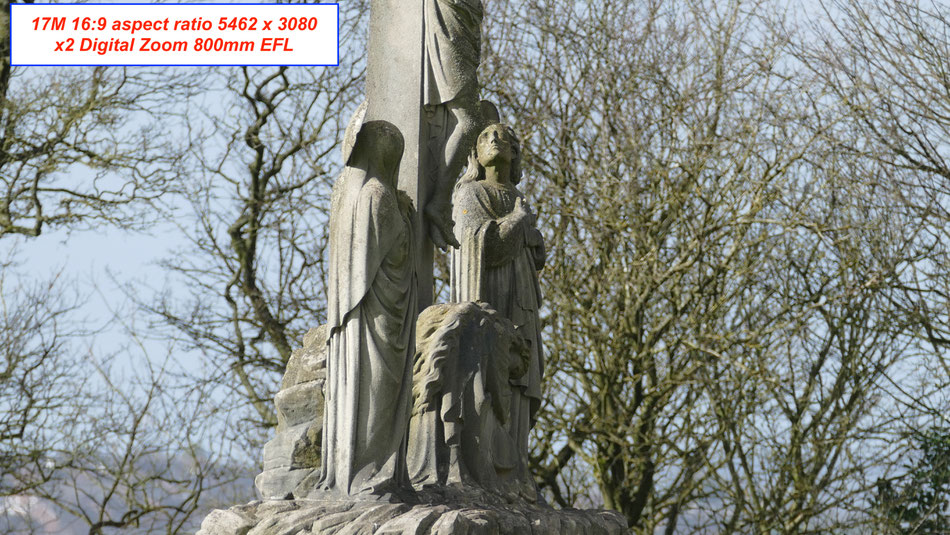
However when we start to progress from x16 to x32 (800mm EFL) the RAW to JPEG processor is using the cropped sensor image pixel dimensions but instead of downsampling to 8M pixel dimensions it upsamples the image using some form of interpolation to achieve the same 5472 x 3080 pixels. Thus we always have the 17M pixels in the image even though they have been upsampled from far fewer (1920 x 1080).
This why it is important to stay around about x1.5 or 600mm EFL where the sensor pixels are still 3840 x 2160 before upsampling.
and what happens if you combine i.Zoom with EX zoom?
Well you use the EX zoom pixels until x22.4 zoom and then you add the x2 upscaling from the i.Zoom to end up with 1600mm EFL.
Digital zoom applies between x1 and x4 magnification of the sensor pixels from x16 to x64 or 400mm EFL to 1600mm EFL.
So what is the difference in image quality?
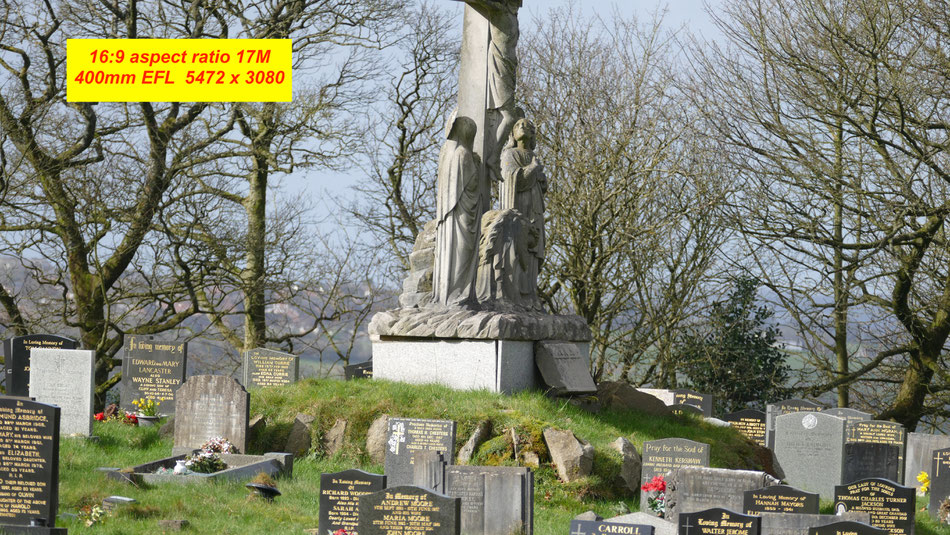
Given the same output image size, either screen or print, there is to my eyes no change in the image quality at full size 400mm EFL (x16 zoom) and the 400mm EFL 8M EX zoom and the 400mm EFL 2M EX zoom.
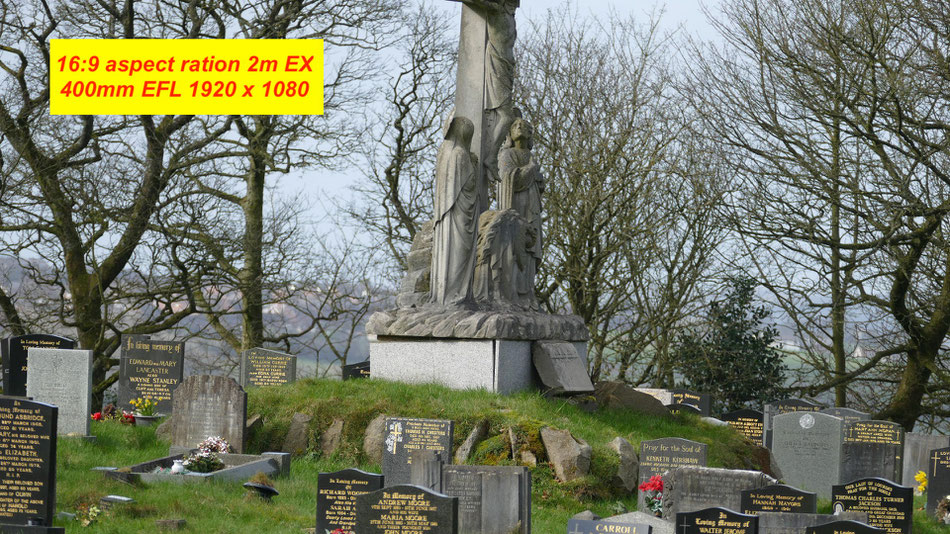
At the same print image size the 17M image is the same as the 2M EX image (one might argue the 2M image looks a little sharper due to the resizing process!)
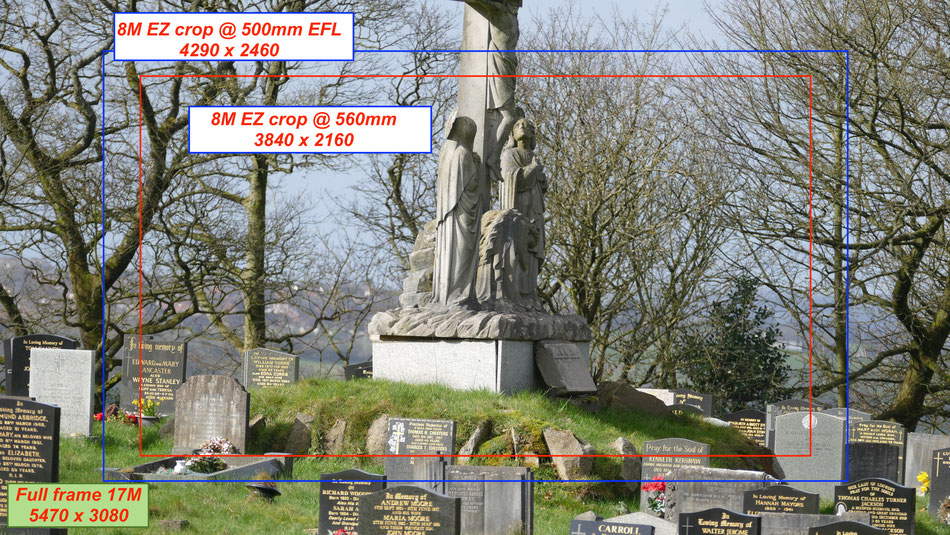
Now let’s look at the images when we start to apply some extra optical zoom.
The first image is with a zoom setting of around 500mm EFL and the second image is with the full zoom applied giving the maximum zoom of 560mm in this mode.
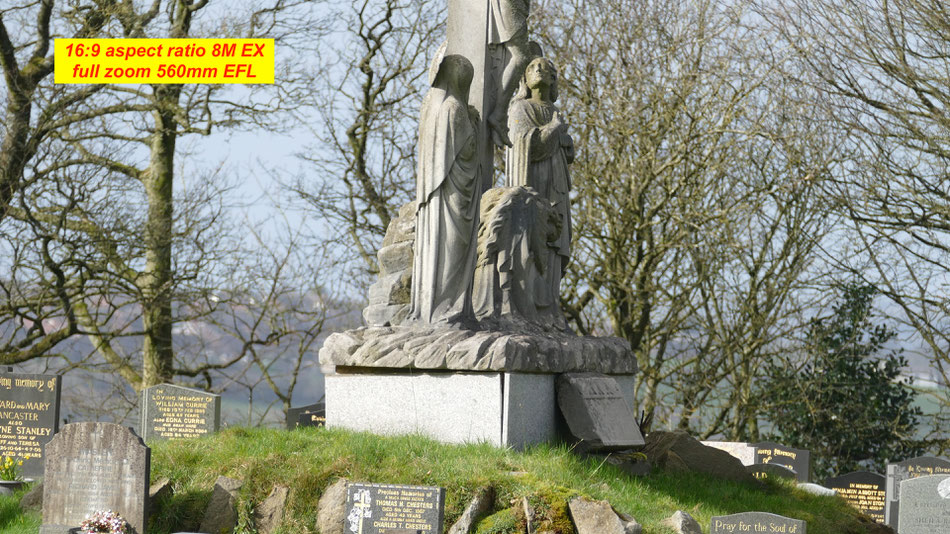
Again, the image quality is indistinguishable at normal print or screen sizes.
Remember at 300dpi (the normal print resolution) the 3840-pixel wide image will yield a print which is 13 inches wide.
For larger, say canvas prints where the prints are normally viewed at greater distances, the print resolution can be sometimes accepted by print laboratories at 150 dpi thus yielding a 26 inch wide print.

When we look at the situation where i.Zoom is used the same 5480 x 3080 file is expanded by cropping into the pixel area and then resizing the image back to the 5480 x 3080 dimensions. The processor also applies additional sharpness and "clarity".
When digital zoom is applied the image is cropped and upscaled however there is no additional sharpening of contrast added
Whilst Panasonic's "EZ Zoom" is a combination of sensor-cropping as well as down-sampling that is used to derive the Medium ("M") and Small (S) picture size, it would seem to me to be very likely that the Bilinear re-sampling algorithm is what (due to computational resource and time constraints) is used in digital cameras - whereas post-processing editors (like Photoshop) commonly provide options to use Bicubic, Lanczos, and other notably higher quality re-sampling algorithms.
4K Video Comparison Test
A test between 6 cameras shooting in the 4k Video mode,
Not a professional level test but one which will hopefully show any quality differences between a 1-2/3 inch sensor, Type 1 Inch, Micro four thirds and APS-C
The images below are screen shots from my test video.
You can click on the image to view full size(and click again for higher magnification)
The 1-2/3 inch sensors show more depth of field but lower resolution and loss of highlight detail.
The EOS m50 did a great job despite it's poor reviews for 4 K video. I like this camera combination


Challenging Old Rules - Linear and Circular Polarising Filters
When we start learning about photography we pick up allsorts of hints, tips and accepted rules about photography and photographic science.
One of these "rules" surrounds the use of polarising filters with cameras. It is recommended to always use the Circular Polarising filter because of the nature in which it works and doesn't affect the automatic focus and metering systems of DSLR cameras. When using a Linear Polarising Filter focus and metering can be affected by the way in which the filter affects light being reflected from the 45 degree mirror in these cameras.
But what about the Mirror less and Bridge camera are they affected in the same way and is there a compelling reason to use Linear filters in these cameras.
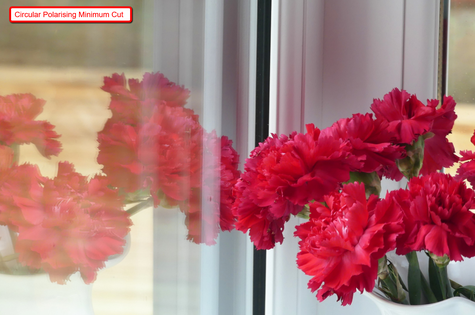
Here's an image of a reflection in a window.
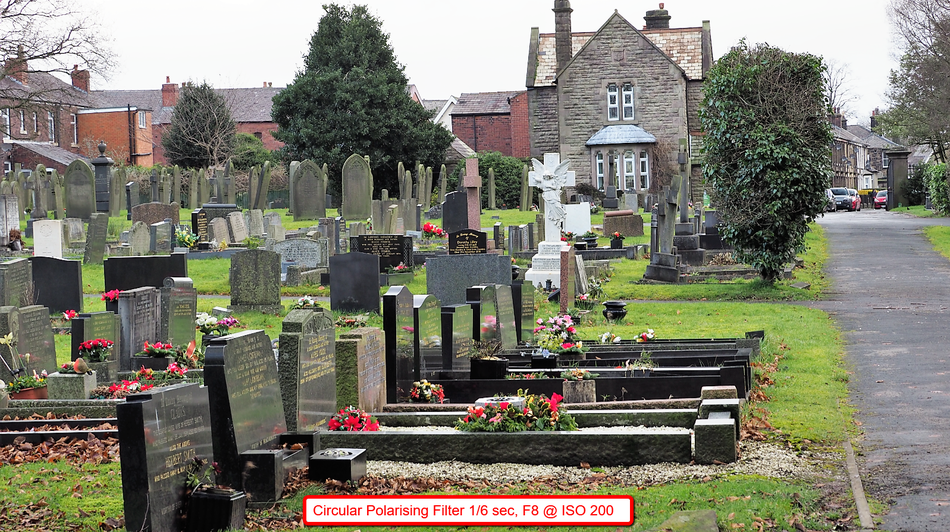
The FZ330 is fitted with a Circular Polarising filter set for minimum cut.
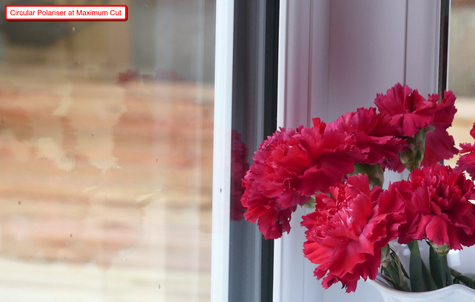
Here's the same image with the filter rotated to give maximum cut
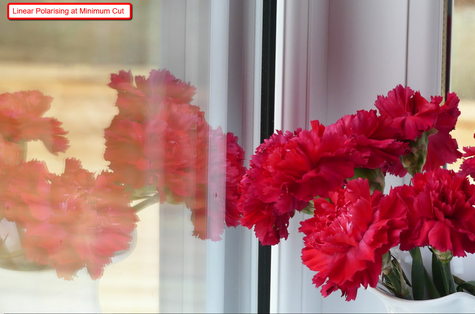
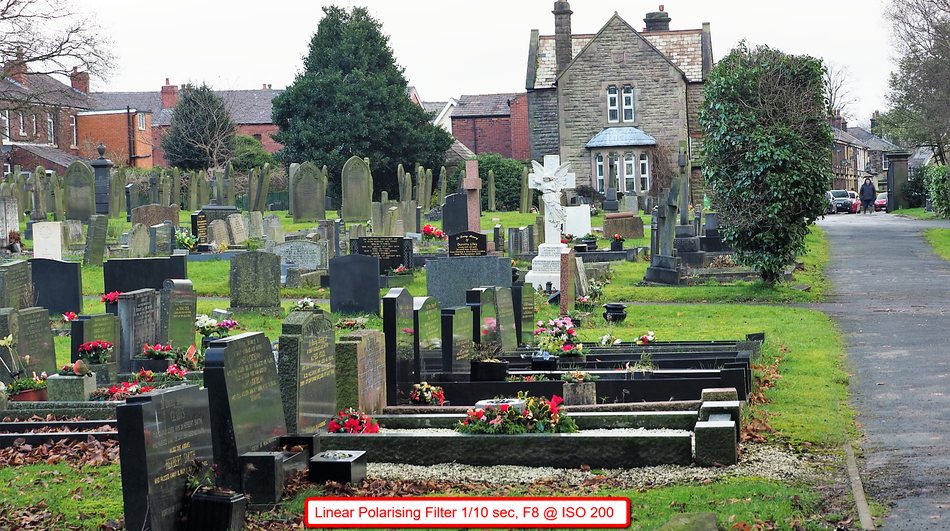
The same shot taken with a Linear Polarising filter at minimum cut

Here's the same shot with the filter turned to give maximum cut.
So photographically there is very little difference between the shots at maximum cut with either filter - or is there?
Well because the circular polarising filter is constructed with a linear polarising filter plus another circular polarising filter (1/4 wave plate) bonded to it, it has a higher light transmission loss than just the linear polarising filter.
Take a look at the some other exposures. With the circular polarising filter 1/6 sec and the Linear polarising filter 1/10 sec and 1/15 sec without any filter. So with the circular polarising filter we lose one and a third f-stops of light versus two thirds loss with the linear polarising filter.
This might not sound a lot but a difference of 2/3 rds of a stop is significant with the light gathering needs of cameras like the FZ200/300/330 with small sensors.
We need the maximum amount of light gathered by these sensors in order to get good images which are not ruined by noise in the image.
So is there a loss of focus and metering accuracy when using a linear polarising filter - well I did 5 exposures using single point AF method without the filter and then repeated it with the filter and there was no difference in focus point. Rotating the filter did not affect the exposure reading so it is apparent that with both the bridge camera and the mirror less CSC (I used the OMD -EM1 mk2 for the test) that there is no loss of accuracy.
So with the linear filters being cheaper and pass more light into the camera it is time to write the rule books again in my opinion for CSC and Bridge camera users.
Why Digital Cameras and Smartphones Save Images to the DCIM Folder
Every camera — whether it’s a dedicated digital camera or the camera app on your Android or iPhone — places the images you take in the DCIM folder. DCIM stands for “Digital Camera Images.”
The DCIM folder, and its layout, come from DCF which is a standard created back in 2003.
DCF, or “Design rule for Camera File system” is a specification created by JEITA, the Japan Electronics and Information
Technology Industries Association.
DCF is so valuable because it provides a standard layout. The DCF specification lists many different requirements with a goal to guarantee interoperability.
The file system of an appropriately formatted devices — for example, an SD card plugged into a digital camera — must be FAT16, FAT32, or exFAT.
SD cards with 2 GB or larger of space must be formatted with FAT32 or exFAT.
The goal is for digital cameras and their memory cards to be compatible with each other.
Among other things, the DCF specification mandates that a digital camera must store its photos in a “DCIM” directory.
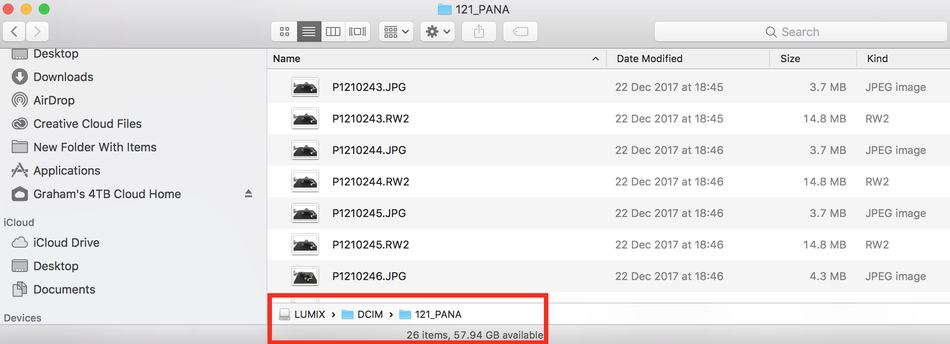
The DCIM directory can — and usually does — contain multiple subdirectories. The subdirectories each consist of a unique three-digit number — from 100 to 999 — and five alphanumeric characters.
The alphanumeric characters aren’t important, and each camera maker is free to choose their own.
On an Apple iPhone for example, the DCIM directory contains folders like “100APPLE,” “101APPLE,” and so on. On Panasonic cameras these are for example, 104_Pana, 118_Pana.
Inside each subdirectory are the image files themselves, which represent the images you take. Each image file’s name starts with a four-digit alphanumeric code — which can be anything the camera
maker wants — followed by a four digit number.
For example, you’ll often see Panasonic files named P1040001.jpg, P1180002.jpg, and so on. Each image folder having 0000-0999 image sequence number before incrementing the first four alphanumeric
number - for example P104 to P105.
The code doesn’t really matter, but it’s consistent to ensure the photos you take are displayed in the order you took them.
DCF is a “de facto” standard, which means that enough digital camera and smartphone makers have adopted it that it’s become a consistent standard in the real world. The standardised DCIM format means digital camera picture-transfer software can automatically identify photos on a digital camera or SD card when you connect it to your computer, transferring them over.
The DCIM folders on smartphones serve the same purpose. When you connect an iPhone or Android phone to your computer, the computer or photo-library software recognises the DCIM folder, notices there are photos that can be transferred, and often offers to do this automatically.
DCIM may not be the most obvious name the first time you see it — how about “Images or Photos”? — but it’s more important that it’s a standard.
If every digital camera manufacturer or smartphone operating system had its own unique pictures folder, software programs wouldn’t always be able to automatically find photos on a connected
device.
You wouldn’t be able to take an SD card from one camera and plug it directly into another digital camera, accessing the photos without reformatting the device or rearranging the file system.
Ultimately, just having a standard is important — whatever the standard is.
That’s why the DCIM folder has followed us from point-and-shoot cameras to smartphone and even tablet camera apps.
The Picture Transfer Protocol, or PTP, isn’t the same as the DCF standard, although it serves a similar purpose. It’s been superseded by MTP and other standards, but PTP is supported by
Android devices and iPhones for communicating with photo-management applications that support this standard.
If you want the history and background to the DCF system have a look here on Wiki
Macro Zoom and AF Macro Modes on Panasonic cameras
The new feature introduced on the FZ300/330/1000/2000/2500 is the macro zoom mode.
This mode sets the camera to its widest angle setting (25mm EFL) and then to provide additional magnification uses digital zoom up to x3.
Allowing a close focussing distance mode of just 1cm (under 1/2 inch) can prove challenging with lighting set ups. Natural history photographers may also come across the problem where insects may not allow you to get this close before flying off.
In video where the image resolution isn't needed to be as high as in stills photography the results can be quite good, especially if you shoot in 4K mode.
Whilst the choice of mode will be dictated by the subject size and camera to subject distance some of the best choices will still rely on the use of close up lenses to allow longer focal lengths/greater working distances to achieve the optimum image quality.
The close up lenses are supplied in sets of usually 4 or they can be purchased as individual strengths.
The usual range is #1,#2,#4 and #10.
To get a better understanding of how these work if you set the camera to manual focus and set the focus point at infinity then if you were to put a #1 dioptre lens In front of the main lens you would find that objects just one metre away will be in sharp focus.
attach the #2 lens and the infinity focus will now be 50cms and with the #4 lens it will be 25cms.
So we can get good image size at distances which allow insects etc., to be filmed without spooking them off.
Of course if you focus the lens closer than infinity the corresponding near focus point will be closer as well.
You will find how these distance change in the article about close up lenses here
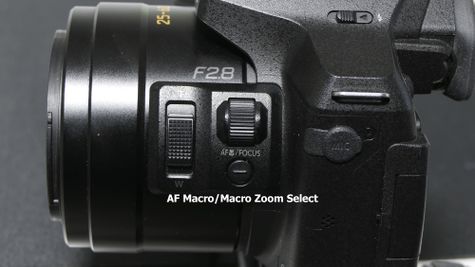
The mode is selected on the FZ300/330 with the push button on the lens barrel (assuming you haven't re-programmed this button to give FF/SS changes)
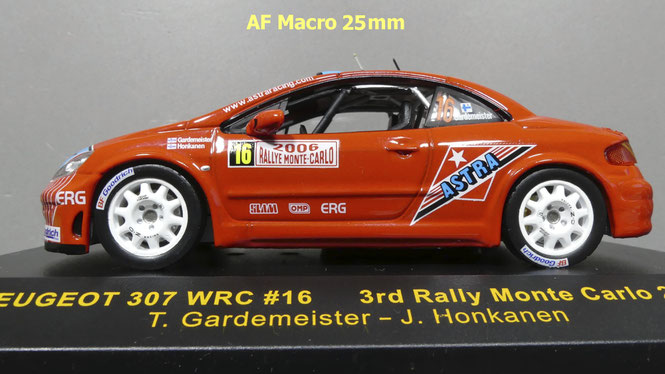
This first image is with the AF macro mode set and the camera lens to subject about 15cms (6 inch). The model car is about 10cms long (4 inch).

The second image is with the lens set to 35mm EFL
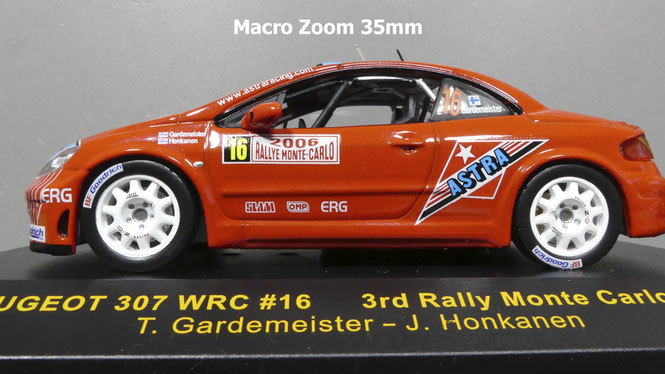
Switching to macro zoom the camera zooms out to 25mm and then I used the macro zoom option to bring the lens back to 35mm EFL.
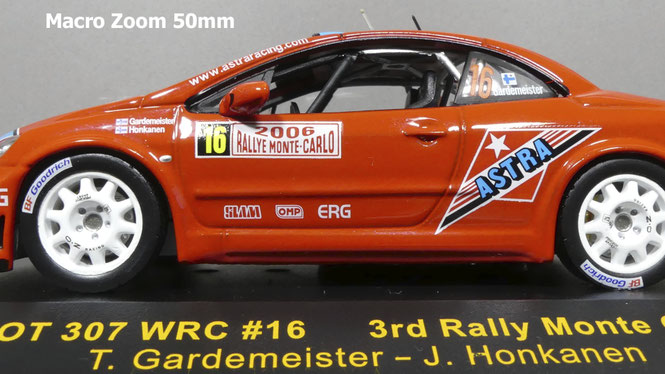
Again using the 2x digital zoom to bring the lens to 50mm EFL
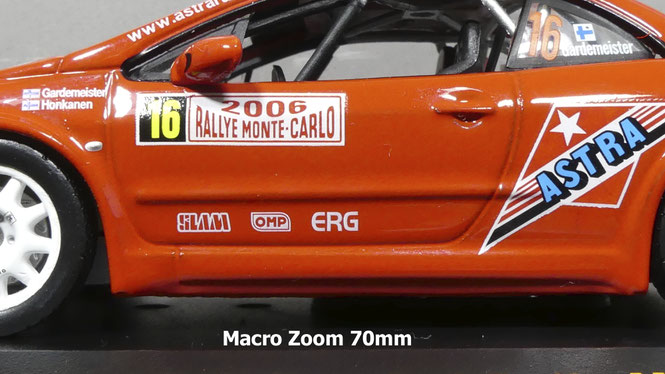
With the macro zoom almost fully engaged this image at 70mm is just showing signs of loss of resolution when enlarged to A4 print size
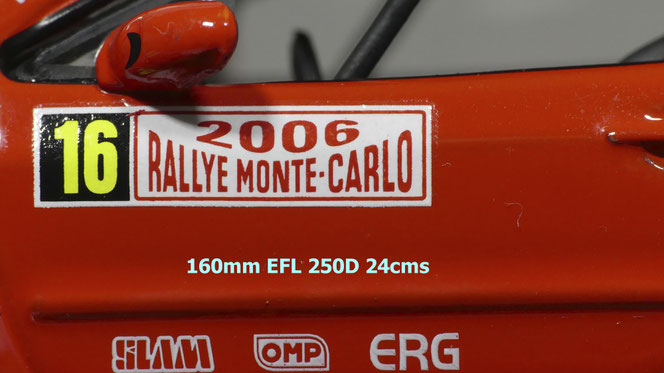
In contrast this image with the lens set to give 160mm EFL and with a 250D achromatic lens fitted #4 the image quality is still excellent at the working distance is 24cms allowing more opportunity to get good lighting onto the subject using ring flash or LED light rings.
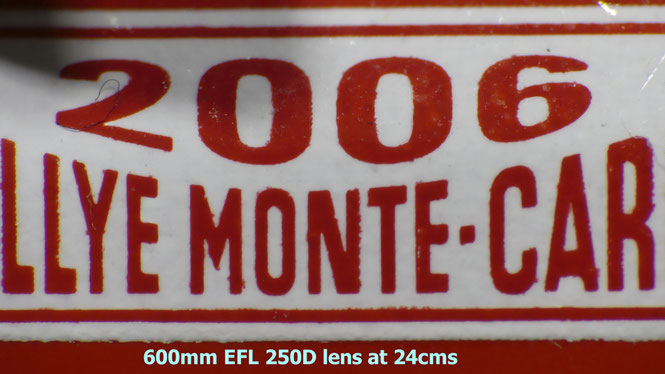
In this last shot you can see the field of view and magnification when the lens is set to 600mm EFL. The camera is still at 24cms subject to camera distance