 Graham's Photography Blog & Technical Reviews
Godox Virso S wireless microphone system

The Godox Virso S M2 is a 2.4GHz wireless microphone system with both internal and external microphones for recording audio. The system can record onto microSD memory cards or send audio to a device, such as a computer, camera, or smartphone.
The Virso S is specifically designed to work well with Sony cameras which have the proprietary Sony MI (Multi-function Interface).
The Virso S M2 system consists of one receiver with an OLED screen and two transmitters, all equipped with internal microphones and the facility to add an external lavaliere microphone.
What’s in the box?
Godox Virso S TX M2 Transmitter x 2
Godox Virso S RX Receiver
Three-way USB-A to USB-C Charging / Data Cable
Mic Windscreen x 2
3.5mm TRS-TRRS Audio Cable
3.5mm TRS-TRS Audio Cable
Omnidirectional Lavalier Microphone (LMS-12B AX) x 2
Hot shoe Cover
Storage Bag
User manual
Design features:
The bodies of the receiver and transmitters are made of black plastic with a smooth texture allowing the 2.4GHz wireless signal to pass through unhindered.

The Virso S M2 has a small OLED screen on the front of the receiver which is bright and displays useful information, it’s also flippable, making it easier to read when the camera orientation may not be ideal.
The top of the receiver has an internal microphone, an output port for a connection to camera which don't have a MI port.
All the controls and ports are labeled with small white icons.
One side of the receiver has a USB-C port for charging and a small factory reset hole.
The other side of the receiver holds the recessed power button and menu button for controlling the on-screen options.

The Virso transmitters have the same rounded design as the receiver with an oversized power button replacing the receiver’s volume dial.
The transmitters have three LEDs on the front indicating battery, connection, and mute/recording status. Including the power button, there’s also a 3.5mm port for connection of an external microphone and internal microphone.
One side of the transmitter houses the USB-C port and Micro SD slot. Using a memory card with the Virso S M2 allows for recording and storing up to 400 hours of audio on the memory card. Transferring that audio to a computer is easy using the included data cable or memory card itself.


The Operational Modes of the Unit
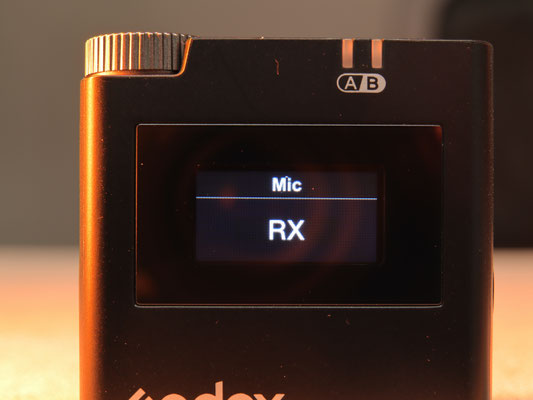
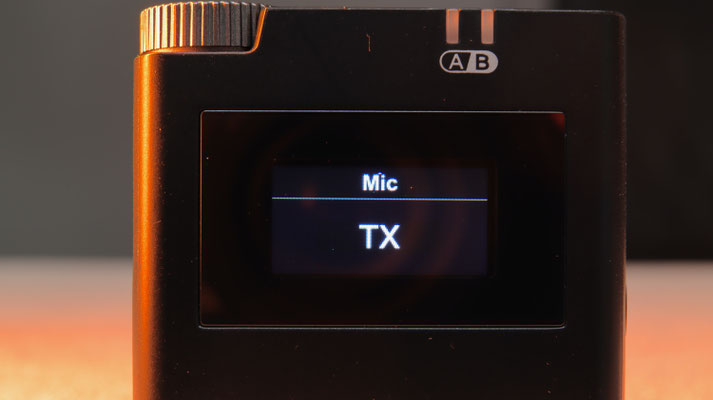
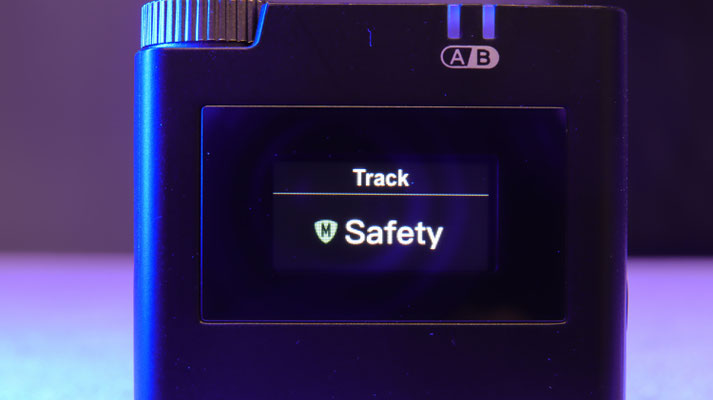
The receiver supports three track modes RX (mic in the receiver only), TX (mics in transmitters) and RX + TX where the mics from all units are employed. The mics can be selected from Mono, Stereo and Mono plus safety track.
As well as the Sony MI you can also use the 3.5mm analogue output port to connect to other cameras which have a mic input if you use the 3.5mm TRS to TRS cable supplied with the unit.
If you want to connect to a smartphone or tablet you can use the 3.5mm TRS to TRRS cable supplied (you may have to use the audio to digital convertor dongle if your device has doesn't have the 3.5mm TRRS socket).
To find out more about this versatile wireless microphone system my full review is available on YouTube

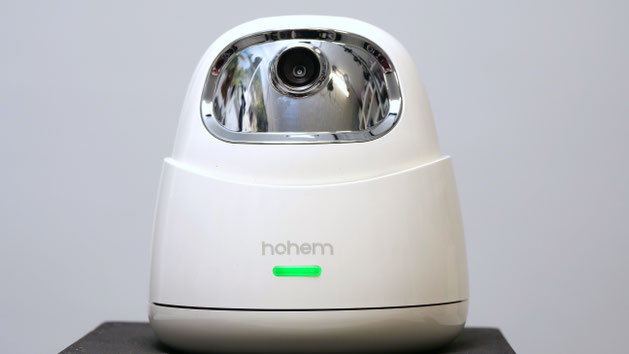
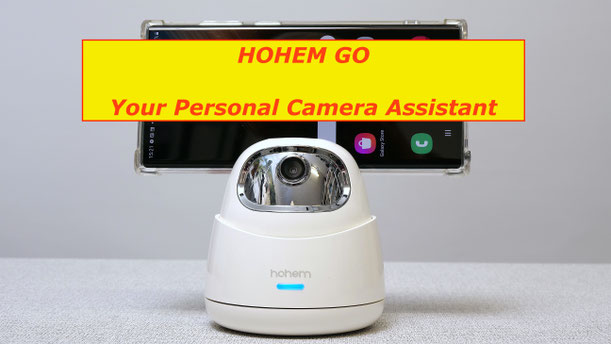
Hohem Go 2 Axis Ai Automatic tracking holder
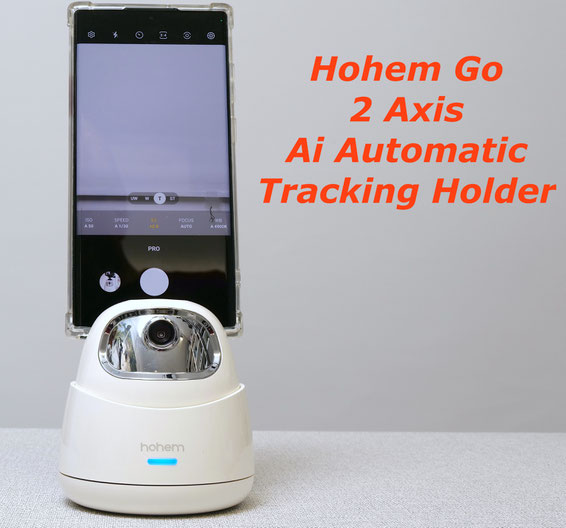
Benefiting from the advanced Face Tracking Algorithm, the GO motion tracking phone holder tracks your face through the built-in camera more smoothly and without blur. The unit does not require any "app" to be installed on the smartphone to operate it.
No matter how you move, the lens always follows on you.
Within the best face recognition range from 1.65ft to 9.84ft, the 2-axis 360 rotation selfie stand supports 360° horizontal tracking and 30° vertical tracking (that is +/- 15°), which is ideal for shooting video content that requires many movements, such as dance tutorials or live streaming.
[Gesture Control Frees Your Hands]
In order to make video shooting more convenient, Hohem’s GO auto tracking stand adopts gesture control to free your hands.
Make the "OK" gesture to enable tracking, while making the "PALM" gesture suspends tracking.
GO smart tracking phone holder allows for less manual adjustment to prevent any damage to the video equipment when you’re shooting cooking, makeup, painting tutorial videos, etc.
The Hohem Go is charged with a supplied USB-A to USB-C cable and the 5v PD USB supply charges the inbuilt 3.7v 2000mAH Lithium Ion battery in about 2 hours.
When charged the unit will run for about 10 hours in the tracking standby mode (Blue LED light showing) and about 7 hours in tracking mode (Green LED showing)
In use if the LED indicator flashes red continuously then the unit has less than 10% charge remaining and should be charged.

As this unit has a payload of 480 grams it can hold most of the current "action' cameras like the DJI Osmo Action or GoPro cameras.
These can be mounted if you make a simple bar 50mm long by 10mm thickness and 15mm high from metal or wood and then drill a 6mm hole in the centre of the 10mm dimension and then glue a 1/4 x 20 threaded bolt leaving 10mm pf thread exposed. A 4mm locking collar should be screwed over the stud to allow the correct positioning of the attached camera.
Travel zoom or other small compact cameras can also be mounted using this option.
I understand Hohem may be bringing out a mounting clip similar to my idea here.
The camera platform can accommodate phones/tablets up to a maximum thickness of 13mm. It can support 11 inch tablets up to the maximum weight of 480 grams.
If using a 11 inch tablet in the "portrait" mode there may be some stability issue if the camera tilts up at the maximum angle of 15 degrees.
If this is the case a small tripod may help to improve the stability. This can be screwed into the 1/4 x 20 threaded bush in the base of the unit.
A video review of this device is now on YouTube
Andycine S2 Ai Face Tracking Remote Camera Platform

Unlike many of the face tracking systems that now flood Amazon and Ebay this one has the feature of vertical movement in the camera platform so it allows you to be “followed” if you bend down of change elevation during your presentations etc.
It doesn’t need any app to be installed on the smartphone and is far more versatile than setting up a gimbal (which I have previously done).
It is “gesture” controlled to enable the tracking to take place – an “Okay” gesture made with your fingers starts tracking and an open palm shown to the camera stops it.
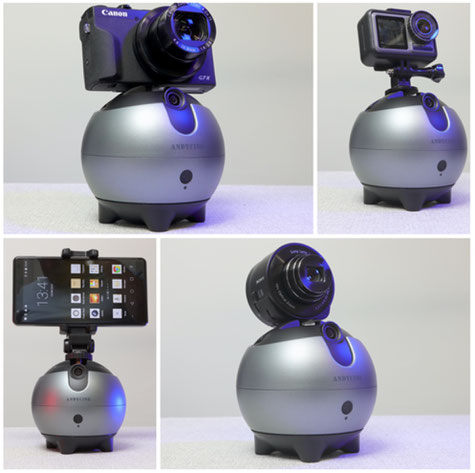
It has a payload of 390 grams so I was able to mount others cameras with great effect on the unit – especially useful with the action cameras and the compact Canon G7X mkIII.
With these cameras mounted on the unit and using an appropriate app on your smartphone you can start and stop recording on those.
The action cameras can also be controlled by voice command.
There is a little “play” in the stepper motor gearing and this is apparent if you change direction sideways – there is a noticeable jump as the unit moves to re-centre the lens.
Similarly with a heavy camera mounted on it the vertical movement also shows the changeover point with a slight jerk.
Overall though it’s quite a fun product and probably will feature in future videos – behind the scenes.
The video review of this product is now on YouTube. https://youtu.be/fgepLo5sSsA
Sony RX10 mk IV initial Review

The Cyber-shot RX10 Mark IV is Sony’s current high-end bridge super-zoom camera.
Announced in September 2017, it retains its predecessor’s 24-600mm f2.4-4 / 25x optical zoom, weatherproof body and OLED EVF, but has the latest type 1in / 20 Megapixel sensor and BIONZ X processor and from the RX100 Mark V.
This is crucial for allowing true phase-detect autofocus for the first time in the Sony line up of bridge cameras series and is the first time for any super-zoom bridge camera.
Phase-detect autofocus allows the RX10 Mark IV to quickly and confidently refocus making the long lens practical for sports, action and wildlife photography especially if combined with the camera’s 24fps bursts for up to 249 images.
This PDAF system can also be used in the 4k video mode which now avoids pixel-binning for higher quality.
There’s also Full HD at 120p and Sony’s HFR modes which film short bursts at 240, 480 or 960fps for super slow-motion.
Now equipped with a large XGA OLED viewfinder and a 3in tilting screen which is now touch-sensitive for the first time on an RX series and can also be used as a touchpad when composing with the viewfinder.
Wifi and NFC are now complemented by Bluetooth for always-on connectivity with your smart phone for easy GPS tagging.
In terms of design, controls and operation it’s virtually identical to the Mark III predecessor, sharing the same DSLR-styled weather-sealed body, XGA OLED viewfinder, tilting screen and lens optics.
The only external difference is the addition of a focus limiter switch below the focus hold button on the side of the lens barrel, offering infinity to 3m or the full focusing range.
The dedicated aperture ring is now knurled all the way round the bottom, making it easier to turn when you’re shooting with the screen angled up.
The touchscreen feature is new, however the menu system still can’t be navigated by touch.
Even the Fn menu with its large icons is crying out for it!
In the playback you can’t swipe, pinch or tap, thus limiting the touch functionality pretty much to moving the focus area during composition alone.
As you’d expect, you can tap to reposition the AF area either for stills or to pull-focus while shooting video.
The stabilisation feature has been improved, so while the number of f-stops of compensation remains roughly the same as before, the camera is much better at telling the difference between camera shake and genuine movements.
When using the camera you notice it straightaway, allowing you to frame, recompose and track much more easily at longer focal lengths.
In terms of shooting video, you can film 4k in 24, 25 or 30p with a mild crop, or shoot 1080 up to 120p.
There’s also Sony’s HFR modes which allow you to capture at 240, 480 or 960fps, now with maximum recording times of four seconds in Quality Shooting mode or seven seconds in Shooting Priority.
Interestingly the RX10 Mark IV supports proxy video recording so that a smaller 720p version can now share the same metadata and time-code as the original high resolution version.
This proxy file can be for easier editing if you have a lower powered PC.
You can of course also use this smaller version for quicker social media sharing purposes.
Focus peaking has also been improved allowing the camera to more clearly indicate the area in focus and do it more accurately and reliably too.
The headline feature is of course the new sensor with the embedded phase detect AF system, inherited from the RX100 Mark V.
Coupled with the enhanced BIONZ X processor and AF algorithms the RX10 Mark IV is transformed into a camera you can genuinely use to shoot fast action or sports.
315 phase-detect AF points are embedded on the sensor, covering 65% of its total area, or roughly 80% horizontally and vertically.
The AF system has a variety of zoning, expand or single area options which you can evaluate to find the one most suited to your shooting needs.
If you’re shooting portraits, there’s accurate Eye AF mode.
You can use one of the customisable buttons to offer AF-On functionality if you prefer to keep it separate from the shutter release.
The RX10 Mark IV also supports the Recall Custom Setting During Hold option which allows you to configure three banks of custom settings including the AF area and shooting mode – fantastic for switching between your general and fast action settings.
The RX10 Mark IV also boasts considerably faster burst shooting than its predecessor, capturing full resolution images at 3.5, 10 or 24fps. The camera will shoot at the top speed of 24fps with full autofocus and auto exposure for up to 249 frames, giving you ten seconds of continuous shooting.
2.4GHz Wireless Microphone Review

This microphone is available as a branded product from ZHUFON or unbranded from IDISKK for the IOS variant or unbranded at some £20 cheaper for Android devices.
Amazon Affiliate link for IOS Device:
https://amzn.to/3CwhJpC
For the USB-C device:
https://amzn.to/3ELKvV8
Further review to follow
YC ONION Lasagna Teleprompter mounting Option

component links (Amazon affiliate links)
SmallRig Camera Base Plate https://amzn.to/2UU0DkF
SmallRig 15mm dual rod clamp https://amzn.to/3rftRGO
SmallRig 100mm 15mm Carbon fibre rods https://amzn.to/3z16Slu
Arca style mounting plate https://amzn.to/2TlVstG
Arca tripod plate (long) https://amzn.to/3igh3Mx
Upgraded tablet holder https://amzn.to/3ksL12j
Final details of the mounting plate to be confirmed and will be added very soon!
Desview T3 Teleprompter Mounting Modification

This new mounting modification holds the T3 unit in place without having the weight of the unit on the lens.
It uses standard SmallRig components plus an easy to make mounting bracket.

The dimensions for making the aluminium support bracket from 35mm x 1.5mm aluminium angle.


The aluminium angle bracket is fixed to the 15mm dual rod holder using the 1/4 x 20 screws supplied with the rods. Use two 6mm washers under the screw heads.
Drill 6.5mm holes at the distances given in the drawing above.
The 5mm mounting set screws, drill a 5mm hole at each side of the bracket and use "Super Glue" to hold them in place.
Cut the two top clearance pieces from the angle using a hacksaw and clean up with a small file. These allow the rod clamp tighteners to rotate for locking.
The Arca plate is fixed to the camera plate using a 1/4-20 countersunk screw into the appropriate mounting hole for your size of camera and lens.
Depending upon the size of the camera fitted to gain the correct centre line height for the lens you may need to add packing under the Arca plate. You can use washers, MDF or plastic sheet. DSLR may need 8-10mm. Mirrorless cameras do not need any packing.
Component list from Amazon UK. (affiliate links)
SmallRig Camera Base Plate https://amzn.to/2UU0DkF
SmallRig 15mm dual rod clamp https://amzn.to/3rftRGO
SmallRig 100mm 15mm Carbon fibre rods https://amzn.to/3z16Slu
Arca style mounting plate https://amzn.to/2TlVstG
Arca tripod plate (long) https://amzn.to/3igh3Mx
Upgraded tablet holder https://amzn.to/3ksL12j
Desview T3 Teleprompter Review

The Desview T3 is the latest addition to the range of teleprompters - succeeding the T2 model with new features.
This new model can utilise up to 19 cms or 11 inch wide tablets as the projector source and also features mounting hardware for both smartphone and DSLR/Mirrorless capture/livestream.
The unit is made from all plastic materials apart from the glass 26 multicoated from surface mirror.
Unfortunately the glass cannot be removed for cleaning inside as it is glued along the lower edge so it is important to keep the rear cap attached when not in use.

The first surface mirror should be protected with the cover when not in use
The mounting hardware for the smartphone/tablet is probably a little under engineered and when using a tablet causes the bracket to "sag" significantly. The smartphone mounting hardware for capture/livestream is again a little weak and unless it is securely tightened the smartphone can tilt. The fitting of the smartphone to the light seal foam inserts is also quite difficult as you have to view through the projector mirror.
The actual multicoated mirror does appear to be of high quality with about 1/3 EV red shift and looses just 2/3EV exposure in use. I didn't see any ghosting or flare when using the unit with either a smartphone or tablet as the source.

The T3 in use with the iPhone 12 Pro mounted as the source and my Canon 90d with 17-55mm F2.8 lens as the capture device. For my needs the lens was set to 28mm or 48mm EFL

The heart of this unit is the included bluetooth remote controller which allows you to start/pause/stop the text scrolling as well as being able to set the speed of the scrolling text.
The BESTVIEW app for IOS or Android allows the source text to be constructed, or copied and pasted from a source file.
Text is projected onto the screen (there was a small amount of ‘ghosting’ although it didn’t impact on my ability to read it) and you have a multitude of options for changing the background colour as well as the font type, size and colour through the app. Importantly it also allows you to "mirror" the text to achieve the correct orientation for projection (some apps only offer this as a "paid" feature.

One of my major concerns is the load applied to the lens when supporting the unit. This is especially true when a tablet is used as the projector.
I use a rail rig and have added a support plate to carry the weight of the unit. It allows the lens to be "zoomed" without having to reposition magic arm clamps etc.
If you use the T3 with the supplied smartphone/tablet clamp with only a smartphone the unit is sufficiently strong enough to hold the smartphone in the projector position. It is only when this clamp is extended to hold the size of a 8 inch tablet that the whole assembly begins to sag and feels very insecure. I will be posting a simple modification that really "beefs up" the mounting of this unit and improves the overall strength and stability making this into one of the best, affordable units available.
Hollyland Mars 300 Pro (standard version) Review
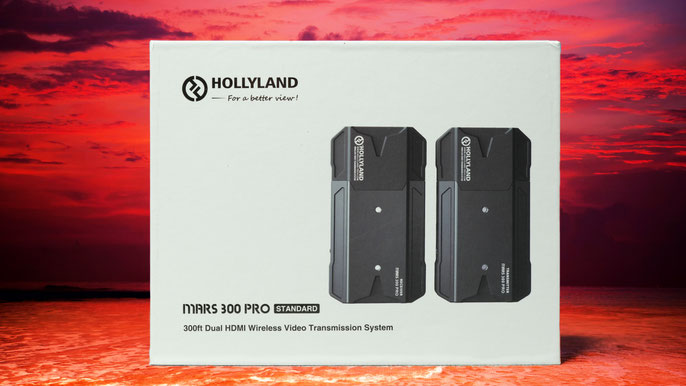
The Mars 300 Pro HDMI Wireless Video Transmission system.

THE TRANSMITTER AND RECEIVER
The Hollyland Mars 300 Pro HDMI transmitter/receiver system which is scalable and allows you to build the system as your business needs grow.
The transmitter only option allows you to wirelessly transmit your camera HDMI output to up to 3 smartphone devices, simultaneously.
Additionally using the Hollyview app allows access to a whole range of useful camera monitoring features such as exposure, focus, false colour and has the option to be able to load in the 3D-LUT that you may have in your camera so that a graded output can be visualised rather than the flat camera output.
If you want to add the facility of using a higher grade monitor then you can use the Mars 300 Pro transmitter/receiver pair.
If you need better signal isolation in wi-if crowded areas then the Mars 300 Pro extended version, which has external aerials, is also available.
In the packaging is the transmitter and the receiver.
They look identical however they are clearly marked as transmitter and receiver.
The transmitter measures 110 x 60 x 30 mm and with a NPF550 battery weighs 230grams, the unit is 136 grams.
The unit has a die cast body with a plastic upper section behind which will be the antenna as these units have inbuilt ones. The mars 300 pro extended units have attachable external antenna.
The body has numerous vented sections to allow the small internal fan of the transmitter to force cool the unit. The fan is silent in operation.
The unit can be powered by either L series batteries like the Sony NP- F range.
For lightness on a gimbal I would use the smaller capacity 550/570 battery
The battery compartment has a good locking and release mechanism.
The unit could be powered from other tray mounted options like this Gonine power distribution plate which allows 8.4v to be applied from monitors or camera to power the device in place of the battery.
It can also be powered by the USB-C port on the unit. Either use the USB-A to USB-C cable supplied or by using USB- PD options.
The port cannot be used to charge an attached battery.
The unit has two mounting options depending upon your particular requirements.
A 1/4 x 20 brass threaded insert in the base of the unit allows for vertical mounting and there are two small holes with helicoil inserts on the face of the unit.
These allow the attachment of a mounting plate to allow a much lower profile or horizontal mounting.
The plate is a tool less fitting - you don’t need to carry an Allen wrench or screwdriver to attach it.
The mounting plate again has a 1/4 x 20 threaded insert.
On the back of the transmitter is the USB-C power input port, the HDMI input port and a HDMI lookout port for connecting a local monitor.
Around the front is the power on/off slide switch and the thumbwheel switch used to alter the channel setting and other menu items.
There is also the bright white OLED display which is used to indicate the channel setting, battery voltage, signal strength, fan operation and the current video format in use.
Power consumption is under 11watts.
The range of the transmitter is 300 feet with the Hollyview app running on a smartphone and 400 feet using the receiver. Figures quoted are outdoor line of sight.
The system latency is quoted at 80 milliseconds.
The receiver has an identical form factor to the transmitter and weights just 10 grams lighter.
On the rear of the unit are two HDMI output ports and the USB-C power input port.
On the front the same switch and display layout as the transmitter.
The receiver does not have the inbuilt fan that we saw in the transmitter pack.
Power consumption of the receiver is under 4watts.
I validated in my review video the 80 millisecond latency and outdoor wireless range test.

The Hollyview, an app which adds a lot of extra monitoring functions via a smartphone running either IOS or Android.
The app can be used with the transmitter at distances up to 300 feet line of sight outdoors.
Most of the functions available can be customised to exactly as you want them.
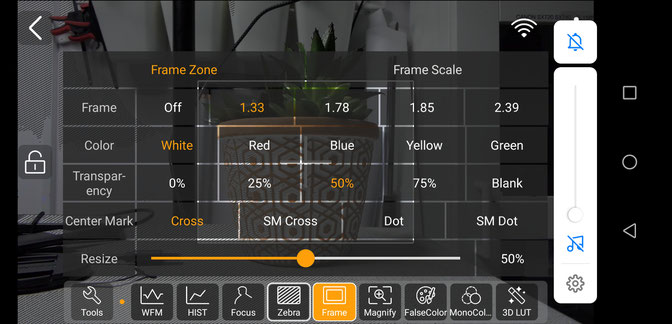
Customisation of the frame zone

The app running on an Android based smartphone.
Andycine C7 4K HDMI Monitor
The Andycine C7 is, as its name would suggest, a 7″ monitor with a wide-angle of view (80 degree left/right and up/down).
Thanks to the addition of an IPS panel display with 2,200 nits of brightness this monitor is ideal for use outdoors, even in bright sunshine.
It's excellent value for money, especially if all you need a monitor for is to check composition and focus.
Andycine have stepped up their game now with the new C7 monitor, offering a touchscreen UI, parade waveform, vectorscope, and 3D LUT support.
It’s a 1920×1200 resolution screen with a 16:10 aspect ratio, but will accept 4K signals and offers 4K HDMI passthrough via standard size HDMI connectors.
Custom LUTs can be loaded through SD cards via an SD card slot built into the monitor.
The 2,200 nit IPS panel built into the C7 is also a touchscreen display, featuring a couple of “virtual sliders” for quickly adjusting the brightness and volume of the monitor, as well as on-screen menus to change settings.
When it comes to assist features, as well as the usual histogram, focus peaking, zebra stripes, false colour, and so on, the C7 also offers parade waveform and vectorscope display. A big advantage over their entry-level monitors.
The C7 also offers some power advantages. On the back are a pair of slots for Sony NP-F style batteries. You don’t need to have two batteries plugged into the camera at once, though. The monitor first uses one battery slot, and then the other, meaning you can hot-swap batteries as you work to prevent a loss in power. This can be quite important as the monitor also has a DC output jack for powering your camera or other devices.
Features:
7 inch IPS screen
1920X1200 Native Resolution
2200 nits brightness
1400:1 contrast
Light weight
4K HDMI signal input
Built-in DC-8.4V power output, you can draw the power from monitor to your camera via dummy battery separately.
Specially designed tilt arms, easy to twist and adjust the best view position.
Advanced features with RGB Parade, Histogram, Zebra exposure, Camera Mode, Image Flip, Check field etc.
Build-in 4K HDMI Input Port with 4K passthrough.
Built-in 3.5mm Earphone jack.
3 Quick access keys.
Three sides mounting points: Left side, Right Side and Bottom.
Auto dimming monitor. There is a built-in light sensor for auto-brightness according to the different environments you are in.

Cynova Audio Adaptor for the DJI Osmo Action Camera
The DJI OSMO Action camera has been missing the vital interface to allow external audio to be recorded on the device. Now DJI have promoted the 3rd party CYNOVA adaptor (why not their own?) and I purchased one from Amazon at only £22 in the UK.
It is available cheaper on Ebay from China but that would mean a 4 – 6 week shipping delay.

Now the adaptor will plug into the USB-C port with the original skeleton frame installed.
Some users have reported that the connection is a little loose and they have removed the rubber gasket from around the plug to allow the adaptor to sit deeper into the socket.
The adaptor supports pass through power and data connections so you can charge and record simultaneously.
Now I have seen lots of reports about poor audio quality with this adaptor and other reports that state that DJI will be making a firmware change to address this.
Now I didn’t experience any noticeable audio quality problems and I used lavalier mics and the new Rode Wireless Go system to input audio into the camera.
There are no manual gain controls everything looks to be controlled by agc (automatic gain control).
A small mic symbol appears on the screen to confirm that external mic is in use and it has 3 levels of audio to show the level of audio being recorded.
The recording is, of course, mono with both left and right channels being paralleled up. A lot of people have been disappointed that it doesn’t record stereo – but this is an action camera not a studio recording device.
If you want stereo recording then it’s more likely that you will record this using a separate audio recorder and sync the tracks in post-production.
Some users have reported that the USB-C plug does not engage fully with the socket on the camera. The solution appears to be to remove the rubber gasket from the plug on the adaptor to allow it to engage deeper.
My full video review with audio samples is on YouTube
A second outdoor test using the Rode wireless Go and Rode Video micro on YouTube
Feiyu Tech Vlog Pocket Gimbal
The Feiyu Tech Vlog pocket gimbal is the latest in the smartphone/action camera gimbals to be introduced in July 2019.
Innovative foldable design on smartphone gimbal make it easily put into the pocket and take out to capture every stunning moment.
Net weight is 272gram while payload is up to 240gram make it be able to mount most of popular large-display smartphones.
For example the iPhone X is
The Huawei P20 Pro is
The Shark 1 is
Basically ready to use once the smartphone is attached in the middle of the gimbal without the need for complicated balance procedure.
It has a 3 axis motor-lock design to efficiently fix three-axis and easy to carry around.
One button switch horizontal and vertical shooting for conveniently taking video.
There has been a new UI design of Feiyu On app to supply a whole new experience of auto-connection, new main interface, motion time lapse, overlapping image and light-tracing features.
It has a long working life of up to 8 hours and up to 14 hours in the standby mode.
It comes with a folding, mini tripod. USB to micro USB charging lead and a soft, portable bag as standard accessories.

The boxed unit is very appealing and reminiscent of many Apple products

Inside the box the gimbal is protected in the foam lining and you can see the foldaway design of the unit.
The gimbal attached to the mini-tripod and powered up into its default home position.

When the smartphone is mounted in the cradle the gimbal is free to rotate about its three axis. Unlike most gimbals the connector to attach a microphone for better audio is not obscured by the carrier frame.
Some of the menu choices available with the Feiyu app


The gimbal offers three axis stabilisation with two modes. Pan-Follow-me and locked. In the "pan-follow-me" mode the vertical and horizontal axis are locked but the rotational axis allows the user to rotate the gimbal shaft to force the gimbal to follow this movement. In the locked mode the rotational axis is free to rotate. In this mode the camera stays in the same plane no matter where the handle is positioned (as long as it doesn't contact the gimbal frame). To switch from the Follow-me mode to the Locked mode, and vice-versa the top button is quickly depressed. To change the gimbal orientation from landscape (default) to portrait, and vice-versa, a long press of the top button is required.
The front "trigger button" when pressed and held allows the gimbal shaft to be rotated about the vertical axis. Once released the camera will be locked into this new plane. A double press on the same button returns the gimbal to the home position.
The lower button controls the shutter button in stills mode or the record button in video mode through the Feiyu On app.

I've noticed that on all the current reviews on YouTube, and with my Gimbal, once you select a Vertical mode (portrait) and the switch back to landscape mode the gimbal does not return to a horizontal level position and you end up with sloping horizons.
The gimbal can be seen here with a horizontal position that is sloping. No matter how many cycles you make from portrait to landscape the horizon is never straight again.
I added some extra grip tape as the body of the gimbal is quite "slippery"
I also added a little grip tape around the front of the gimbal shaft as again I found trying to hold this whilst pressing the buttons was difficult because of the slippery nature of the plastic.
Viltrox EF EOS M2 Focal Length Reducer
The Viltrox EF EOS M2 is the latest focal length reducer for Canon mirrorless EOS M series cameras.
It allows Full frame Canon EF (only EF lenses) to be used with the EOS M with the advantage that it makes the full frame lens focal length almost the same on the APS-C crop factor EOS M series of cameras. The actual new focal length multiplier instead of being 1.6 as for the APS-C sensor but it is now 1.6 x 0.71 = 1.14. So for example a 50mm FF lens which would normally be 80mm on the EOS M using the EF to EOS M adaptor will now become a 57mm lens. Also because of the reduction in the image circle to fit the APS-C sized sensor the actual light intensity on the sensor is increased giving an effective 1 f-stop speed gain - hence the trade name of " Speed Booster" marketed by Metabones.
Change the focal length and you change the ray directions and the spatial variation of intensity (illuminance).

This is the Viltrox EOS M2 unboxed.
It is supplied with a plastic moulded case and front and rear caps along with an allen wrench to remove the Arca style tripod mounting foot.

So how is it that these devices can reduce the focal length of the Full Frame lens that is attached to it.

In the illustration above, I set up as light source in front of a convex lens which had a long focal length. You can see the slightly converging beam from the lens.
Now by adding a second convex lens (as the compound lens of the Vitrox is essentially a convex lens) you can see how this causes the beam to converge. This is the effect of reducing the focal length of the lens. The imaging circle is smaller and brighter - again confirming the Viltrox speed gain.
From my video review on Youtube the final developed raytrace showing how the addition of the second convex lens if placed beyond the focal point of the camera lens will shorten the focal length of that lens.
By experimentation I found that the Viltrox has a focal length of 70mm.

Construction wise all of the Viltrox adaptors are all metal and have a good finish with good attention to internal light baffles etc. The internal surfaces are not "flocked" but I haven't noticed any reflections or ghosts that you wouldn't normally expect to see.
Body and lens flange are nice and tight with very little radial "play" when twisted.
The tripod mounting foot has a profile which would fit a standard "Arca" style QR base and can be removed if needed with the supplies Allen wrench key.
Whilst the adaptor lets you use your existing EF lenses on the EOS M series cameras and recover some of the image as the effective magnification become just x1.14 instead of the usual x1.6 the gain in doing so is to get the extra benefit from fast aperture lenses and the 1 f-stop light gain.
This also impacts on 4K video as the image circle is reduced and its intensity increased so better image quality as a result - especially in lower light.
My video about the physics of the unit
To verify the accuracy of the claimed reduction in focal length of 0.71 I set up an experiment to measure the field of view.
I used my 100mm F2.8 macro lens with the Viltrox EOS M2 to establish the width of the image at full sensor pixel width (4:3) giving the 6000x4000 pixels.

You can see that the width of the image is 93mm and the distance to the sensor was 470mm.
Using a bit of trigonometry to work out the tangent of the midpoint 46.5mm as the opposite of the right angle triangle and 470mm as the adjacent returns an angle of 5.65 degrees so the real field of view is 2x this or 11.30 degrees.
From FOV tables this equates to a focal length 112.4 mm
Using the given 0.71X magnification the theoretical focal length of
100x 1.6 x0.71 = 113.6mm
So pretty close enough to call accurate!
VILTROX EF-M2 Canon EOS EF to Micro Four Thirds Adaptor
The VILTROX EF-M2 is an "active" adaptor allowing the use of Canon EOS EF(only) lenses on a micro four thirds system. It allows the control of Aperture, Focus and image stabilisation for any lens which supports that function and gives the advantages of reducing the 2x crop factor to 1.4x and giving an increase of 1 f-stop in light.
Looking exactly like the M1 version the only difference is the addition of the lens elements to provide the focal length reduction.
The limitation is that only EF lenses can be used as the lens rear element on most EFS lenses would hit the front element of the Viltrox M2 optics.


If we consider the f-number of the converted lens, the aperture diameter is unchanged, but the focal length is shorter, so overall the f-number has become smaller – that is, the lens has become ‘faster’.
In reality, the lens is still transmitting the same amount of light, but it has just been packed into a smaller area by the extra power of the lens – which is why the ‘speed booster’ only works well if the sensor of the camera it is used with is smaller than that of the camera for which the lens was designed.
Build quality is quite high with chromed front and rear flanges. Lens release is firm and works well. Software updates to the firmware are achieved by plugging the M2 into a PC with a micro USB cable and copying the .vtx file from the download folder to the new USB drive. Updating takes just second.
Like the M1 there is a small rocker switch on the top to adjust the aperture manually. Autofocus and image stabilisation both work well with all my EF lenses. Current firmware v3.2


Sample images with the Viltrox EF-EOS M2
VILTROX EF-M1 Canon EOS EF/EFS to Micro Four Thirds Adaptor
The VILTROX EF-M1 is an "active" adaptor allowing the use of Canon EOS EF/EFS lenses on a micro four thirds system. It allows the control of Aperture, Focus and image stabilisation for any lens which supports that function
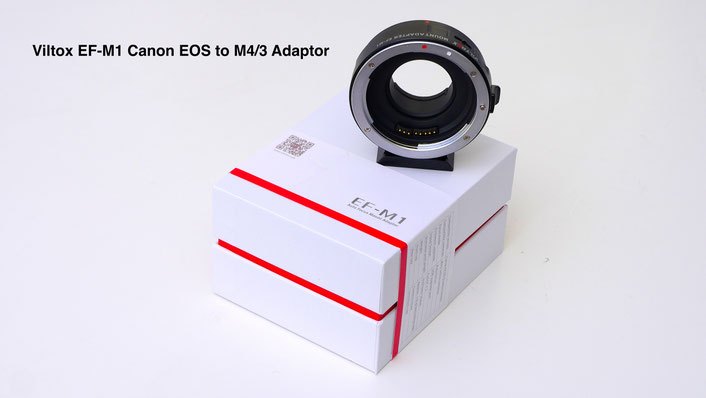
Attractively Packaged and supplied with Allen key wrench to remove/fit the tripod mount foot if necessary.
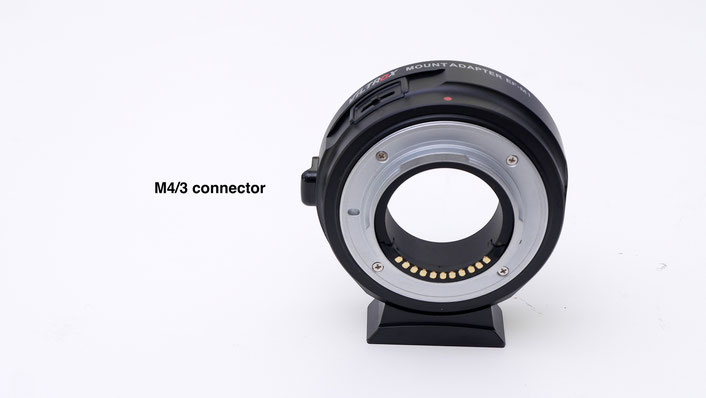
The rear of the unit features the micro four thirds mount, metal mount on metal body.
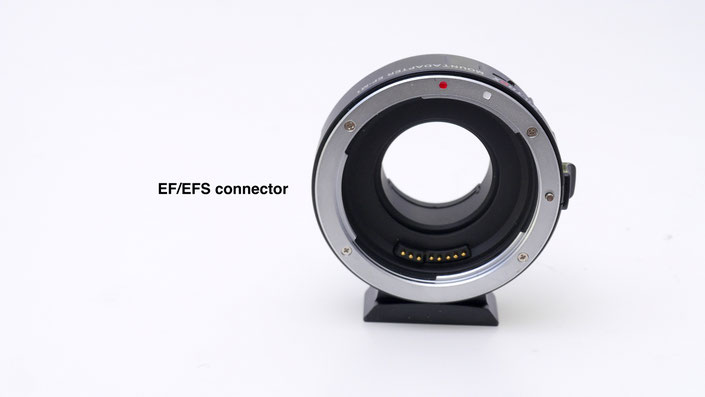
The front of the adaptor features the Canon EOS lens flange
The adaptor fits between the M4/3 camera and the EOS Lens
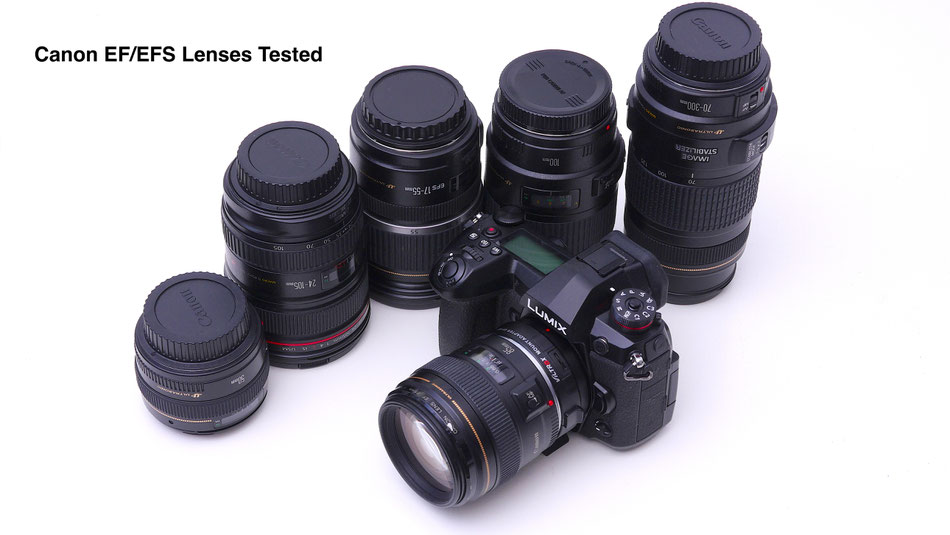
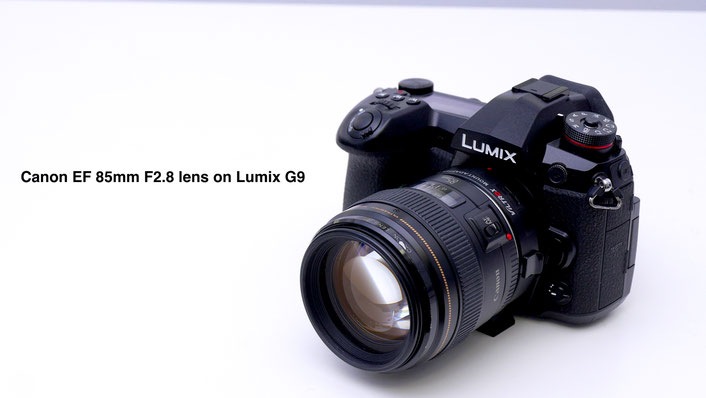
Tested with Panasonic GX85, GX8, GH3, G9 and Olympus OMD EM1-Mk2.
Quite apparent when using this adaptor with Panasonic cameras with IBIS (in body image stabilisation) there is an issue with image shift when the shutter button is pressed making composition impossible. If you align your subject centrally as you capture the image the image moves down by a considerable amount (depending upon lens focal length) As IBIS cannot be disabled (as far as I know for lenses which don't have the lens switch) this renders the adaptor of little use on these cameras as the IBIS doesn't match the lens focal length. The adaptor works perfectly on Olympus bodies with IBIS! - update... appears to have been fixed with the later firmware 3.2
Panasonic G80 Review
The GX80 is a micro four thirds camera from Panasonic and is a mid range model. It sits beneath the GX8 but above the G7 in terms of functionality. The new feature of this camera is that the anti-alias filter (optical low pass filter) has been removed from the sensor. It appears to be the same 16M sensor as the G7. This is said to improve the sharpness of images captured such that it rivals the GX8 which has a 20M sensor.
It features a flip/tilt LCD tilting up by about 90 degree and down by 45 degrees for those overhead shots. this screen is also touch enabled which offers lots of useful features if you are a fan of this operation.
From moving/sizing the focus point, navigating menus changing on screen tool position like the histogram pull focus etc.etc.
It also supports 5 soft function keys on a "fly-out" panel from the right of the LCD.
These allow user programmed features or in video mode allow control of aperture, shutter speed, microphone level etc.
All the external ports for the camera (HDMI and USB) are now on the right hand grip side of the camera. Interestingly the USB port is now used for in camera charging but you cannot power the camera from the USB port for extended shooting or video capture.
It supports 4k video/photo shooting but alas does not have a microphone input port nor does it support the Cinelike D and V profiles of the professional grade cameras. You have to use the Natural photo style and customise the settings to your liking for post processing.
The new in body stabilisation - dual IS now adds to the 4 axis mode of the GX8 giving now 5 axis (up/down, left/right and now rotational) stabilisation which is active even during video recording in 4K.As for ISO sensitivity, the Panasonic GX80 is rather straightforward.
As with other recent Panasonic cameras, the GX80 features a native ISO range of 200 to 25,600, with an extended low ISO of 100. Not surprisingly, the GX80 offers both RAW and JPEG image capture, plus with its new on-board RAW development feature, you have the flexibility to shoot all in RAW and then easily process your shots into JPEGs after the fact, making use of the GX80's array of creative options, all in-camera.
The GX80 also includes Panasonic's Starlight AF mode, which can detect the precise, small contrast differences in stars compared to the night sky for easy focusing. The Panasonic GX85 offers a similar array of other autofocus features found in recent Lumix cameras including focus peaking, Pinpoint AF, and Full Area AF, letting you focus on anything within the field of view. The GX80 also includes the 49-Area/Custom Multi mode, which lets you freely select a custom group of AF areas as you see fit for the particular subject. The camera also has Face/Eye Detection AF that automatically detects the face and left or right eye of your subject.
For capturing fast action, the GX80 is capable of 8 frames per second with focus locked at the first frame. If you want continuous focusing, the burst rate drops slightly to a still-respectable 6fps, which is in-line with the earlier Panasonic GX8's performance specs. As with the GX8, this camera also lets you opt for an all-electronic shutter mode, which bumps the AF-S burst rate up to a handy 10fps. There's also a Super High-speed burst mode at a whopping 40 frames per second, though it only captures JPEGs at a much lower 4-megapixel resolution.
The Panasonic GX80 offers loads of exciting features surrounding its 4K capabilities, particularly with regard to 4K Photo modes. Starting with the video features, the Panasonic GX80 is capable of capturing 4K UHD (3840 x 2160) video at both 30p and 24p, as well as a variety of Full HD and HD frame rates.
The GX80 captures video in either MP4 or AVCHD formats, however 4K is only available in MP4 mode. Though not as robust a selection of formats and bitrates as the video heavy-hitter GH4, the GX80 still offers 4K video at a high quality 100Mbps bitrate. Bitrates for Full HD and HD videos aren't nearly as high.
For MP4, 1080/60p is captured at 28Mbps, 1080/30p at 20Mbps, and 720/30p at just 10Mbps. For AVCHD videos, 1080/60 is pegged at 28Mbps, and both 30p and 24p options top-out at 24Mbps.
Continuous sustained 4K video recording is unlimited for the NTSC-region model. Pal models stop recording at 29mins 59sec.
The camera will continuously record videos until the file size reaches 4GB, at which point a new file will automatically be created, although playback will be seamless.
Along with the new creative filter options now available in PASM stills modes, video capture can also make use of all the special effects and various creative filters. Some modes, however, like the simulated tilt-shift Miniature effect for example, cannot be used with 4K, and instead default back down to 1080/60p.
One new video trick that the GX80 offers is a new 4K Live Cropping feature.
The camera is able to utilize the entire sensor area, but only capture a smaller 4K-sized frame within that area.
What this allows is an all-digital, programmable and automated panning and zooming feature while recording video -- You can set start and end points for panning, or the end zoom framing, and the camera will smooth and automatically capture 4K video with these pre-programmed "movements."
The GX80/85 with 12-60mm 3.5/5.6 lens
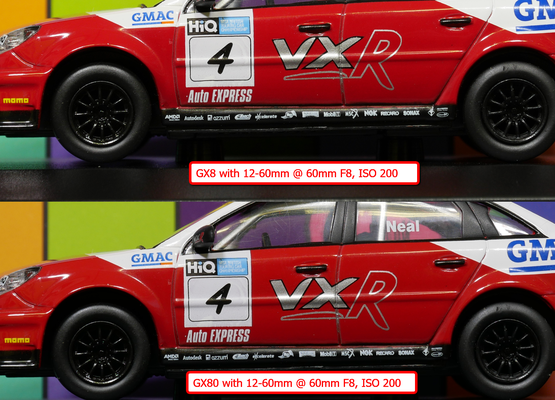

Above, comparison tests using the same lens and lighting set up between the 20M GX8 and the 16M GX80/85

A couple of sample images at ISO 3200 with the 20mm F1.7 lens at f2.2
MCOPLUS LED LIGHT PANELS
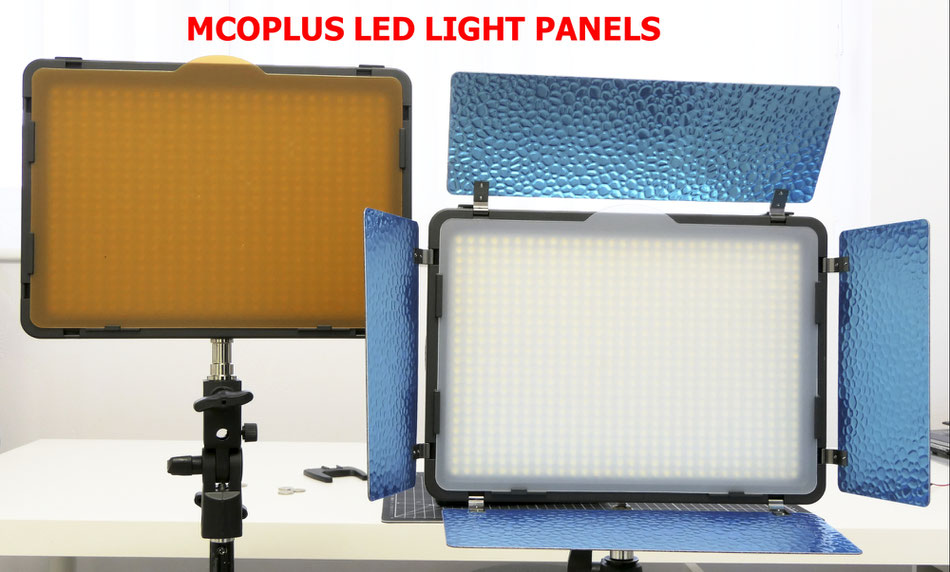
These LED light panels come in a range of sizes and output power rating.
There are basically two types the "A" type having all daylight rated LEDs and the "B" type which is a bi-colour LED populated unit with half the matrix being daylight LEDs and the other half tungsten rated LEDs.
Above are the model LE-520A and the LE-720A units.
The 520A is populated with a 22x 24 LED matrix and the 720A is populated with a 24 x 30 LED matrix.
The rated light output from the 520A is 3400 lumens and from the 720A 4700 lumens, however I measured the lights at exactly 1 metre distance and found the outputs to be more like 2500 lumens for the 520A and 3400lumens for the 720A using the soft diffuser and an battery power.
In both cases the LED colour temperature measured was about 4900K.
All this series of lights features barn doors however due to the nature of the panels and the wide beam angle I found them to have very little affect on the output. It is not possible to shape the light as you can with a spot light type light unit.
These lights are fitted with a 2.4 GHz Wi-Fi controller which is used to control the light intensity.
It provides the facility to select the light on 1 of 4 channels (H1 to H4). By selecting the correct series (A or B) on the controller it is possible to change the light output level in the case of the A series units or on the B series units you can select the LED bank used for the output - either of the Daylight LEDs or the Tungsten LEDs or have both on simultaneously.
All the lights come with a soft diffuser and a CTO (colour temperature orange) diffuser. This can be used to provide an accurate 3200K output but at the expense of about 2 F-stops light loss.
Power is provided to the LED banks using pulse width modulation which keeps the voltage the same but varies the ratio of on to off time of the applied voltage. This keeps the colour temperature constant rather than dimming the LEDs through voltage reduction which can lead to colour temperature changes.
The power level is displayed on the rear of the unit on a two digit LED display and can be adjusted in unit increments from 0 to 99. in the case of the "B" series lights both the 3200K and 5500K LEDs can be adjusted independently.
The unit has an inbuilt fan which in the auto mode powers up to cool the unit if it begins to overheat. The fan noise is noticeable at close distances when running at full speed however, it is unlikely to be picked up at the light placement distance from the subject.
The unit, being wireless controllable can be assigned to 1 of 4 available channels so 4 lights could be set up and controlled with the one remote control unit. This unit also has a strobe effect lighting mode. The frequency of which can be controlled from 1 - 10 flashes per second in unit increments and then units of 10 from 10 to 90 flashes per minute. Power can be adjusted as normal for this mode.
In summary they are useful light sources able to be used to provide a fill light for either tungsten (3200K) or daylight (5500k) lighting situations and made easy to adjust by the wireless remote controller.
They may also be used to provide illumination for head and shoulder type interviews however as with all these smaller panels does not give enough illumination for head to toe shots without significantly increasing camera ISO.
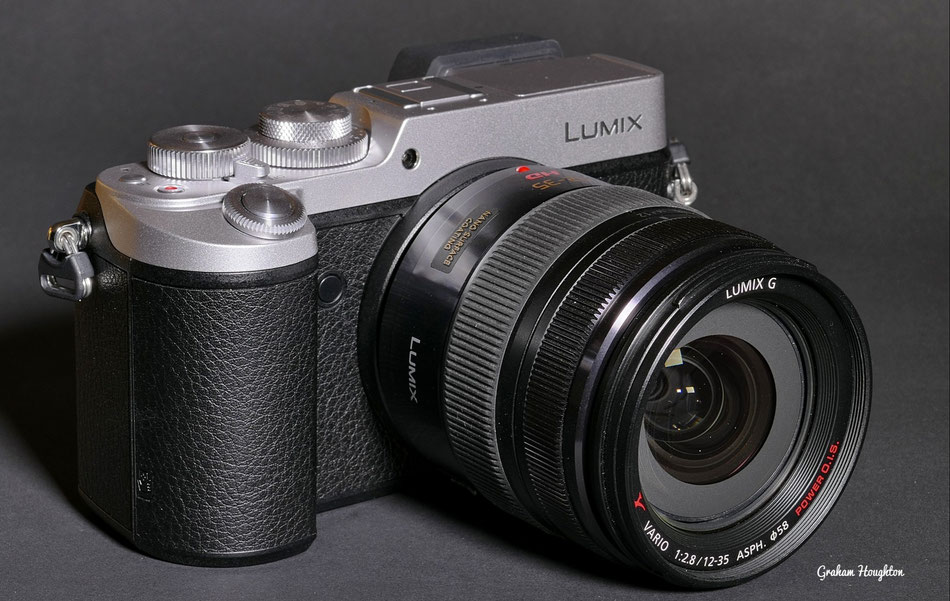
The Panasonic Lumix DMC-G7
Replacing the Panasonic G6, the G7 sits beneath the Panasonic GH4 in the Panasonic's line-up of compact system cameras. It's the smaller of the two
SLR-like models, and is aimed at enthusiast photographers. It sits alongside the Panasonic GX7, and above the GF7, GM1 and GM5.
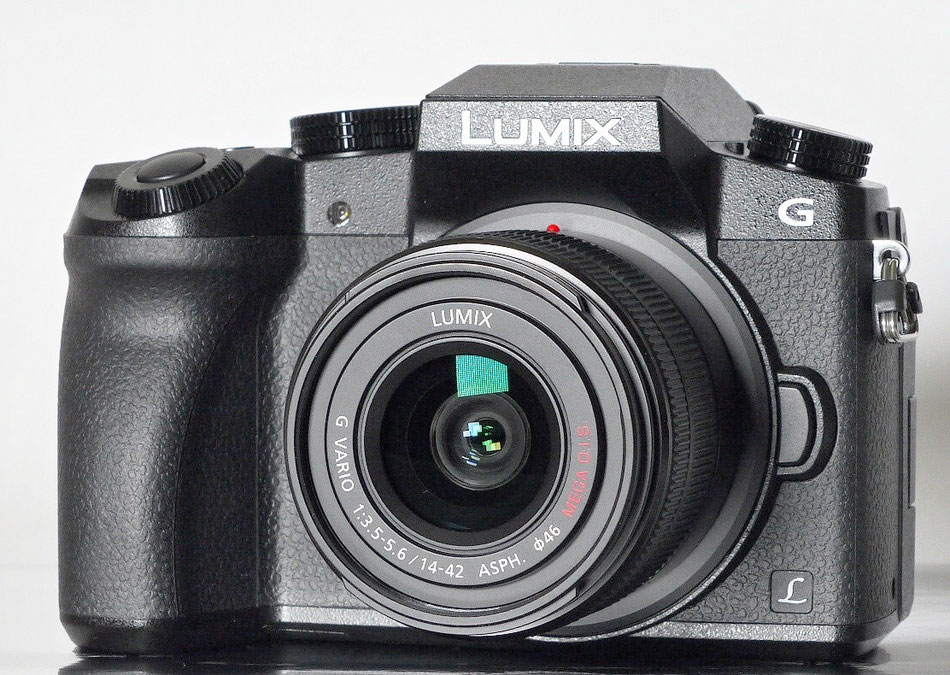
On the face of it there doesn't appear to be much on offer to those who may already own the Panasonic Lumix G6 camera which does a superb job of crafting both stills and video. However when you dig a little deeper you will see that Panasonic have actually added a lot of new features to this camera and makes it an exciting model to look at if you are wanting to step up to a micro four thirds system camera.
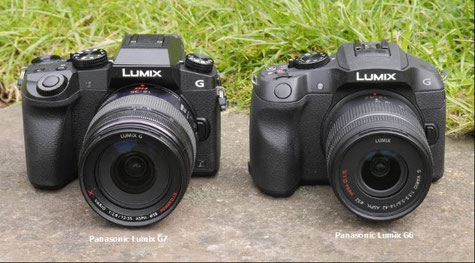
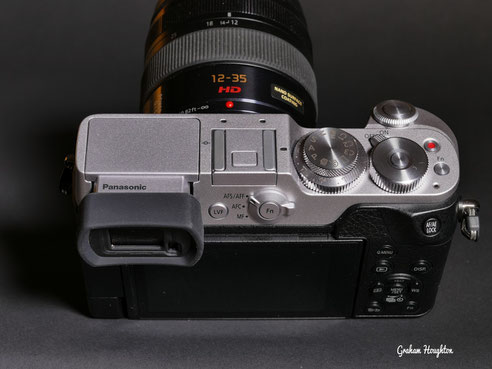
In this image you can see the more angular design of the G7 compared to the more rounded style of the G6. The addition of the two control dials and the shooting mode dial on the G7 should be very obvious additions.
On the rear of the camera the welcome removal of the dual function "click in and rotate" back control wheel which became the Achilles heel of the FZ200. Now replaced by two control dials, one under the forefinger and the other under the thumb give fast access to aperture and shutter speed when in the manual exposure mode.
The camera also has no less than 10 programmable Fn (function buttons) 5 physical and 5 on screen ones. Each button can be assigned from 14 pages of 4 options!
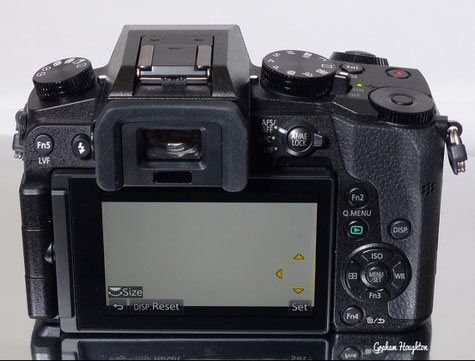
The G7 electronic viewfinder is one of the highlights of the camera. It's large, bright, detailed and can display a wealth of information and shooting aids including effect previews, a live
histogram, magnified focus assistance, levelling gauge, focus peaking, zebra patterns and a variety of alignment guides. It's an OLED panel, with a magnification of 0.7x, the
resolution has been upgraded from 1440k dot (800x600) to 2360k dot (1024x768) in this model.
The LCD is touch enabled for either point to focus or point to shoot. It can be used as point to focus if used in conjunction with the EVF. I did find my nose often touched the panel causing my focus point to shift from where I intended it to be.
The camera can be purchased with either a 14-42 or 14-140 lens giving 28 to 84 or 28 to 280 mm equivalent full frame focal lengths. In this respect it isn't quite as useful for landscape photography where the 12-35mm lens is probably a better option
The new kit lenses are more compact than previous models and in particular the 14-42 doesn't extend as far as the previous model thus making the camera a lot more compact.
Image quality appears to be improved as well.
Native base ISO for the camera is ISO 200 with the option to extend to ISO 100. If you do select ISO 100 the loss of highlight is very apparent so that's why I guess its buried in the "extended" range!
One new feature on this camera is the setting to combat "diffraction limited resolution". Normally with micro four thirds cameras using apertures smaller than F11 results in a slight softening of the image. When this option is turned on it is still very acceptable image sharpness at F16 allowing more depth of field which is particularly beneficial for macro photography.
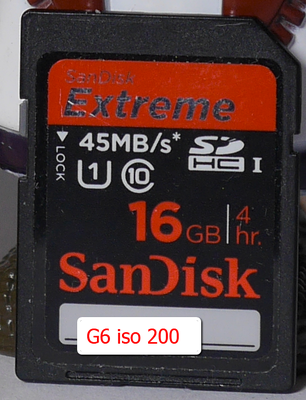
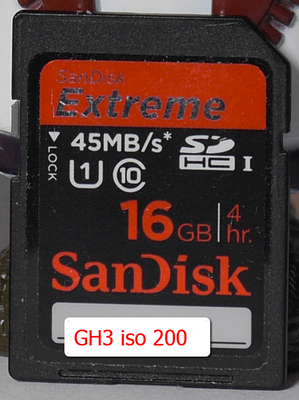
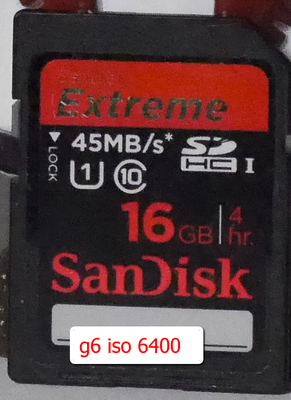
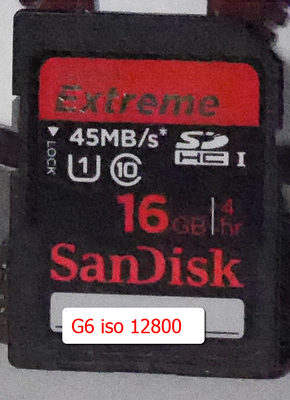
ISO Noise Test ISO 200 - ISO 6400
click for full screen images


Comparison Noise Test 100 % crops G6, G7 and GH3 all using same lens and photostyle settings


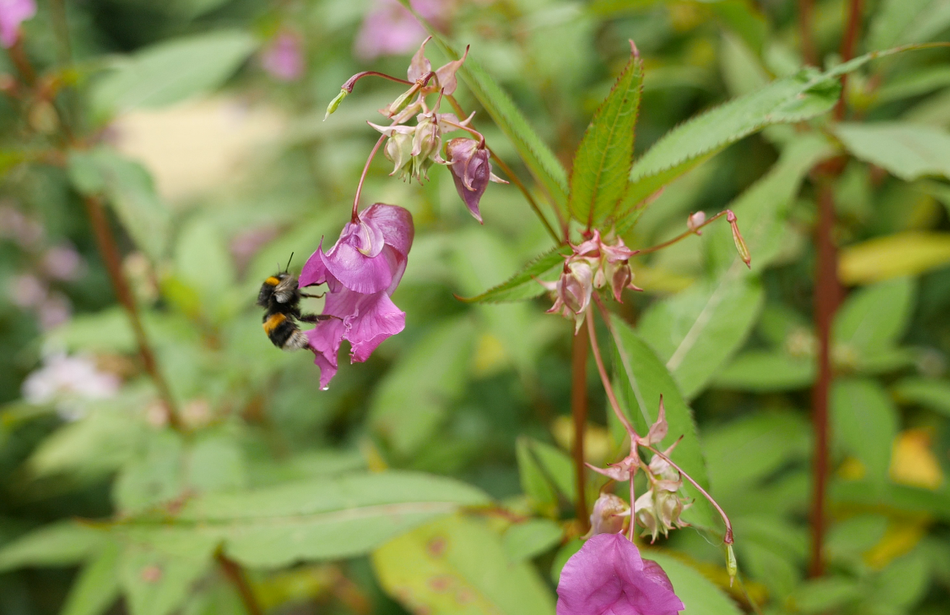
One of the reasons to purchase the G7 is the ability to shoot 4K UHD video at 30fps or shoot 4K photos in 1 second bursts at 8 Megapixels or extract a single frame from the UHD video clip. Here's a sample from a 4K video clip where I was able to capture the exact moment this bee fell out of the flower to fly to the next one!
Panasonic Lumix GX8 Review
The Panasonic Lumix GX8 is a camera aimed at enthusiasts and complies with the Micro Four Thirds standard.
It replaces the Lumix GX7 which was the first Lumix body to feature built-in stabilization.
The new GX8 shares the flat-topped styling as the GX7, but is all-round bigger than the GX7 however it now boasts weather-sealing. Like the GX7, there's an electronic viewfinder in a housing that can tilt up by 90 degrees, and now consists of a 4:3 aspect ratio 2,360,000-dot OLED instead of the traditional LCD, the image is now larger too. It supports a 3in touchscreen, but again the LCD panel of the GX7 has been switched for a 1,040,000 dot OLED. The screen is now fully-articulated rather than just tilting vertically.
Previous cameras employed 16 Megapixel sensors, the GX8 has now 20 Megapixels, making it the highest native resolution Micro Four Thirds body to date. The sensor has four axes of compensation and the ability to work with OIS lenses (with firmware updates) to add additional two axis stabilisation to further improve performance. The GX8 also offers 4K video (lens stabilised only), fast contrast AF with DFD technology (Depth-from-Defocus), the choice of mechanical or silent electronic shutters (with a maximum speed of 1/8000 or 1/16000 respectively), and 8fps burst shooting or 6fps with continuous AF.
Previously on the GX7, optical stabilisation took priority, so if a lens supported it, the in body stabilisation was disabled. If a lens without OIS was mounted, then the in body system turned on, operating in two axes. This was great for legacy lenses on micro four thirds adaptors.
On the GX8, the in body stabilisation now operates in four axes, but additionally it also works alongside any existing lens-based OIS. This so-called Dual IS system combines the efforts of OIS and in body stabilisation, but requires that the lens knows about it first with a firmware update. The latest lenses, such as the 14-42mm and 14-140mm kit zooms, as with the 12-35mm f2.8, 35-100mm f2.8, 30mm f2.8 Macro and 42.5mm f1.7 all have firmware updates to support Dual IS with more to follow.
In video mode, the GX7 didn't offer any in body stabilisation, instead relying on lens OIS where present to suppress any wobbles. The new GX8 still doesn't offer in body stabilisation for video, but it does at least now offer electronic stabilisation for video which can work alongside any lenses with OIS. However this feature is only available when filming in 1080p; if you shoot in 4k, there's no stabilisation unless you're using an optically-stabilised lens!
Panasonic now allow you to switch the function of the twin dial on the top plate of the camera. On the GX8 a button in the middle of the thumb dial performs this operation. You can customize what the dials do, but by default the button switches them from, say, exposure control to adjusting the white balance and ISO.
In terms of customization it's not only these two dials that can be reconfigured. The GX8 has no fewer than 13 customisable function keys: five are soft keys which use the touch-screen, but eight are actual physical buttons.
Panasonic has also equipped the GX8 with a dedicated exposure compensation dial, positioned under the main mode dial, and a new lever on the rear which switches the
camera between focusing modes (AFF/AFS, AFC and Manual). The combination of all these new buttons, switches and dials makes the GX8 look and feel like a much more serious camera than its
predecessor, the GX7
Unfortunately like the FZ1000/ G series, there's no dedicated dial for the drive mode. Rather these options are adjusted by pushing the down button on the rear pad.
Meanwhile pushing up sets the ISO, pushing right sets the White Balance and pushing left sets the Direct AF area selection.
In terms of connectivity, the GX8 is equipped with a combined USB / AV output, a Mini HDMI port and a 2.5mm jack that doubles as a mic input and for connecting old-style remote release cables. It's a shame that it is not a more standard 3.5mm microphone jack, but at least the GX8 now has microphone connectivity as this was absent on the GX7.
In a nice upgrade, the USB port now supports tethering via a laptop, a feature that was previously only available on the GH4.
As before the BLC12E battery and memory card are housed together in the grip, positioned just far enough away from the tripod thread so that smaller plates won't block access. Panasonic quotes a battery life of about 340 shots under CIPA conditions, however I found that I could only achieve far less than this when interspersed with a few minutes of video added into the equation. I ran out of battery after approximately 2 hours of shooting stills (218) and 8 minutes video.
Panasonic Lumix GX8 shooting modes
The Lumix GX8's main exposure dial offers the usual PASM modes, along with Creative Movie mode (which also unlocks all the video options), Panorama, three Custom positions, Creative (with a bewildering choice of 22 effects), and the usual Intelligent Auto.
There's no Scene presets nor a dedicated position on the dial for 4K Photo mode. Instead both these positions on the dial are devoted to providing additional Custom presets C2 & C3.
The GX8's mechanical shutter offers speeds between 1/8000 and 60 seconds, and additionally the maximum Bulb time has been extended from two minutes
to 30 minutes. Compared to the Lumix G7 which offered a 60 second to 1/4000 range with a Bulb of two minutes.
Switch the GX8 to its electronic shutter option and the fastest shutter speed accelerates to 1/16000, giving you an extra stop over the top mechanical shutter with
the added benefit of operating in complete silence and avoiding any potential shutter shock.
This extra stop makes it easier to shoot in bright sunlight at large apertures without having to deploy neutral density filters, and is ideal for freezing very fast action.
Note the slowest shutter speed with the electronic shutter on the GX8 is one second, although the full 100-25600 ISO sensitivity range is available. One "Gotcha" is that the Flash is disabled if you leave the electronic shutter set to ON, it must be in the OFF or AUTO position for the flash to be enabled (via the hot shoe connection)!
Electronic shutters do however have some limitations you should be aware of. Most notably their readout time can mean a moving subject could have shifted on the frame before all the data is gathered, resulting in undesirable skewing artefacts; this can also be seen if the camera is panning.
You can see the effect in the adjacent image where the car appears to be skewed from bottom to top.
If you understand their limitations though, electronic shutters can still be very useful, not just for being discreet in quiet environments, but also for avoiding
shutter shock and shooting with large aperture lenses in bright conditions.
I also like to use them during timelapse sequences to avoid the constant sound of the mechanical shutter clicking away and reduce shutter wear.
It's a key benefit over most DSLRs which currently don't offer truly silent shooting options.
Panorama Mode
The Panorama option, found now on the mode control dial, gives you the usual choice of Standard or Wide image sizes and the chance to pan the camera up, down, left or right. The camera keeps shooting to generate a full 360 degree panorama, which can require some practice to keep turning, but you can of course crop the image to your desired coverage.
The GX8 does a good job at blending the exposures, although you can spot multiple instances of subjects in motion, such as birds in flight or people walking by, so its best suited to instances where this doesn't matter otherwise some post image editing is needed to clone out these instances.

HDR Mode
If you want additional dynamic range then there is the option if you shoot in JPEG mode only to create an in camera HDR composite image which captures three frames at 1, 2 or 3EV intervals before compositing them into a single file.
If you prefer to generate HDR manually, or simply want to ensure that you have captured an important subject, the GX8 is very well-equipped for exposure bracketing with three, five or seven frame options at up to 1EV apart; these can be triggered singly or in a burst. Unfortunately these cannot be done with the internal camera timer as they're in the same menu. There's also plenty of control over the way the camera processes images, including the chance to adjust tone curves in the Highlight Shadow menu.
Adjacent is a subject containing a wide range of highlight and shadows captured using this method.
Time Lapse
The Lumix GX8 offers in-camera Timelapse capabilities with the opportunity to encode the frames into a movie afterwards, in 4K resolution if desired.
You can adjust the shooting interval between one second and 99mins 59sec, and for between one and 9999 frames. You can also delay the start time up to 24 hours in advance. Alternatively you can choose the Stop Motion option which relies on you pressing the shutter for each frame when you're ready.
Once you've captured the desired number of frames, the camera offers to encode them into a movie. If you prefer you can trigger this process during playback later. The video resolutions include VGA, 720p, 1080p (at up to 50p/60p) and even 4k (at 24 or 25 or 30p depending on region). You can also choose a lower frame rate to stretch your movie length and choose whether to run through the sequence forwards or backwards. It is also possible to re-run this process as often as you like to create multiple versions of the same video clip.
When capturing the frames for a HD project, be careful to choose 16:9 aspect ratio before starting , otherwise you may end up with 4:3 shaped video letter-boxed in a 16:9 frame. I'd also recommend reducing the image quality to ensure you don't run out of space. The Medium resolution (8 Megapixels in 16:9) actually records at the 4k UHD frame size, so is perfect for generating 4k video and unless you intend to manipulate the frames later. You could record in RAW however, the processing time would be extremely long to convert to the video format chosen.
Burst Rate Shooting Options
There's four continuous shooting modes on the Lumix GX8: Low (2fps with Live View), Medium (5.5fps with Live View), High (8fps without Live View) and Super High (40fps but only for a three second burst of 120 frames and at a reduced resolution of 10 Megapixels using the electronic shutter).
With Continuous autofocus, the top speed reduces slightly to 6fps regardless of whether you're set to Medium or High, so you may as well go for the former and enjoy Live View. Panasonic quotes 'more than 30 frames' when RAW files are being recorded.
In terms of bursts with continuous AF, I shot a variety of subjects in motion and found the GX8 recording between four and five frames per second, with generally all of them in focus!
4K Photo Mode
The GX8 offers a 4K Photo mode. 4K video actually contains 8 Megapixels of information on every frame, so why not use it for capturing reasonable quality stills at high frame rates? There's three options: Burst (which records video while the shutter button is pressed), Burst S / S (which starts recording with one press and stops with another), and 4K Pre-burst (which keeps a rolling 2 second buffer to avoid unwieldy clips to store and go through).
When you play the capture back, you're shown a still photo rather than a video clip, with the option to cycle through the frames quickly by pressing the left or right arrow keys. This makes it very easy to jog back and forth before selecting the perfect moment, after which a press of the Menu/Set button saves the frame as a new JPEG with 8 Megapixel resolution. You can choose the aspect ratio prior to capture along with having full control over the focus, exposure mode, aperture, shutter and ISO. To avoid subject motion blur it is best to use an exposure which has a high shutter speed
The 4K Photo mode is great for capturing the perfect moment when faced with fast action, but it's also surprisingly useful for portraits, especially of children, where an expression can change between frames.
AutoFocus
The GX8 lets you choose from six AF area modes: pinpoint, single, Custom Multi (which lets you configure your own focus zones), 49-Area, Tracking or Face Detection. In each case you can use the touch-screen to reposition AF areas or select subjects. Panasonic even lets you tap the screen to configure the AF area when you're composing through the viewfinder. This can be achieved by swinging out the lcd panel and using a finger to rapidly adjust the focus point - a really useful feature.
As always, the Single AF modes are the highlight of the Lumix GX8 focusing experience. The camera focuses quickly and confidently even if the AF area is dialed-down to its smallest size, and impressively in very low light too. The GX8's AF system works down to -4EV with a sufficiently bright lens which means it can simply keep focusing in very dim conditions when other cameras become sluggish or give up. It's an important capability that makes the GX8 very usable across a wide range of lighting conditions. Whether you're shooting cityscapes at night or exploiting the excellent face and eye detection to capture events, the GX8's AF system feels very confident.
Panasonic Lumix GX8 movies
The Lumix GX8 offers 4k capture, full control over exposure, silent screen-based adjustments, flat video codec profiles, focus peaking and zebra patterns. 4k UHD video is available at 24p and either 25p or 30p depending on region, all at 100Mbit/s.
Alternatively you can capture 1080 at 50p/60p at 28Mbit/s, or at 25p/ 0p at 20Mbit/s. 720p and VGA options are also available.
The maximum recording time on all models, independent of sales region, is 29:59. The in body stabilisation is not available for video.
A new, in camera, electronic stabilisation mode is offered for 1080p, but not at all for 4k - so if you want stabilised 4k footage, you'll need to use an OIOS (optically stabilised lens).
You can start recording in any exposure mode by simply pressing the red record button, but for the most control and options you should turn the mode dial to Creative Video which lets you film in the choice of PASM modes with full control over exposure. The sensitivity for movies is selectable between 200 and 6400 ISO, and there's an Auto ISO option too, although sadly not when shooting in full Manual mode.
The touchscreen can be used for video: it's possible to touch to pull-focus between subjects when filming, either automatically if Continuous AF is enabled, or as soon as you half-press the shutter release if it's disabled. Tapping the screen also pops-out a tray of controls, allowing you to silently adjust the aperture, shutter speed, ISO, exposure compensation or microphone level all while filming, depending on the mode.
A variety of processing parameters can be adjusted within the Photo Styles, including sharpness, contrast, saturation and noise reduction. There's also the Cinelike V and Cinelike D profiles the latter offering fairly flat output for grading later (plus you can dial-it down even further if desired). You can also choose between 0-255 and 16-255 for the Luminance Level, the former being preferrable if you intend to capture the best-looking stills from footage.
Audio is recorded using either the built-in stereo mics, or an external microphone connected to the 2.5mm jack. Stereo level meters can be displayed and the level adjusted in fine increments, but there's no headphone jack.
The Extra Teleconverter option works in all but the 4K modes, taking a 1:1 crop from the middle of the frame at the selected video resolution and therefore
providing a tighter view without degradation in quality; neatly the 1:1 crop also better avoids moire effects. When filming in 1080p, the Extra Teleconverter effectively applies a 2.39x field
reduction.
SAMPLE IMAGES (click for larger image)


Below are the 100% crops from the Reference Images at all ISO settings (click for full size images)


Comments and conclusions for the GX8
I have to say that the image quality is excellent from this camera partly due, I guess, to the new processing pipeline. The additional leap from 16 - 20 megapixels sounds a lot however, in practice only gives a small amount of additional print area when you consider the 300dpi need for producing print. Nevertheless the increased resolution (when coupled with a lens capable of delivering that degree of resolution and fine micro contrast) does give some pretty good detailed images.
The addition of the tilting EVF is a great feature for low level shorts as it allows those of us with less than perfect vision to really check focus etc.
The new dials and access to certain functions is totally different to any other camera I have and did take some getting used to.
Quick adjustments were often made impossible because I hadn't got into this cameras way of operation. If it is our only camera then once you have set up the Fn buttons to your preferences and got used to the layout of the dials and push buttons I'm sure it will become second nature and "on the fly adjustments" will be quickly achieved. Autofocus is fast and accurate and the metering appears to be consistent also requiring very little in the way of exposure compensation except for those scenes which would normally require it, like backlight shots.
For video it may not have all the features of the flagship GH4 but covers most of my amateur needs. I wish they had kept the 3.5mm audio input socket as it does mean using another 2.5mm to 3.5mm adaptor cable to utilise my external miss - and this could be a source of electrical noise. It's also welcome to see the Panasonic lenses with OIS are catered for, in the video mode with in lens stabilisation - using Olympus lenses would not give you the two axis stabilisation in video.
Overall I would say it is a camera I could recommend if you want some really good image quality. With very usable ISO in low light up to about 1600 ISO it does give low light shooters, or lenses with smaller apertures, a great benefit.
My main "niggle" is the fact the SDXC card is located in the battery compartment, not a deal breaker but when compared to the GH4 with side access it really is a bit of a pain when tripod shooting - even though you can still get access to the compartment with most tripod quick release plates.