Graham's Photography Blog & Technical Reviews
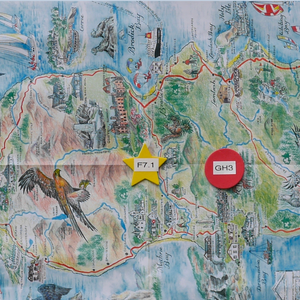
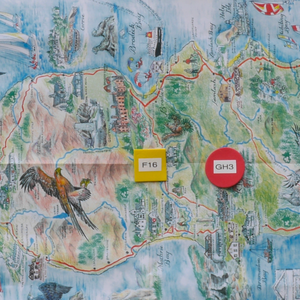
Field of View, Depth of Field and Magnification of Raynox Close Up lenses with the Panasonic Lumix FZ200/300/330
A conducted a test to determine the above criteria for both the Raynox 150 and 250 lenses. The tabulated results are shown below.
The subject to focal plane distance is the distance from the subject to the centre of the Mode Dial on the top plate of the camera.
This focus distance is the closest focus distance that will achieve auto focus.
Using the test rig it was possible to measure the subject width and the distance from the subject to the focal plane.
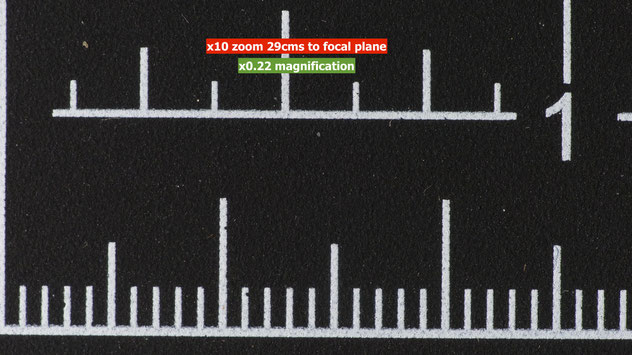
As the FZ200/300/330 sensor is 6.2mm wide the magnification is given by the formula IMAGE WIDTH/SUBJECT WIDTH
SO IN THIS EXAMPLE WITH THE RAYNOX 150 LENS, THE CAMERA SET TO X 10 ZOOM (250MM EFL) THE MAGNIFICATION IS 6.2/28 (MILLIMETERS) = 0.22
THIS IS ACHIEVED WITH THE SUBJECT TO FOCAL PLANE DISTANCE OF 29 cms.
The result depth of field was determined by another jig to show the band of focus at the sharpest aperture for the lens plus macro lens. In testing the best aperture was F4 All the depth of field measurement were taken at F4. Beyond F4 the images loose sharpness due to diffraction.
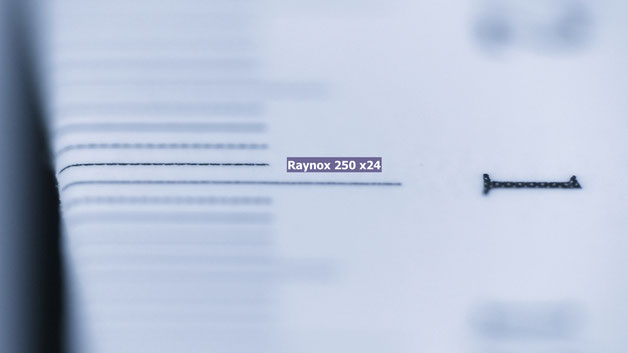
As an example with the Raynox 250 lens attached and the camera zoomed out to x24 the measured depth of field is approximately 1 mm!
This is the full chart of my test results.


The video showing the test.
Using Photoshop Smart Object Stacking Mode for Noise Reduction of high ISO JPEGS
With CS3 and above versions of Photoshop (not Photoshop Elements though) there is a very useful feature which allows the use of the Median filter when applied to stacked images.
Median stacking will consider all the values of a pixel at a single location across each image in the stack, then choose the final value for that pixel based on the median result.
Assuming you took 5 images for a stack, then for a given pixel location, there will be at most 5 different pixel values:
Red   (075, 100, 120, 140, 151)

    Green (120, 136, 149, 153, 167)

    Blue  (167, 199, 203, 214, 226)
A Median stack will give the final pixel value as RGB(120, 149, 203). Basically, the median will pick the value as the number that falls in the centre of the list, assembled into an ordered sequence.
If there are an even number of values, it will average the two values that fall on either side of the middle. This means that values that are spurious or outside of the range will be disregarded.
This works very well, as noise is mostly random, while the image data should remain constant at any pixel location.
What does this mean in practice? Well for any sequence of JPEG (or RAW conversions) shot with the camera in a burst mode in order to create an image set which doesn't contain a lot of subject movement it means that when these are imported into Photoshop and merged into a "smart object" stack (so the original images are always available if needed) and then the stack is first auto aligned to get good registration of the images and then the median filter is applied the result is a much smoothed image which has a lot of detail and less noise.
Here is a before and after image using this process. It's a 100% crop from an 6 images from a FZ330 image shot 1/10 sec, F2.8 @ ISO 1600


The upper image is one of the images used in the stack and the lower image is the final image after the median filter has been applied.
You can see the amount of nose reduction in areas like the signage which is now noise free.
On the Tech talk page I'll publish the method to achieve this result. It has its origins in astrophotography to reduce noise in long exposure images but can be used for any image sequence where there is a random noise component - even ISO 100 images! You just need a sequence of images to produce the result. The more images the better the result, so 4K burst mode shooting would be ideal!
The Use Of Focal length To Isolate Subject From Background.
Depth of field is determined solely by the aperture of the lens. That is if you keep the subject the same size, as you alter the focal length, by moving the camera distance relative to the subject. With small sensor cameras (like the FZ200/300/330) because of the optics required to form the imaging circle large enough to cover the sensor diagonal the depth of field is inherently quite large.
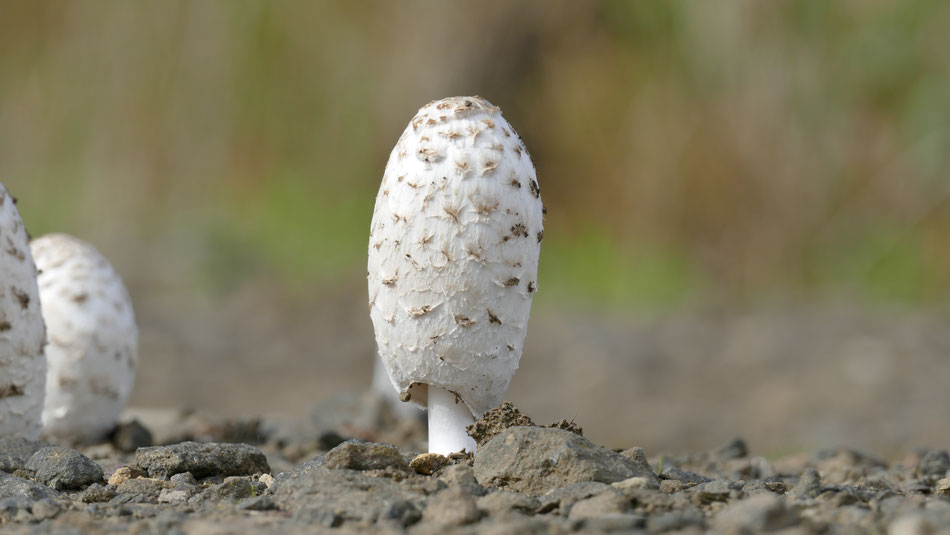
The only way to give the apparent reduction in depth of field is to use longer focal lengths, keep the camera as close to the subject as possible (1 metre in AF macro mode) and trying to keep the subject as far away from the background as possible. Conversely if you wanted to show the habitat of a plant for example then you would use the shorter focal lengths and move much closer to the subject.
Here's an example of a fungi where I wanted to show the habitat and then show the detail of the fungi without a too distracting background.

Panasonic EZ Zoom
Extended Optical Zoom is a wonderful expression used by Panasonic to deliver expectations of using longer focal lengths (beyond the native longest focal length of the zoom lens) without loss of image quality in the process.
Well lets examine this in a lot more detail. First the resulting zoom is NOT delivered as OPTICAL zoom extension.
Lets' see how the extension to the apparent zoom is created.
With the FZ200, for example, we have quite a few choices for the EZ zoom. In the 16:9 aspect ratio the native picture size is 4000x2248 pixels. If we drop to the 6M EZ setting this is reduced to 3264x1840. At the HD image size it's 1920x1080 pixels.
So at x1 zoom or 25mm EFL we have 4000x2248 pixels and at x24 zoom or 600mm EFL we have 4000x2248 pixels. Now if we select the 6M EZ image size at 25mm it gives 3264x1840 and at x24 or 600mm gives 3264x1840. Now as we increase the zoom beyond the x24 marker we find we can get 29.4x zoom. If we look at an image created at this magnification it is still 3264x1840 pixels.
What is happening? Well at 25mm the JPEG processor is taking the 4000x2248 pixels are applying some down sampling to give 3264x1840 pixels. Similarly at the end of the x24 optical range of the zoom it is applying the same degree of down sampling to still produce 3264x1840 pixels. Now the magic begins! Go beyond the x24 and the JPEG processor is taking less area of the sensor pixels and still down sampling this to 3264x1840. So it looks like we have zoomed into the image yet still kept the same image pixel dimensions. Easy to believe that you have extended the optical range of the lens! At the full extent of the zoom lever travel (x29.4) it is the direct 3264x1840 pixel crop of the sensor that the camera is using.
But wait, all is not bad here! There is a beneficial advantage of using down sampled images from the camera. Firstly the down sampling adds extra sharpness in the image. the more the down sampling the stronger this effect appears to be. Secondly noise is also reduced by the processing giving a cleaner looking image. I hear you saying why buy a 12megapixel camera and use only 6Megapixels! Well yes it's true by using the lower image dimensions the ability to produce big enlargements or crop into the image is a little reduced but for the usual 6inch x 4 inch print or HD computer display we only require 2M images anyway.
It's very easy to prove the advantage of using in camera down sampled images. Just take the first image at full image dimensions and then take the second image at a EZ setting and then compare the two images on you PC screen enlarged to the same full screen view (not 1:1 but fitting the screen width or height).
In the next images you will see the results of such a test from the FZ300/330 at 9M and then 8M and the 2M pixel count.
These are 650 pixel wide crops from the 9M, 8M EX and 2m EX sizes and enlarged to the width of this page.
You can clearly see the effect of higher down sampling producing sharper image. The bottom 2M image in particular is far sharper than the native 9M top image.


The two images below are from FZ1000
1/. a 1920 x 1080 iso 1600 image
2/. a 5472 x 3080 iso 1600 image

Using Flash For Close Up Photography
I think that if you are interested in photographing plants and insects, particularly at close range to give super enlarged views using supplementary close up lenses on bridge cameras like the FZ200/300 or extension tubes on CSC's and DSLR's then flash becomes the must have, go to accessory.
The reason, we need to be using small apertures to get the depth of field, F7.1/F8 in the case of the FZ200/300. In dull light this forces us to use longer shutter speeds as we always want the ISO to be the lowest value - for both dynamic range and noise reasons. Because we are magnifying our image the amount of subject movement, through our unsteady hands, is greatly magnified with a result that we often get images which are less than perfectly sharp.
Flash becomes our "portable sun" and can help us to achieve some stunning images. I want to look at the various ways flash can be used to provide this additional light needed. Covering the basic options through to more advanced techniques.
Lets first look at using just the inbuilt, or on-camera flash.
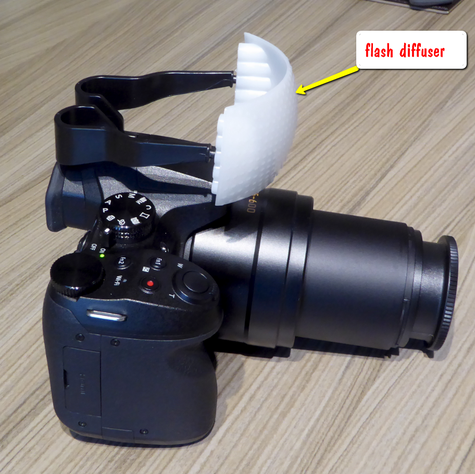
Although the naked pop up flash can be used at these closer distances as the point light source shadows aren't quite as distinct I prefer to use a purpose made flash diffuser, such as the one illustrated here. It gives consistent results, is durable and easily fits into my camera bag. Home made tissue paper ones are OK for a single image however I would recommend this as a very positive addition to your camera kit for this type of photography.
It gives nice soft diffused shadows however it is on axis lighting and sometimes doesn't show any three dimensional texturing.
Below is the image from this setup.


In this illustration I am using a Sunpak 422PX flash gun which is actually a Canon EOS E-TTL dedicated flash gun however I'm using it in the fully Manual Mode on the FZ200/300/330 as the centre pin is all that is required to give the "firing" instruction to the flash.
It is slightly too high for this operation if you are working at really close distances - this head doesn't have the facility to point down by 7 degrees as with some other units. The light is not diffused and the image shown below from the flash with the power level dialed to 1/32 power in this case. The extra height does create a little three dimensional lighting though.


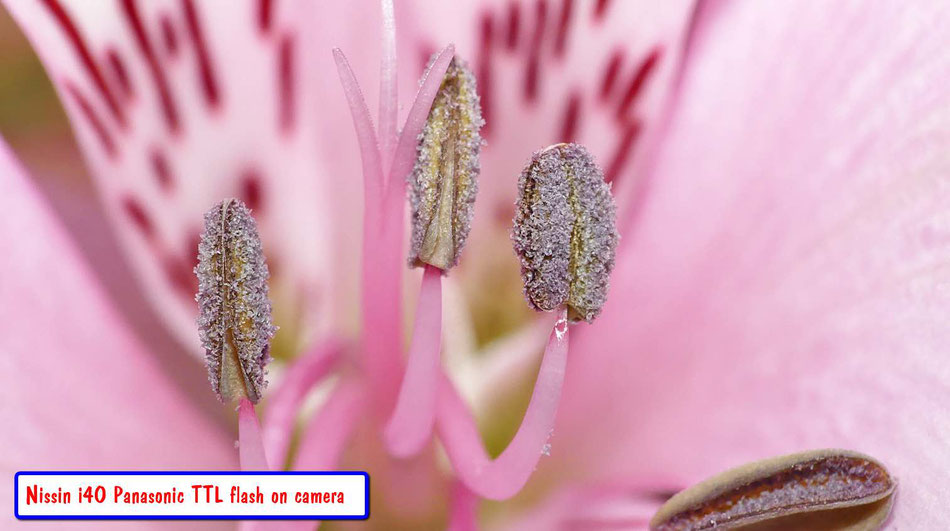
In this illustration I am using the Panasonic dedicated Nissin i40 flash gun as it allows the camera to perform the exposure adjustment, automatically so there is no need for test exposures as in the case of using manual set power levels on other flash units. It is a slighter better combination as the gun is a little lower however it is still on axis and doesn't give good three dimensional lighting.
An example of the image from this set up is shown below,
Better, three dimensional modelling is achieved if the flash gun is removed from the camera either by using an extension cord or inexpensive wireless trigger units (not for TTL use though) and the flash unit is held at 45 degrees above and to the subject. This creates natural looking lighting on the subject. With TTL it is easier to get the right exposures as any change in the flash distance is automatically corrected.
An example of this type of lighting is shown below. You will be able to see the subtle side shadows creating extra depth in the image.

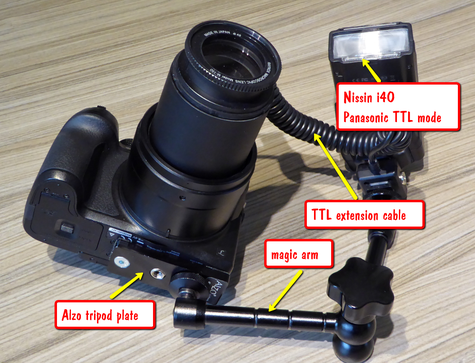
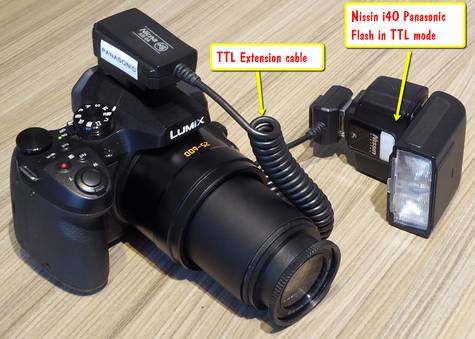
To achieve consistent results and give a "handle" to hold the flash unit I created this setup to assist me with shooting this type of modelling using a single flash unit on a TTL extension cable.
It consists of the TTL extension cable, (http://amzn.to/1UCQGvb)
and a "magic arm" (http://amzn.to/1YvZIzR).
The magic arm screws into the ALZO tripod plate (http://amzn.to/1QaJlXz) using one of the 1/4 -20 mounting holes.
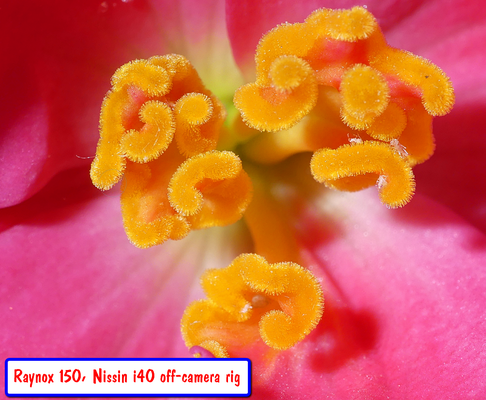
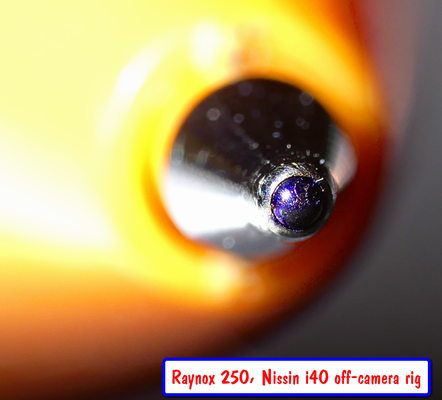
I'm using the Nissin i40 TTL flash unit (http://amzn.to/21q4nCc) as this is probably the best unit I have tested for the FZ bridge cameras. The image below were shot using this set up with Raynox 150 and 250 lenses


Using a dedicated flashgun on a non dedicated flash camera.
Most digital cameras employ a positive voltage centre triggering electrode in the hot shoe of the camera. By utilising this fact we can quite happily install flashguns designed specifically for compatible camera cameras on any camera. Of course we cannot employ the e-ttl ii protocol in the case of Canon flashes or the i-ttl system of Nikon flashes however with the flash gun set for manual operation we can easily fire the flash, adjust its output power and create great images.
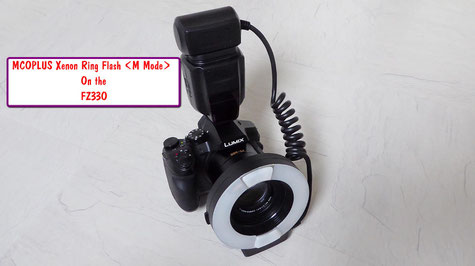
Here in this image I have a Canon E-TTL II ring flash installed on the Panasonic Lumix FZ330 and operated in the full manual mode creates great images. This is ideal as there are currently no dedicated TTL ring flashes for the Panasonic system.


I have produced a tutorial video which shows how to use this system on the Panasonic Lumix FZ330 and you will find it here on Youtube

All of the flash units show adjacent were intended to be used as dedicated TTL flash units on DSLR or CSC cameras.
Because of the common triggering connection on all digital cameras(and film cameras) it means that we can now use these flash guns, which you may have retired when you bought a lighter, and more convenient, Panasonic bridge camera.
Because of the low voltage triggering and low voltage digital connection on the other pins it is extremely unlikely that any damage will be caused to either camera or flash unit using them in this way. I have been using my flash units for years in this mode without any issues at all.

The electrical connections for both the Nikon and Canon dedicated hot shoe showing the only electrode which is necessary for the system to work (plus the ground connection of the metal hot shoe itself as the return signal path)

If you want to use the flash off camera you can either use an extension cable (which will be the Panasonic TTL cable ideally although any should work) or use the method shown adjacent.
Using the hot shoe to PC adaptor on the camera and a male to male PC connection cable to connect the camera to the PC connection of your flash gun (if it has one fitted)

The "PC" connection found on a lot of external flash units can be used to trigger the flash from the camera

With manual only flash guns there is only one electrode on the hot shoe. This is the one responsible for the actual firing of the flash from the signal from the camera. It is normally a low positive voltage (less than 10v dc) and the camera sends a low signal pulse which fires the gun - similar to shorting the pin to ground.
Older film days flash guns may have trigger voltages on the pin of over 200 volts so it is unwise to try and use them before checking the actual voltage on this pin.

Typical displays of the TTL units when placed in the manual mode with provision to set the power level. Usually this is from 1/1 (full power) to 1/128 the minimum power. Some units offer the reduction in 1/3rd EV units which is ideal, others just 1 stop increments.
Given an option to shoot wide angle or telephoto - which produces the best overall results?
If you are shooting a static shot such, as the red admiral butterfly shown below, if it is possible to shoot wide angle to get more depth of field, extra lens sharpness and use a lower shutter speed then you may want to consider it for your next shot. A lot will depend upon the image that you want to create. If you want strong image separation with the background then you will need to use a longer focal length, get as close to the subject as the minimum focus distance will allow and have the subject as far from the background as possible (like in the tulip below). Moving in close allows the use of a wider angle setting which automatically increases depth of field for the same aperture and generally the zoom lenses produce better images at these focal lengths than at telephoto settings. Of course it will depend on whether you subject will tolerate the camera lens being just a few centimetres away and what the background is. Just another suggestion for your imaging skills. click on the images for larger views


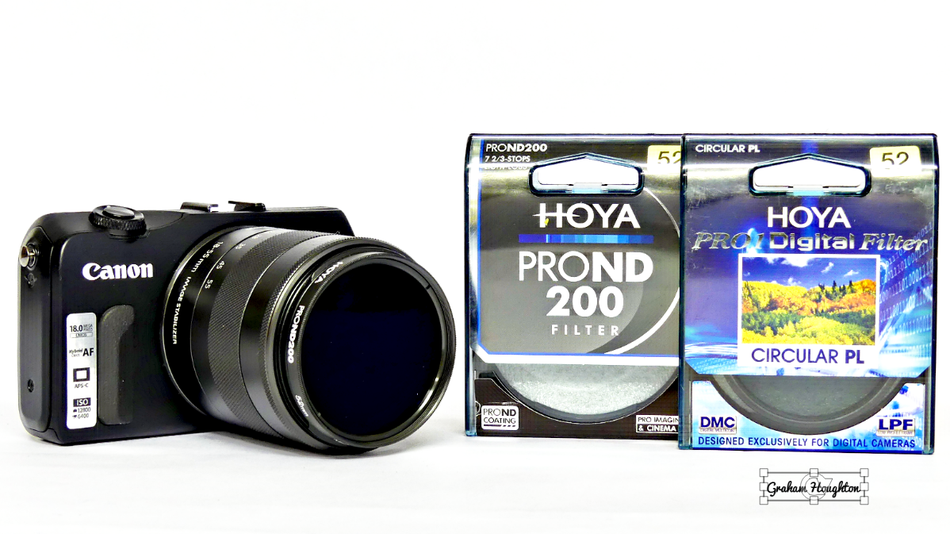
Are More Expensive Filters Worth The Investment
Specifically do the more expensive filters not affect image quality!
Some time ago I did a series of tests using "cheap" ND and CPL filters and found that they definitely affected image quality.
Not only with colour casts but also loss of image contrast and sharpness.
As I rarely use filters I never considered the investment in "more expensive" filters to be cost effective for my types of photography. However, I have a planned photoshoot next month which will require the use of fairly dark ND filtration so I decided to purchase a mid-price range ND200 (7 and 2/3 stops light reduction) and re-test it prior to this photoshoot.
None of the shots will feature the light source being in the frame so I'm not worried about any secondary reflections from the additional glass surfaces but I would be concerned about image colour cast or loss of contrast.
I'm pleased to report that this ND filter didn't add any loss of contrast or resolution of the image when viewed at 100% from each image. Based on the images I shot using the Hoya PRO series I can recommend them if you want decent results.
Here are two images shot at the same time, one with the ND200 filter and one without. Both the same ISO and Aperture. Just let the camera determine the new shutter speed. Click on images for larger view.

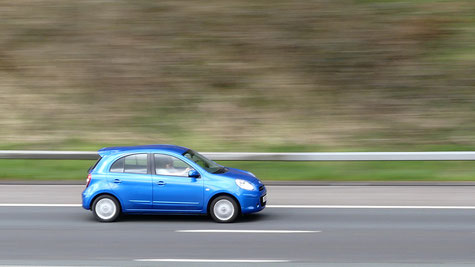
Using The FZ200/300/330/1000 for blurred background motion shots - panning techniques

To capture moving objects such as cars, trucks, motorcycles, runners etc you need to adopt a specific setup for your camera in order to achieve this. Normally we want our subject free from motion blur so we often use the 1/focal length of the lens as the shutter speed to prevent handshake however, to arrest subject motion blur due to movement across or towards the camera we may need to use 1/500 second or faster shutter speeds.
For our "panning" shots we need to select a shutter speed which allows the background to become blurred as the principal point of interest, i.e. the moving subject, remains sharp.
To be able to successfully achieve the execution of this image you need to consider the camera setup first.
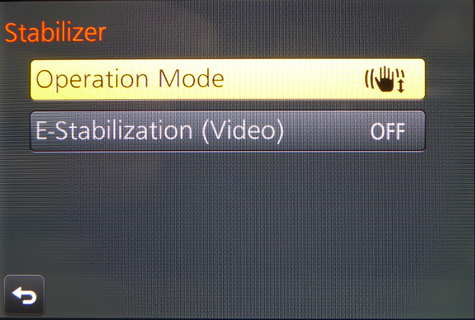
The camera image stabilization is normally set to provide both horizontal and vertical motion compensation. During our panning sequence we need to disable the horizontal motion correction just leaving the vertical correction active.
In the Image Stabilizer menu select the menu option to vertical only for the 300/330/1000 or set it to OFF for the FZ200
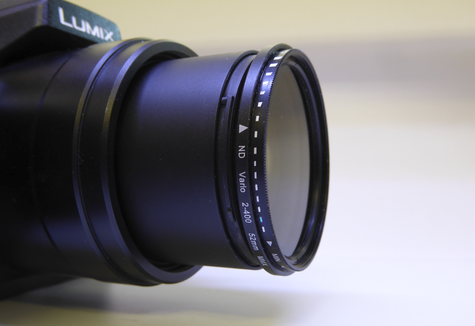
In bright conditions to achieve the necessarily slowish shutter speeds of 1/25 to 1/50 sec it will often be the case that you will need to add neutral density filtration in front of the camera lens.
Using the sunny F16 rule in bright sunlight the camera setup would be 1/100 @ f16 with ISO 100. As we are limited to F8 that would equate to 1/400 sec exposure. To get to 1/50 sec under these lighting conditions we need to reduce the light by at least 3 F-stops.
By far the easiest solution is to use one of the variable ND filters with the right size filter size 52mm or 62mm on the FZ1000 however, the optical quality of the cheaper ones will lead to poor image quality. I would suggest getting a plain ND8 ( 3 F-stop filter)
for better quality images
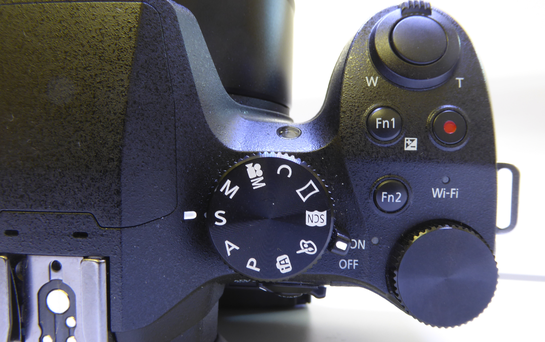
On the mode control dial select Shutter Priority mode
and set an exposure of 1/50 second to begin with. Set ISO at 100 for best image (ISO 125 on the FZ1000).
You can either use the single area AF mode and AFS to set the focus point.
It's often advantageous to stand square on to where the subject will pass in front of you. Select the focus point on the ground there, press and hold the shutter button at the halfway point to lock focus and exposure then keeping the shutter half depressed reposition the camera view to where the subject will start to enter you view. In the viewfinder, or lcd screen keep the subject central, or with slightly more room in front of the subject and continue to track the subject. Fully depress the shutter at your chosen position but keep the camera moving through to the end of the sequence. Burst mode may also be used, use the mode with AF enabled.
The camera can be held so that you are using the EVF or the LCD screen. Keep a stance with the legs slightly apart and twist your upper body to the entry point for the panning action. As the subject approaches follow the subject rotating your upper body around your trunk and fire the shutter when you have reached the forward facing position. Keep the camera moving smoothly trying to keep the subject in the same place in the viewfinder or on the LCD screen. Examine the image if the subject background still looks slightly static you can either
Reduce the shutter speed further to 1/25 or 1/15 but you run the risk of camera shake here or select a longer focal length on move further back to compress the background more towards the subject.
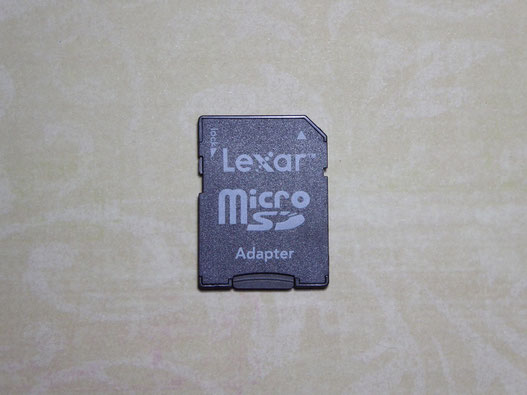
The Suitability Of Micro SDXC Memory Cards in Cameras

You may find that the prices of Micro SDXC memory cards are about half the price of the usual package SDXC memory cards.
Designed for smaller devices like mobile phones and action cameras is there any problem using these cards with the adaptor (if you purchase a kit which included the SD to Micro SD carrier) in cameras which normally use the SD format cards?
Well I've been testing the Lexar 64GB micro SDXC class 10 card with my Panasonic Lumix GX8 both for stills, burst mode 4K photos and 4K video and so far the results have been very encouraging. The 4K burst mode and 4K video recorded fine with no apparent problems with the captured clips.
However, there are some important things that you should know about SDXC cards in general which may may you reconsider them.
Firstly, if an SDXC memory card is inserted into a computer or device that does not support the SDXC standard, a message may prompt you to format the card.
Do not format the SDXC memory card in a non-compatible device because it will erase the data on the SDXC memory card and format the card for a different file system, making it incompatible with SDXC devices.
I think it true to say that all Panasonic cameras support the SDXC U1 specification so formatting them in camera is OK.
The EX-FAT (extended file allocation table) used with SDXC may need an update to your windows operating system if you are using windows 7 or Windows Vista. This can be obtained from the Microsoft download centre. It is available for 32 bit and 64 bit PC's.
Secondly, by using the adaptor you are introducing another connector into the system between the micro SDXC card and the SD adaptor/carrier. This may affect reliability if the card is repeatedly inserted and removed from the carrier
Transferring Panasonic Lumix camera files to Smartphones via USB (though it works with most USB connected cameras)
There has been many occasions when I have a really interesting image shot on my camera and wanted to post it to my social media page there and then. I have the Image App which allows me to transfer the file by wi-fi using the camera and the smartphone which works fine. I also use Toshiba Flashair wi-fi cards which allow file transfer however, that relies on having that card present in the camera at the time of shooting. I was trying to see if I could transfer the images from the sdxc camera card to the smartphone (Andoid version Sony Xperia Z3) via the OTG (on the go cable) and the Apple iPhone using Apples lightning to USB connection cable.
When I hooked up the camera to the smartphone using the camera USB and the OTG cable the camera recognised that it had been connected to an external device. I selected PC mode however, the smartphone did but load any USB driver and I could not see the camera with the File Commander app on the phone. The OTG would recognise USB flash drives so I knew the system was working but why no camera connection.

I thought it was not going to be possible however, I tried the Pictbridge application which is designed to send images to printers and this time the smartphone launched the Google Photos Camera Importer App
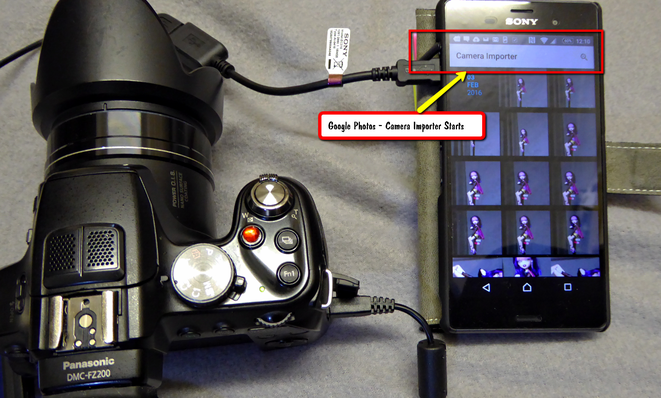
With the camera importer app running it was possible to select any JPEG image that was on the card. It even presented them captured by date order which was good. It cannot transfer RAW or video files.

Once the required images are selected clicking the Import button transfers the images directly to the photos gallery. Once the images are there you can send them via the camera's phone service connection to the social media, cloud or wherever you want to send them.

I managed to get the iPhone to accept the USB connection from the panasonic camera however, I had to use the Apple USB connection cable. I tried a few third party adaptors but it would see that Apple has managed to block them out! It would work using both the PC and Pictbridge connection modes

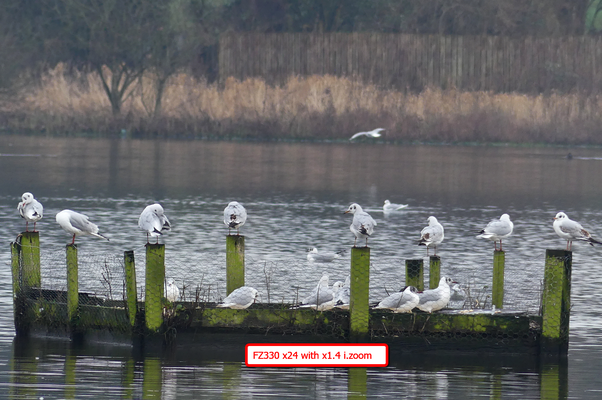
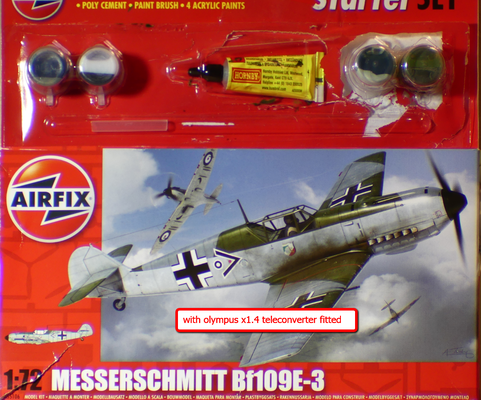
Even with 600mm (Effective focal length) we always seem to want more reach from our lenses. One popular way is to use an AFOCAL TELE CONVERTER lens like the Olympus TCON14-B shown above fitted to the Panasonic Lumix FZ300/330. Adapted from 58mm to 62mm using a step up ring (note this is a Chinese adaptor tube with 58mm threads not the official LA7 tube which has 55mm threads)
This lens changes the camera focal length, in this case by 1.4 x magnification, but various other multipliers are available like the Panasonic LTE55 which is a x 1.7 magnification.
These lens are AFOCAL, that is it has an infinite effective focal length so will always allow infinity focus with any lens to which it is attached.
They do not alter the effective aperture that the camera is set to as they are generally large enough to allow almost 100% light transmission. Most contain coated optics to reduce flair and ghosting.
So how good are they and are they worth the investment?
When coupled to the FZ200 or the FZ300/330 using the LA7 adaptor tube (needed to support the weight of the optic) I found both the Panasonic LTE55 and the Olympus TCON 14B produced visibly softer images with noticeable chromatic aberration.
When the camera was set to JPEG mode only with i.zoom enabled after zooming in to the equivalent optical magnification of the teleconverter lens I found the images to be a very superior quality as seen in the sets of images below. (click for larger images)


Aperture or Shutter Priority - Which is the best choice and a BONUS feature for Panasonic FZ330(300) and FZ1000 users.
Ask 100 photographers this question and the majority would say they use Aperture Priority. However what about Shutter priority for wildlife shooting? After all, as wildlife photographers, shutter speed is the key to suppressing subject motion blur, right? So why not just set in the ideal shutter speed and run with it?
Well the biggest problem with Shutter Priority is that it uses F-Stops to maintain your shutter speed and exposure. This comes with some heavy trade offs.
For example there isn’t much range in F-Stops compared to shutter speeds - especially when you need more light. In reality you have only 4 stops of variance with the FZ200/300/330 (F/2.8, 4, 5.6 and 8).
Compare that a whole range of shutter speeds from 30 seconds on up to 1/2000th (or more on the FZ300/330.
If we just look at the “useable” shutter speed range of 1/30th - 1/2000th we have 6 F-stops in Aperture Priority versus just 4 in Shutter Priority.
Additionally as the light levels begin to fall If we have our shutter speed set to 1/500th, we “bottom out” pretty quick, even with an F2.8 lens - Shutter Priority simply can’t open the lens up to let more light in, so now beginning to get into underexposure. This can be the most common source of blurred images if you don't realise the light levels are falling and the camera has maxed out on aperture.
Conversely on a really bright sunny day if you have set 1/125th of a second set as your shutter speed then in order to maintain that speed, the lens needs to stop down to at least F11 or F16.
This isn't possible on the FZ200/330/330 so we run the risk of overexposure as the camera only can set F8 as the minimum aperture at the lowest ISO of 100 (based on the sunny F16 rule!).
The trouble with the smaller apertures is the problem of diffraction causing the image to become less sharp and it becomes harder to isolate the subject from the background!
So what is the bonus feature for the FZ330(300) & FZ1000 shooters. Well it lies in the fact that these cameras support a new AUT0 ISO mode in the MANUAL Mode. This unfortunately does not exist on the FZ200 so you cannot adopt this shooting method.
As we should know Exposure depends upon three things Aperture Value, Shutter Speed and ISO. Change any one of them and the exposure can be maintained by changing equal and opposite to one of the other components. Thus we can have the best of Aperture Priority where we can set our optimum Aperture and Shutter Priority where we can set the optimum Shutter Speed and let the Auto ISO maintain the Exposure for us. Cool feature or what!
Additionally we can set an upper ISO limit (using the side control wheel on the FZ330(300) and via the REC setup menu of the FZ1000) so that we don't begin to lose image quality through excessive noise. The camera will warn you when you have reached the ISO limit that you have set by flashing the indicated exposure aperture and shutter speed in red.
Below is a selection of images shot in the manual mode with 1/50 sec, F3.2 and the Auto ISO mode engaged


Understanding Your "Pop Up" Flash Performance
One subscriber emailed looking for advice on getting respectable performance when using the "pop up" flash on the FZ200 camera.
He was finding that the iA mode gave superior results compared to shots taken with Aperture priority and flash.
Images taken in the iA mode showed brighter tones, warmer colours and better background coverage whereas the Aperture priority mode images, by comparison looked cold and had dark backgrounds.
I simulated the effects on a table top scene.

The image taken using the iA mode. Note the camera has selected ISO 800 due to the low ambient light level

The image taken in Aperture Priority mode, same f2.8 aperture and 1/60 sec shutter speed, however I used ISO 100 here to keep noise to a minimum.
From the two images above you can see the effects of the iA and A mode exposures. Normally in A mode when you pop up the flash head if the exposure is longer than 1/60 second the camera sets the exposure to 1/60 second and then the TTL flash power is adjusted to compensate for the lower light. So although in the Aperture priority mode the two figures are correctly exposed, the flash fall off causes the background to go dark as the 1/60 sec ISO 100 exposure is insufficient to produce a correct exposure under this lighting level.
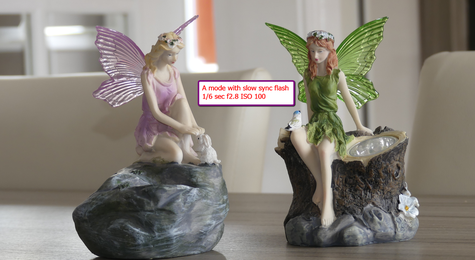
The correct balance was achieved using the slow-speed shutter synchronisation feature of the flash menu. Here the camera uses the ambient light to calculate the exposure and then the TTL flash just fills the foreground. Note the 1/6 sec exposure gave the same background exposure as the iA shot but with substantially reduced image noise.
In situations where the ambient light is low and it means long exposure times in the slow synch mode it might be advisable to switch to Manual mode. By keeping the same aperture (for the correct flash exposure - which will be TTL based by the camera) and then adjusting the shutter speed to adjust the ambient lighting of the image. You can safely go down to 1/30 second with f4 at ISO 100 and achieve good results. The amount of ambient light will be the determining factor. If it is very low level then you will need to open the aperture to f2.8 and/or increase the ISO if you want to avoid the usual dark backgrounds to the flash images. Here are some images to illustrate this point.

Here's a typical on camera flash picture. I've used the FZ330 (300) here but it is the same with the FZ200/1000 etc.
Because of the amount of white in the image I had to increase the flash exposure compensation (the flash output power adjustment - not exposure compensation) to add extra power to the flash. The background, a few feet behind the subject, is typically dark.

Here's the same shot but switching from Aperture priority to Manual Mode keeping the same ISO and Aperture but adjusting the shutter speed until the background ambient light added enough light to the image to make the image less stark.
Again +1EV on the flash exposure compensation to allow the camera to correctly expose the flash part of the exposure.
As there is a mix of colour temperatures in the image the more ambient light there is added to the exposure the more this will affect the whites of the flash exposure so it is best to keep an eye on this, unless you want the warmer images that tungsten lighting adds to them.
Why Exposure Compensation Is Needed In Some Scene Types
|
|

|
|

|
|

|
|

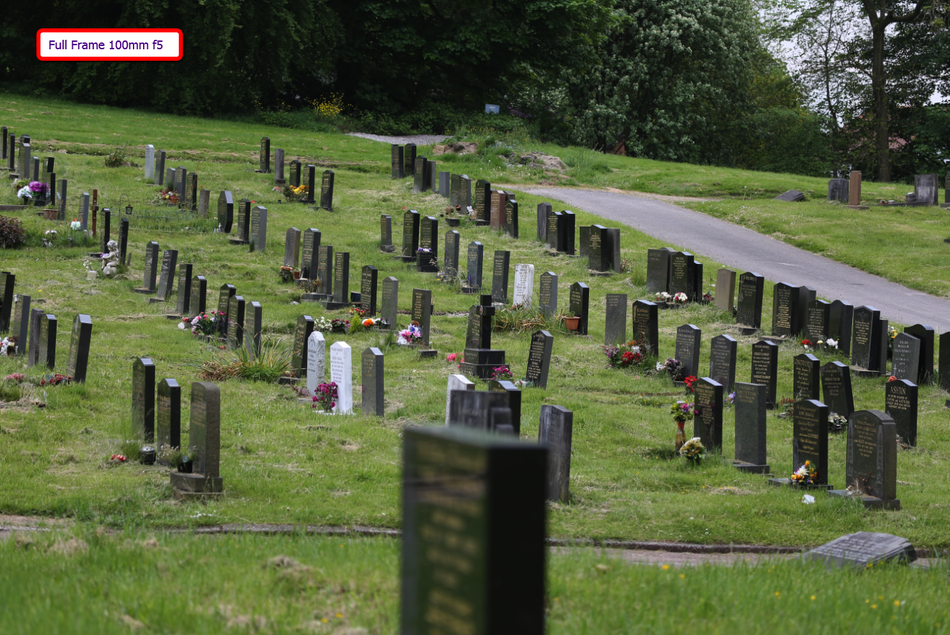
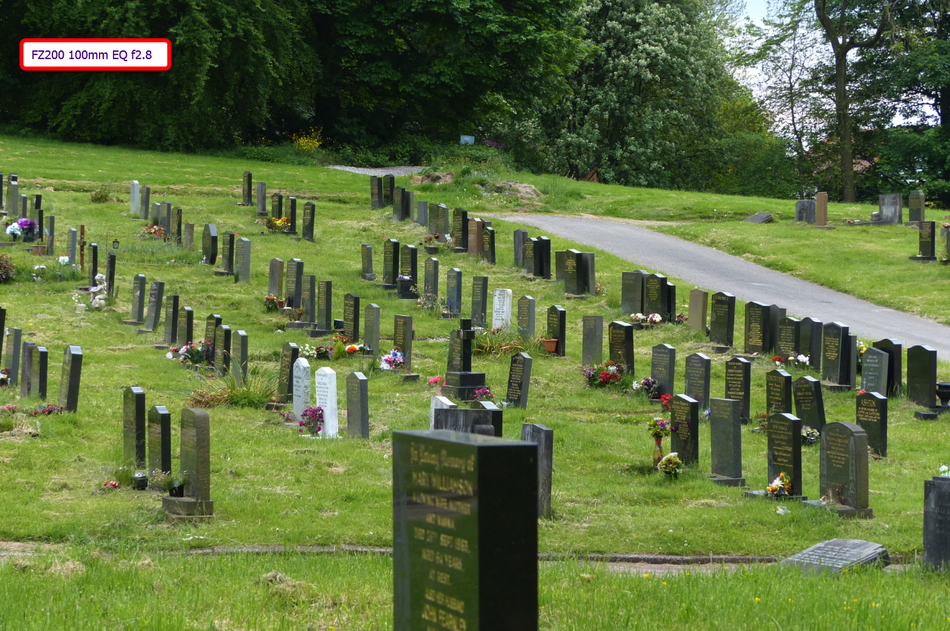
Maximising Image Quality
With digital cameras there is always a compromise to be made as our eyes have a dynamic range, that is our ability to see light and shade, highlights and shadows, with a far wider scope than any digital camera.
The smaller the sensor in the camera, the worse the compromise becomes.
Several factors can affect overall image quality. The sensor fabrication technology such as CMOS or CCD has an impact and even within a technology such as CMOS, the most common sensor technology in modern cameras, there is a wide range of implementations from
BSI (back side illuminated) to sensors with no anti aliasing filters (those put in front of the sensor to actually slightly blur the image to prevent aliasing and moire patterns affecting the image.
Sensor Size. Both sensor size and pixel density will affect the image quality either through resolution, dynamic range or noise. Better image quality is usually achieved with larger format sensors and larger pixels.
The lens quality. Good lenses are extremely complex optical devices with may elements used in their construction to allow the rays of light be focussed accurately onto the sensor. They type of glass, the number of elements, the number of blades in the diaphragm and whether it is a "prime" lens or a zoom construction will also affect image quality. It's quite normal in a lens construction that image quality is not uniform throughout it's aperture range or, if it's a zoom lens throughout the zoom range. Most lenses, unless they are fixed aperture ones, will increase in sharpness as you stop down from the largest aperture to a peak which is between 2 and three f-stops smaller. It will the have an region in the f-stop range which delivers almost equal performance and then as the aperture gets smaller the sharpness falls away again. This can be down to lens design but more commonly through "diffraction limited resolution" which is caused by the small opening in the diaphragm at these apertures. Lens coatings are used to provide some scratch resistance but also to maximise light transfer from element to element. This is important to keep the design speed of the lens, promote good contrast in the image and to reduce ghosting and flairs when shooting with the light source visible in the image.
Use of aperture. As we know aperture affects depth of field. A large aperture (like f2.8) delivers a shallower depth of field than a smaller one at the same focal length. So its important to chose an aperture appropriate for our subject. Landscapes for example will usually dictate that we have maximum depth of field to enable both foreground and background areas to be equally in focus. We would use a small aperture to achieve this. Portrait photography normally would require a much narrower depth of field and so the use of wider apertures are normally used.
Use of image stabilisation and shutter speed. We have come to expect cameras and lenses to have some form of image stabilisation built into them and have come to accept the 2-4 stops of increase in the ability to be able to hand hold the camera/lens at much slower shutter speeds than previously achieved with image stabilisation. However this builds a false sense of security in the knowledge that are images will be blur free at slower shutter speeds. It might prevent camera shake but does nothing to arrest any subject motion that might be occurring.
Camera mechanics. The very action of exposing the sensor to the light coming from our image requires some for of a shutter system. In DSLR's traditionally this has been either fabric roller blinds, or nowadays metal slatted ones, that have to be driven up and then back in front of the sensor. This movement can cause what has become universally known as "shutter shock" and can cause loss of sharpness in an image. Some cameras have a facility by which this can be reduced, a so called silent mode, where the shutter is either driven with less energy or there is a slight delay imposed between the shutter opening and the "read out" of the image data from the sensor. This "shutter lag" might be objectionable for hand held pictures and is usually only reserved for when shooting on a tripod. Similarly in some DSLR's there is a mirror which also has to flip out of the way. Again this can cause vibrations which can also cause loss of sharpness. Again for tripod shots there is often a "mirror lock-up" setting which causes the mirror to flip up prior to the exposure taking place thus allowing the camera vibrations to be reduced before the shutter opens and the exposure starts.
Tripods and heads. Often overlooked is the stability of the tripod we use. The action of the camera mechanics can cause significant oscillation or vibration patterns to occur during the actual exposure time. The amount of height used when using the tripod, the diameter of the legs, the materials used for the legs and the construction of the tripod head all can influence the resulting image. Also important to consider is the affect of wind. This can set about vibrations in the tripod which can severely affect telephoto shots and the action of the wind on long lenses causes torsional motions which again result in vibration and resulting image blur. Not to be overlooked as a source of tripod vibration is the vibration caused by traffic when shooting by the side of a busy road. Heavy vehicles can cause ground waves when the hit a manhole cover or similar and if you have a long and heavy lens on a tripod set at maximum height you may see image wobble as you look at the viewfinder.
So to maximise the image quality we should eliminate as many of the possible elements that will come into effect as we take our pictures.
DOES SIZE MATTER
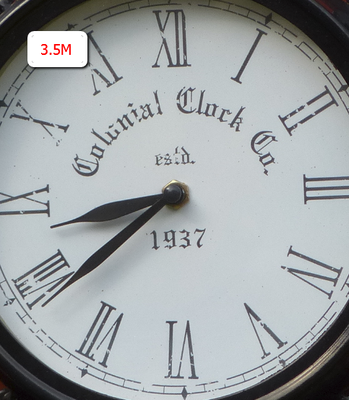
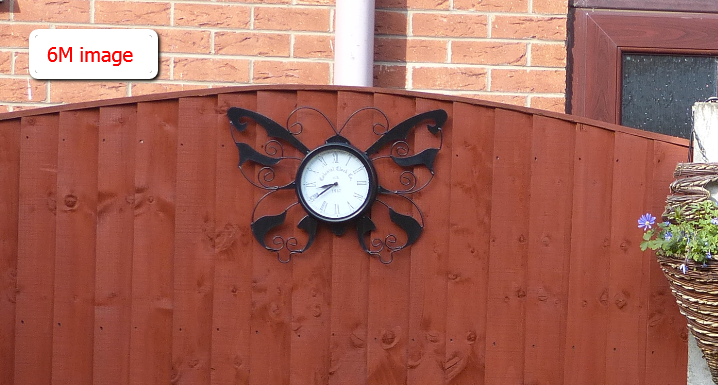
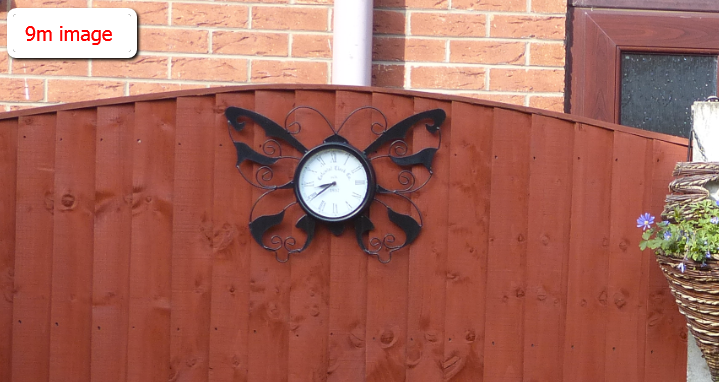
During the week I was in the kitchen when I noticed some starlings frantically poking their beaks into the area of the garden referred too as the lawn (actually more moss and weed than grass!). I ran back to my study, picked up the FZ200 checked there was a memory card installed and then hurried back to try and capture them through the kitchen window. In my haste to get a picture I hadn't checked that the camera was set up for another project I was filming and the image size was only set for 3.5M rather than the usual 9M that I usually have it set for ( that's in 16:9 aspect ratio as I predominantly shoot in this mode in case I want the images for video purposes) I was using the full 600mm EQ focal length however the image size of the birds was quite small so I thought I could crop in to pull out a better image.
It is then I discovered I had no pixel head room left to do that! I was so annoyed with myself for not checking the obvious settings (or I should have C2-1 set for default standard shooting for such grab events!"). However it did start another train of thought and one which is turning up some rather interesting results. As all my images now are generally destined as screen images in HD video productions or at most 1600 pixels wide for Facebook posting or only requiring 4 x 6 inch prints actually there is no need to keep shooting at full camera resolution apart from the fact that with larger resolution it would be possible to use sections of the image.
I started to experiment with the different image sizes available for each aspect ratio to determine what would be the minimum acceptable capture size. In doing the tests, shot from a tripod with manual locked focus when I reviewed the images all scaled to the same screen size I was surprised to see that the 6M image was actually sharper than the 9M image. I repeated the test with different focal lengths and subject distances and each time I got the same result. Additionally I believe the actual level of noise seen in the image is also reduced as I assume the JPEG camera generated image from the RAW file is scaled down after processing and this has the result of reducing noise and JPEG artefacts. Although the effect is difficult to see in these screen grabs the original images are quite discernible


The above series of images were shot at 600mm EQ focal length and then cropped from the same image size, click on the images for the full size cropped image. You will aslo notice that the resolution is still perfectly acceptable from the 2M image!
The above series of images were shot at 25mm EQ focal length and then cropped from the same image size, click on the images for the full size cropped image.


The above series of images were shot at 200mm EQ focal length and then cropped from the same image size, click on the images for the full size cropped image.
I also shot with RAW enabled on the camera and checked the images at this state and both appeared to have equal sharpness so it is my conclusion that it is the JPEG re-sizing operation which is causing this effect. As I don't really need to shoot at full 9M image resolution for the images I use I have now adopted the policy to shoot at 6M


The above series of images were shot using the camera set up for 6M image size and then scaled down to 1600 pixels wide (my normal upload dimension) I think they are more than adequate and are,
to me, marginally sharper through using this lower JPEG image size.
Getting Sharper Images
If your images don't appear to be sharp there may be a couple of reasons why this might be. For example
I have never
tested a lens that is at its sharpest at the extremes of the zoom range. As an example, if you shoot a 25-600mm EQ lens on the FZ200, you will get sharper photos at 500mm than 600mm ( x20 on the
zoom scale).
#1. I know it's always tempting to use maximum zoom however sometimes shooting at a little less than
full zoom and then, in post production, cropping into the image will yield sharper images.
As an example even my the Canon 100-400mm L series lens shoots sharpest at 300mm. I’m sure there are exceptions to this rule, but I haven’t seen them personally. Almost all
lenses are sharper somewhere between the extremes of the zoom range.
This is especially important if you are shooting a less expensive zoom lens or a kit lens on a mirror-less or
DSLR camera.
Spend a little time with a tripod mounted camera and take a picture of a newspaper taped to the wall across from you at different focal lengths and apertures as I've detailed on finding a lens sweet spot on my blog before. You’re likely to find quite a variation in sharpness levels depending on the focal length and generally 2 stops down from maximum
aperture. Once you have established the best aperture at your chosen focal length keep a mental note of this for your next shooting session.
#2. Are you stabbing the shutter button rather than squeezing it off like you would a rifle trigger. That
sudden quick button press is enough to add significant camera shake - even with mega OIS systems.
#3. Decrease your ISO is one of the best tips I can give you. Once you start to use anything but the native or
base ISO you will start the image degradation process due to noise and the noise reduction algorithm in the camera applying more softening of the image as the value increases.
#4. Maybe the actual focus point chosen is not the actual point YOU wanted sharp in your
image.
So here’s my recipe for proper focus every time…
1. Decide if you are shooting an action photo or a photo with a stationary
subject. If you’re shooting a moving subject, choose continuous focus AFF or AFC and if you’re shooting a stationary subject like a landscape or a portrait of a person, choose
AFS.
2. Always set the focus point yourself. Don’t let the camera decide as in
the case with multi area methods. Get used to moving the single area focus point by pushing the side focus button and moving it with the navigation buttons the back of your camera.
If you’re shooting a portrait, ALWAYS place the focus on the eye of the person
closest to the camera. On the nose or face or body of the person is not good enough. If you’re shooting a landscape, generally focus one-third up from the bottom of the frame, (the
hyperfocal distance) however if you have a strong foreground element, you may want to focus closer.
3. Once you've focused, be extremely careful not to sway forward or
backward at all. When shooting with a long lens at a wide f-stop, even a slight movement will move the focus before the shot in the AFS mode.
4. Be sure not to focus too close to the lens. A lens has a close focus distance, and camera manufacturers like
to push the envelope with this distance. I usually find that if I focus right at the closest point where the lens will still focus, the result is a slightly blurry shot. Back up a
little bit from the closest you can be to the subject and you’ll always improve the result.
#5. If you are using a tripod it is recommended that you turn off the image stabilisation. I also
recommend you use the 2 second timer or a wired remote shutter release cable to prevent any movement to the camera as you make the exposure.
#6. Check your shutter speed. OIS is a great thing to help achieve blur free images caused by
hand shake at longer exposure times however it doesn't stop any subject motion that may occur in your subject. The same scenario applies for tripod mounted shots. If the subject is moving,
birds on a feeder are a great example of this, you need to ensure the camera shutter speed is sufficient to stop the motion blur. It will depend upon the zoom you have on the lens but at x24 or
600mm EQ focal length this is likely to be above 1/250 second! Indoor sports are another classic case where there is sufficient light to hand hold at 1/30 second but subject motion blur ruins the
images.
#7. Are you using any kind of filter in front of the lens? I've tested several ND filters, variable ND
filters, CPL and UV filters and in almost every case there is some loss of image sharpness due to either loss of contrast or other optical loss due to these filters. If you are in any doubt use
the test highlighted in case #1 and check your image with a shot with and without the filter. Your lens hood not only provides shade against light causing contrast loss but also physical
protection to the lens. I only advise a UV filter if you are near water and there is any danger of water splashes on the lens. I've got some expensive lenses and you won't find any filter on
them, I've never had any lens scratched in over 40 years of handling lenses however this is a personal choice.
LED Lights For Photography

With so many LED light panels coming into the market just how useful are these for stills and videography?
When I first started to look at these, over a year ago, the only information I could find about these was their light output in terms of lux level.
To a stills photographer lux doesn't translate very easily to exposure in the usual form of ISO-Aperture-shutter speed.
there are some complicate d formula to convert lux into EV numbers and then from EV to F-stop and shutter speed for a given ISO setting but I needed a quick "ready reckoner" to give me some idea of just how much light (exposure) I could expect from these units.
Some old school photographers may remember the "Sunny F16" rule which stated that if you set the camera shutter speed to the reciprocal of the film speed (ISO) then if we shot an exposure in bright sunshine (in which the sun cast distinct shadows) then the exposure would be correct. So if we had ISO 125 film loaded in the camera we set a shutter speed of 1/125, an aperture of F16 and we got pretty good exposures. Of course we could modify this in our head to 1/250 at F11, 1/500 at F8 if we wanted a specific aperture. This "Magic" number was derived from the fact that this equated to EV15 and had a lux value of 82,000. For each 1 EV unit we halve or double the lux value and or aperture value.
So with ISO 100 and a shutter speed of 1/100 sec EV15 (bright sun) would be an aperture of f16
If we halved the light intensity (EV14) the lux would be 42000 and aperture f11
if we halved the value again (EV13) the lux would be 21000 and aperture f8
If we repeat the sequence we could build a table to show the lux equivalent and aperture
EV12 10,500 F5.6
EV11 5,000 F4
EV10 2,500 F2.8
Knowing these values we can now get a "rule of thumb" for light output from these panels.

If we look at the Amaran Aperture H528S light panel it quotes a light output of 4280 lux at distance of 1 metre (40 inches) from the subject.
From our "table" we can see that this equates to just under EV11 so the light output would be 1/100 sec @ F4 ISO 100 with this panel. Install the diffuser (shown in the photo) the light output is halved so the exposure would be f2.8!
The other factor is the CRI or colour rendering index. This is a factor which relates to the spectral output from the light. Higher CRI's generally mean more balanced lights in terms of their Re, Green and Blue intensities however it is a little more complicated than that and the best method of evaluation is to shoot your own test target colour patches and check the pastel colours to ensure the look correct.
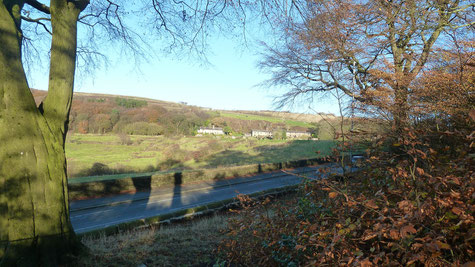
Shooting in Snowy Conditions

Depending upon the ratio of background to subject the metering system may well drive the whites in the scene to a mid grey tone as seen in the adjacent image.
The normal way to overcome this is to use exposure compensation (EV adjustment) by as much as +1 to +2 EV units

Using Exposure Compensation of +2 EV has corrected the exposure to bring the "grey" whites to a more reasonable brightness level.
If the lighting on the scene is also overcast it may also create flat looking images. This might be improved by adding additional contrast in the Photostyle Menu. Similarly if the lighting is producing a strong contrast it might be worth shooting with a very soft contrast setting (the control set to the maximum negative value) and if necessary to adjust the final contrast you require in post process editing as shown in the examples following. This method does not apply if you are shooting in Camera RAW


Using Extension Tubes with Micro Four Thirds Cameras

Using a set of automatic extension tubes like the ones shown left allow you to focus the camera closer for any given focal length thus increasing the size of the image recorded.
This set of two tubes a 10mm and a 16mm, which can be combined to give 26mm, are relatively inexpensive as they are manufactured from a high grade plastic rather than the usual all metal mount.
OK they can't be considered suitable for professional work but for amateurs, like myself, who infrequently have the need for close up work they provide a very cost efficient way of getting into macro photography or allow you to use telephoto lenses at a closer working distance to the subject.
Being fully automatic they allow the camera to be focussed at full aperture giving a bright image and then the lens stops down during the exposure. I've tried these tubes with the rather heavy Panasonic Lumix 100-300 lens. ideally the lens would be supported in a lens ring to take the strain off the mounting flange which tends to allow the lens to sag a little. This sagging will change the focus plane if using very shallow depth of field and may show up as out of focus top to bottom of image - especially if the two tubes are combined.
Normally when using extension tubes the lens to sensor distance is increased. This has the resulting effect of reducing the light intensity. The fall off in light obeying the square law so doubling the lens distance from the sensor results in a 4 times reduction in light reaching the sensor. With manual tubes this "factor" had to be applied to the exposure system manually in order to achieve the correct exposure level at the sensor plane. With the automatic tubes there is feedback from the lens as to what aperture is being used so the camera exposure system can automatically meter the amount of light and make any necessary adjustments to shutter speed if using aperture priority mode. This offers significant advantage in being able to get consistently correct exposures. With the camera body able to communicate with the lens it is possible to have full aperture viewing for focussing and then stopped down aperture for the exposure cycle.
Magnification depends upon the focal length of the lens and the amount of extension tube fitted between the lens and the camera body. Usually there is a chart supplied, or a mathematical formula given, to allow you to determine the magnification for any lens and tube combination.
Depth of field becomes extremely shallow at high magnification and it is essential to either use flash photography to illuminate the subject or use a tripod and slide plate to set the focus point accurately. Some close up photographers use "focus stacking" techniques to improve the overall depth of field in the final image. In this method a series of images with the camera moved incrementally close to the subject until front to back sharpness has been achieved. The image sequence is then loaded into a "focus stacking" program which assembles these individual planes of focus into 1 image with deeper depth of field.
Lets look at the image size and working distances using the lens and extension tube combination. Click to view full size images


As you can see the extension tubes have allowed the closest focus distance to be more than halved and with a corresponding increase in image size. At 300mm the internal flair of the tubes caused image degradation

With shorter focal length lenses the working distance can become very short and the lens almost touching the subject.
I used the 14-140mm lens at EQ50mm and EQ100mm with the 10mm and 16mm extensions to create the following images. Click for full sizes images


Better quality tubes with metal flanges available through Amazon (click to purchase it won't cost you anymore but will help support this site maintenance... thank you)
Are the latest versions of popular cameras always the best?
Every year manufacturers, like Panasonic, exhibit new versions of popular cameras as the numerous trade shows around the world. With each new version comes promised increased image quality, lower noise at higher ISO values, extended optical zooms and more recently the added capability of communicating with smart phones or tablet pc's. My question here is with these so called improvements does the image quality really improve or are the manufacturers continuing to "milk a cash cow".
Let's take the populat Panasonic lumix travel zoom cameras the TZ (ZS) line up. We have evolved the camera to the TZ60 (ZS40) which now has 30x optical zoom, an 18 Megapixel sensor, Wi-Fi and GPS capability. Now what drove these features to be added and at what cost to image quality? It is a well known fact that in the past manufacturers found it hard to market their cameras solely on image quality as how do you quantify it for the average consumer to be able to benchmark one camera against another. No, they chose pixel count as this is a quantifiable value everyone can understand. What most consumers didn't understand was the inter relation ship between pixel count and pixel density. The more pixels you cram on a sensor the smaller they become. As they become smaller the light gathering physics become more challenging to focus the image onto each of the pixels without causing some light loss at the outer edges as the angle of incidence to the sensor pixel becomes more acute. Add to this the fact that you may have to amplify the tiny analogue voltage more in order for it to present a sufficient level to achieve a full 12 or 14 digit value word from the analogue to digital converter which presents the digital representation of the light falling on that pixel. During amplification noise is introduced. At normal light intensities this might go un noticed at low ISO settings however as the light intensity falls (or in shadow areas of an image) we may see lots more evidence of noise emerging.
We hear of new processing engines with improved algorithms to process out this noise but does this not also reduce image quality.
I put this to the test as I had a TZ10 (ZS7) in for repair as well as being able to test it against the TZ30 (ZS20) and the TZ40 (ZS30).
Ok the sensor technology of the TZ10 is of the CCD type compared to the CMOS type in the others which only permits video readout at 720P but in theory a lower pixel density CCD sensor can outperform a CMOS sensor in stills mode.
Let's test the theory.
I took the three cameras out and tried to shoot exactly the same scene with each at the same focal lengths, ISO and aperture (where ever possible) and here are the sample images achieved.
This is the original scene and then each image was enlarged to full screen from each camera and then a screen capture made so as to show the pixel level detail available from each camera.


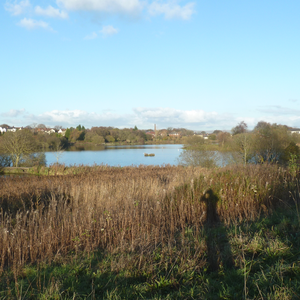


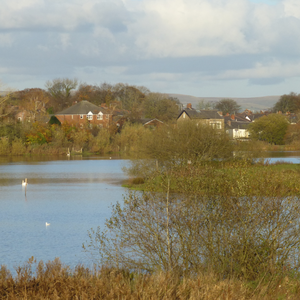
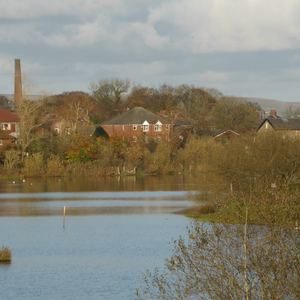
For me the TZ10 has created a "sharper" image - especially in the shots with the reeds in the final shots of the nature reserve than the TZ30. The TZ40 has done a better job than the TZ30 in these tests which does go to show that the higher pixel density and better processing has produced slightly better image quality at these levels of scene illumination. It will be interesting to see the results of the same tests in lower light levels .... coming soon
i.Zoom or not? Reasons for using it with the FZ1000 camera
Digital zoom has always been the last resort when trying to get closer to the subject with our cameras. Its like taking a magnifying glass at your LCD monitor, the more you zoom the more you see the pixels and noise!
Panasonic have, for a long time, used EZ zoom which physically crops into the image produced by the sensor and then saved the resulting smaller format file. It was a way to give you extreme close ups and a way of getting more images on your memory card. there simply isn't any advantage now in shooting this way, in my opinion, you get just the same result if you crop to the same degree in your editing program if you don't resize (or resample) the image.
Digital zoom creates the same file size but by using pixel interpolation to produce an apparently larger image. So we still have say a 12 Mega pixel file created by the camera but the results are simply a "best guess" as to what the pixel colour/tone should be based upon different algorithms used in the interpolation.
My own experience of digital zoom is that it can be useful up to x 1.5 if you keep the camera at base ISO and the lighting is sufficiently good to give clean exposures.
When I got the FZ1000 with its 400mm (35mm equivalent focal length) lens I was eager to see the results of using the i.zoom feature of the camera to try and push the resulting focal length of the lens to match the FZ200 at 600mm. Of course it's not the same optical focal length so no change in depth of field is achieved by doing this but it does give an enlarged, full file size image.
The results from the camera are quite outstanding and it can be used way about base sensitivity and still get very acceptable results.
In the images below you will see the original image, the 2x i.zoom image and the original image cropped and re-sampled back to the same size as the i.zoom image. think the images show how good the in camera interpolation now is.


Hints And Tips For Photographing the Moon with the FZ200 Camera

I know from the number of questions raised that the Moon is still a very popular subject to photograph- especially the "Super" and "New" Moons. They are also the subject of much frustration as getting a decent exposure can be quite a challenge unless you understand how the camera is reacting to this photographic scene.
First of all, as with all subjects it is better to try and get as big an image formed on the sensor as possible. This means zooming all the way to the maximum of the telephoto range ( x24) if you are lucky enough to have a tele conversion lens such at the LT55E then you can get additional optical magnification. I would suggest you take advantage of the "in camera" crop by using the "EZ" mode with the size set to 2.5 megapixel. Avoid using Digital Zoom when using this mode. Chose a 1:1 aspect ratio.
Now it is important to switch the camera metering mode to "Spot" as this allows the camera to calculate an exposure from a very small area on the sensor. If you leave the camera set to full area or centre weighted you will end up with just a big white orb!
With these high levels of image magnification it is essential to use a tripod. Even when the shutter speeds are as high as 1/500 sec you will find that even with the steadiest of hand holding techniques your image will lack critical sharpness (honestly!).
Switch to Aperture priority mode and dial up an aperture of f3.2 to f4 and an ISO of 100. (if you see that the ISO will not show 100 when you press the shutter release its highly likely you have one of the i.dynamic modes selected - I would suggest you turn it OFF).
As the Moon reflects the Sun's light it does not have any color itself. It's best to shoot in Mono photostyle and if you want to add some hint of a tint then you can do this in post process editing. In Mono Photostyle select +1 sharpening and -1 noise reduction.
For the photo graph of the moon I would suggest you use the 10 second 3 picture in camera timer to take the shots.
Frame the moon centrally in the viewfinder and with the spot metering you should see the moon with plenty of detail.
AFS is the best autofocus method for this type of image. Set the timer, and then release the shutter. Allow the camera to make its 3 exposures
you will get a sequence of the 3 images recorded on your SDHC card. Process the image in your editing program, reduce the brightness, increase contrast slightly but don't over sharpen or preferably use un-sharp mask for this last process. If necessary crop a little more of the black area from the image, add your title and be amazed.
FZ1000 and FZ200 RAW File Comparisons
RAW file showing the whole image file before any processing of the image for vignetting, geometric distortion sharpening, noise reduction or image brightness/contrast/saturation etc. You can see a slight black curved edge of the left hand side. This is removed by the jpeg processing when the camera produces the in camera jpeg file.
In this case from the FZ1000 you can see the original image is much wider than the same focal length of the FZ200 however the frame vignetting is more pronounced and needs heavier cropping to reduce it. The net result is the jpegs look very similar in crop, however manually processing the FZ200 RAW file allows more of the image to be recovered - i.e. in camera crop is a little more aggressive than really needs to be.

In the two out of camera jpegs enlarged to the same degree ( not 100% crops!) you can really see the image quality differences between the two cameras. The FZ1000 has more shadow and highlight area detail and more sharpness because of the higher number of pixels in the original file. The FZ200 image can be worked to produce a higher contrast however it is at the expense of more highlight and shadow detail loss.
OPTICAL TELECONVERTORS ON THE FZ1000


From the above images you can see that the image taken with the 1.7X teleconvertor attached to the lens thread of the FZ1000 using stepdown ring ( only as a test with the lens fully extended and not zoomed at all with it attached to prevent possible zoom motor/gearbox damage) produces a noticeably softer image. Camera was mounted on a sturdy tripod, electronic shutter used to minimise any vibrations). With the same magnification using i.zoom you can see there appears to be very little loss of image quality. Obviously using an optical convertor would give shallower DOF as you can just about see. The i.zoom is really just a digital crop from the optical image so the DOF remains the same.
Is this the reason Panasonic have removed the facility to attach a lens conversion ring to this camera as it does not give the final image quality that we would expect!
FZ1000 sample Jpeg File to download.
Full size image from the FZ1000 available for download.
Sample Still Images From FZ1000 4K video Files

The 4K video file allows you to extract 3840 x 2160 still images ( 8 megapixel ) which are fairly high quality. Subject motion may be a problem if the camera shutter speed is low.
The link to download the file for inspection is below.
second image from a 4K video shot in overcast light and slow shutter speed.

The Panasonic Lumix FZ1000, My First Impressions

As you can see from the picture the FZ1000 is a much bigger, and heavier, camera. It weights just over 800 grams so is quite a weight to carry around on a whole days shoot compared to the FZ200. When you first look through the new OLED EVF of the camera you will be amazed by the clarity and size of the image you will see. Infact when I was preparring the side by side tests of both cameras it was a lot more difficult to see through the FZ200 EVF after using the FZ1000. The EVF is clear and bright and doesn't suffer any of the colour flickering that you may have noticed on the FZ200 EVF. The LCD has a higher resolution making it easier to focus if you are using manual focus mode. New to this model is the Zoom/Focus ring. This ring isn't mechanically coupled to the lens but is fly by wire so the zoom or focus is controlled electronically. This was my first real disappointment with the camera. The way the control works in zoom is not very smooth, you need to be rotating the zoom ring fairly quickly before there is a corresponding movement of the lens zoom, in effect you cannot do a very slow zoom with the ring and any attempt to do a smooth zoom is thwarted by apparent jumps in the amount of zoom applied for similar movements. The same is true when you switch to manual focus. It is necessary to move the control ring fairly quickly to engage the focus system, getting the fine focus point by oscillating backwards and forwards seems very sluggish.
Overall image quality is excellent and it is possible to use ISO 3200 as you would ISO 400 with the FZ200. If you keep to the lower ISO values it is possible to use digital zoom with good effect as you can see in the images below. Autofocus is fast, however I have has a number of occasions where the autofocus (in single area mode) would not focus and I have had to point the camera at a nearby object and then go back to the object I wanted to shoot. You can see more oof the review on my Youtube channel https://www.youtube.com/watch?v=QosCsSf2L0k&list=UUPfe6kkX-LqgAovxwxHQXdQ.


Depth Of Field and Full Frame Equivalent Focal Lengths and Apertures
Fairly recently Tony Northrup posted a video on Youtube which caused newcomers to the FZ200 quite a bit of dismay! Only this week I have had two emails regarding this so thought I would like to try and put into context what he was saying in the video and why some of it is just irrelevant and misleading.
Basically you probably have heard the term " crop factor" being used in one contect or another. This comparison method came abour when we started to produce digital sensors for use in cameras. It was a means of expressing the size of the sensor to that of a Full Frame 35mm negative (24x36mm) The diagonal of each unit was chosen as the metric to measure by. So the high end full frame digital cameras have a crop factor of 1 as they have the same dimensions as a 35mm negative. In the FZ200 the ratio of the size of the FZ200 camera to the 35mm frame is 5.5 so the crop factor is 5.5. What does this really mean when looking at camera specifications. Let's begin by considering the sensor itself. For it to receive light from the imaging lens and have that lens cover the whole area of the sensor the lens designer has to create a image which is slightly bigger than the diagonal of the sensor. The lens actually produces a circular image at the sensor plane! If the sensor is large then the last element of the imaging lens has to be large as a direct result. This in turn means the distance from the last element of the lens to the sensor is also large - conversely a smaller sensor needs a smaller exit lens and distance from sensor to final element. This distance from the last element of the lens and the sensor is where the out of focus rays are actually being imaged. Those nearer the actual focal point being imaged more sharply. Increase this distance and the depth of field become shallower, reduce it and the depth of field increases. To image the scene on the sensor of the FZ200 the lens only needs to have a focal ength of 4.5mm at its widest angle. So infact the camera is a 4.5mm lens at wide angle and 108mm at full telephoto. This method of crop factor allowed new digital users to be able to understand what the equivalent focal length this would be if the sensor was scaled up to Full frame size. This is where we get the 25 to 600mm ratings our FZ200 is often quoted as having. It's 5.5 times 4.5 and 5.5 times 108mm.
Everyone was happy with that! Now the waters started getting muddied! Lens apertures are marked in F numbers and these are ratios of the iris diamter to the focal length of the lens. So by calculation a F2.8 lens has a iris size depending upon the focal length
and this aperture will transmit the same amount of light through the lens as another f2.8 on a lens with a different focal length.
Longer focal length lenses need a larger front lens element and iris size to meet the calculation and hence the reason fast telephoto lenses are so big!
So recapping a minute here, our FZ200 has a 4.5mm to 108mm f2.8 constant aperture lens which when compared to a full frame camera is a 25mm to 600mm lens. The misconception of not converting the apertures as well is where a lot of the confusion occurs.
The camera is NOT a 25mm to 600mm F2.8 lens it is a 4.5mm to 108mm f2.8 lens. {Or a 25mm to 600mm F16 lens}


Method for testing your lens sweet spot!
The method of determining the "sharpest" aperture range of your lens is actually quite a simple one and I detail the procedure below.
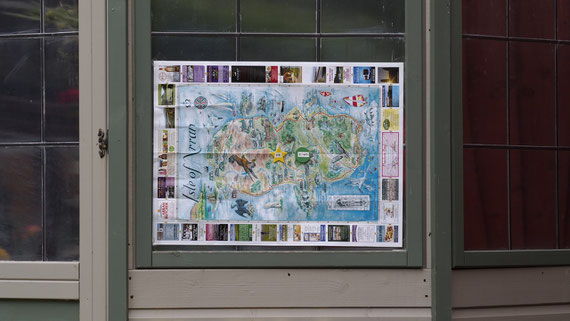
You just need a large newspaper, magazine or other target with fine text or markings, a sturdy tripod, a cable release (or use a 2 second timer within the camera) and some sickers with the aperture numbers written on them. Set up the target at a distance that gives you the image size you want. This may be a smaller one for testing the centre sharpness of a larger one for centre and corner sharpness.

The camera set up on a tripod about 20 feet from the map. The centre of the lens is set to the same height as the centre of the map and the camera parallel to the target map.
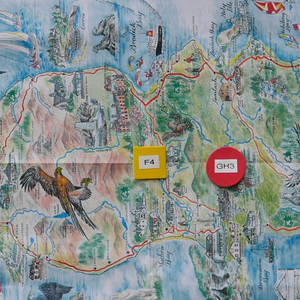
Here I am looking at testing the centre resolution so keeping the image small helps the subsequent evaluation of the image.
Note the stickers to denote the aperture and camera used for testing.
I use manual focus with focus assist to set the first exposure and then leave the camera set at this focus point. Use manual exposure keeping ISO the same so that image noise doesn't affect the image, set the aperture and then adjust the shutter speed to give the correct exposure using the camera exposure meter. Take the shot with remote release or a 2 second camera timer.

In your image editing program select a 100% view and then make a crop of the image (say the visible screen size) and then save it with a suitable filename like camera-aperture (the above might be EM5-F8) Do this for all the apertures tested. You can then compare the enlarged images to find the sharpest one.
Click to enlarge and scroll through the image set. You will notice that after F8 the image starts to lose some sharpness, but still usable. At f22 it is significantly softer. This is due to the effect of diffraction limited resolution caused by the size of the lens aperture. This aperture is determined by the focal length of the lens which itself depends upon the sensor size. Hence smaller sensor based cameras have far more DOF but become diffraction limited very early in the aperture range (maybe as low as f3.3) and Larger sensors such as full frame can use F22 with little problem (which is useful as the DOF of these cameras is very shallow at wider apertures)


Crop factor, Full Frame Equivalent Focal Length and Aperture
Following the video posted by Tony Northrup on this topic there appeared to be a whole debate on the validity of the claims made in the video. From the comments left by viewers it is really apparent that a lot of people do not understand the relationship between crop factor, field of view, equivalent full frame focal length and equivalent full frame aperture.
I was going to post up a video response however that would open me up to a whole fanboy attack so I have decided to post my version here on my blog.
Crop Factor is the mathematical relationship between the width of a Full frame 24x36mm sensor compared to that of the cropped sensor size. A micro four thirds (M4/3) sensor measures 17.3mm x 13mm so the crop factor equates to a factor of 2. The FZ200 has a 1-2/3" sensot measuring 6.17mm x 4.55mm giving a crop factor of 5.63.
When interchangable lenses are fitted to cameras with different sensor sizes (usually via lens adaptors to maintain the correct flange back ( rear element to focal plane) distance) we introduce the concept of "Equivalent full frame" focal lengths.
So for example if we take a 50mm f1.4 lens designed for a 35mm film camera (full frame 36mm x 24mm) and mount it on a micro four thirds body (via an adaptor) the resulting image from this lens projecting the image on the "cropped" sensor looks like the image from a 100mm f2.8 lens mounted on a full frame camera.
Notice I say looks like - the depth of field of the image from the micro four thirds camera has MORE depth of field at the same f1.4 aperture and if you were to view the image from a 100mm f2.8 lens the depth of field would be very similar.
So the crop factor is used to multiply the focal length to obtain
what the full frame focal length lens would be and the aperture is calculated by again using a factor of 2 (which is 1 f stop) Below are the examples of images taken with a 100mm f5 lens compared
to a 50mm f2.8 lens on a micro four thirds camera.

So you can see in the images above the field of view is almost exactly the same and the amount of depth of field and blur is about the same.
If we use the same calculations for the FZ200, with the zoom set to x4 giving an equivalent full frame 100mm focal length the field of view is exactly the same however the depth of field is greater. With the lens at f2.8 the same depth of field could be achieved on our full frame camera if we were to select an aperture of f16 on the 50mm lens.
Below the image from the FZ200 showing the same field of view and greater depth of field even at f2.8 (f16 on Full Frame to get the same look!)
So hopefully these illustrations will show how the "Equivalent" full frame lens values are obtained. The important factor is still the aperture remains the same no matter what camera body it is attached to, the focal length remains the same but the field of view changes when the lens is used on a different sized sensor to which the lens was designed for which gives the appearance of the magnified image. That is why exposure remains the same. The aperture equivalent calculation tells you the value that the full frame lens has to be set to to get the same Depth of Field i.e 1 stop on M4/3 and 5 stops on the 1-2/3 inch FZ200 system giving a value of f16 compared to f2.8 on the FZ200.
So the crop factor can be seen as an advantage over full frame cameras when shooting wildlife and sports as there is a lot more Depth of Field compared to the full frame lens of the same focal length. When Tony states no one shoots F16 for wildlife its because you can't normally get enough light for this aperture anyway! The FZ200 is more than capable for these sports and wildlife shots as illustrated in the images below by kind permission of John Knopf