 Graham's Photography Blog & Technical Reviews

The Canon Powershot G7x - Mark3 Review
The PowerShot G7X Mark III updates Canon’s most popular compact, The G7X Mark II with some unexpected features that will delight videographers and vloggers in particular.
It keeps the earlier 24-100mm F1.8:2.8 lens and much the same body and controls, but adds a 3.5mm microphone input, the chance to live stream direct to YouTube over Wifi, and allows you to film vertically-formatted video for Instagram Stories and other phone platforms.
The resolution remains the same 20 Megapixels, but with the presence of a stacked type 1 inch CMOS sensor allows 4k video, 1080 slow motion up to 120p, and fast burst shooting at 20fps or in a RAW-only mode at 30fps.
The sensor is probably the same as the one in the Sony RX100 mark IV which is contrast based AF rather than the recently introduced phase detect or dual pixel types.
The mic input is arguably the most important new feature of this upgrade allowing a potential upgrade in sound quality on your videos. In the absence of a hotshoe, you’ll need to use some kind of bracket to mount a shotgun or wireless transmitter, alternatively you could alternatively simply connect a wired lavalier mic straight to it.

The G7X Vloggers kit
The Tripod/handle with Bluetooth remote controller(which can operate in stills mode with or without 2 second shooting delay or use to start and stop video recording) It also includes the mic/light bracket and the kit includes a 64GB SD U3 memory card.
The flip up LCD screen angles down by about 45 degrees or up by 180 degrees to face you for vlogging or selfies.
The camera uses Canon’s new DIGIC 8 Imaging Processor with a 1-inch stacked CMOS sensor. So the results are very good and almost at par with what you would get with an entry-level DSLR. The camera offers very quick autofocus and you can also use the screen to select the size of the focus area and the exact spot you want to lock it on. Plus, you can achieve an unprecedented 1/25600s shutter speed with the electronic mode.
I love the low light capabilities of this camera, which seemed almost at part with some of then mirrorless models I have used. This camera too lets you expand ISO up to 25600.
With the new CR3 format the Mark 3 can handle 55 RAW or 118 JPEG frames in 20 fps mode, and up to 70 frames in 30 fps RAW burst mode.
The Canon G7X Mark 3 also allows focus bracketing that enables you to do focus stacking resulting in a much increased depth of field. This may be particular relevant for macro shots of immobile subjects.It also now features an in-camera full-resolution panorama mode. A new feature for the G7X Mark 3 is the addition of an on-screen video record button, which is much handier than trying to position your hand in an awkward way to reach the dedicated button on the back of the camera.
You can also tap around the screen to change the focus point – both in video and stills – as well as making changes in both the main and quick menu.
It’s also possible to extract stills from the 4K footage in-camera. This is easy to do, and you don’t need to select a special mode like on Panasonic cameras. Instead, you just need to tap the image grab icon when playing back the video!
Sample Aperture Sharpness test at Full Optical Zoom


Sample ISO Noise Tests


Close-ups Using Raynox 150 Lens on the G7X mark 3


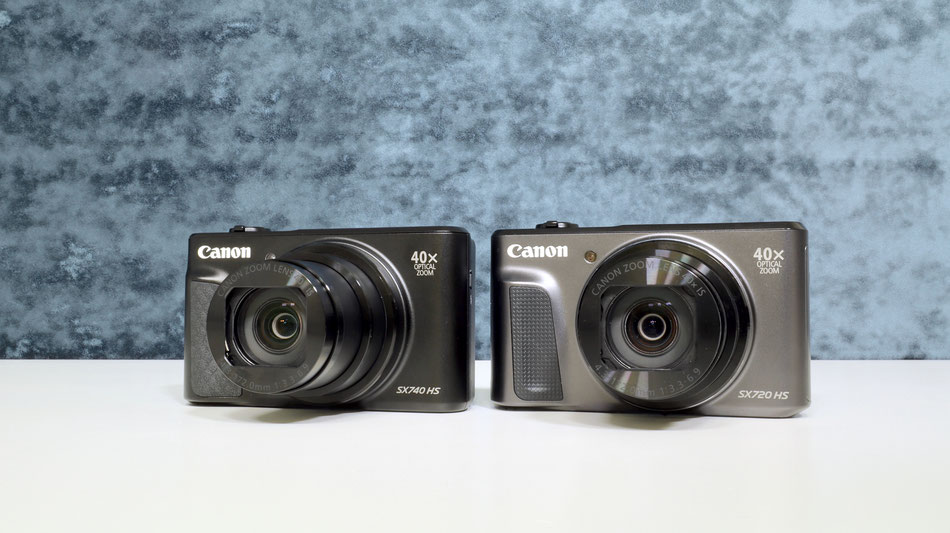
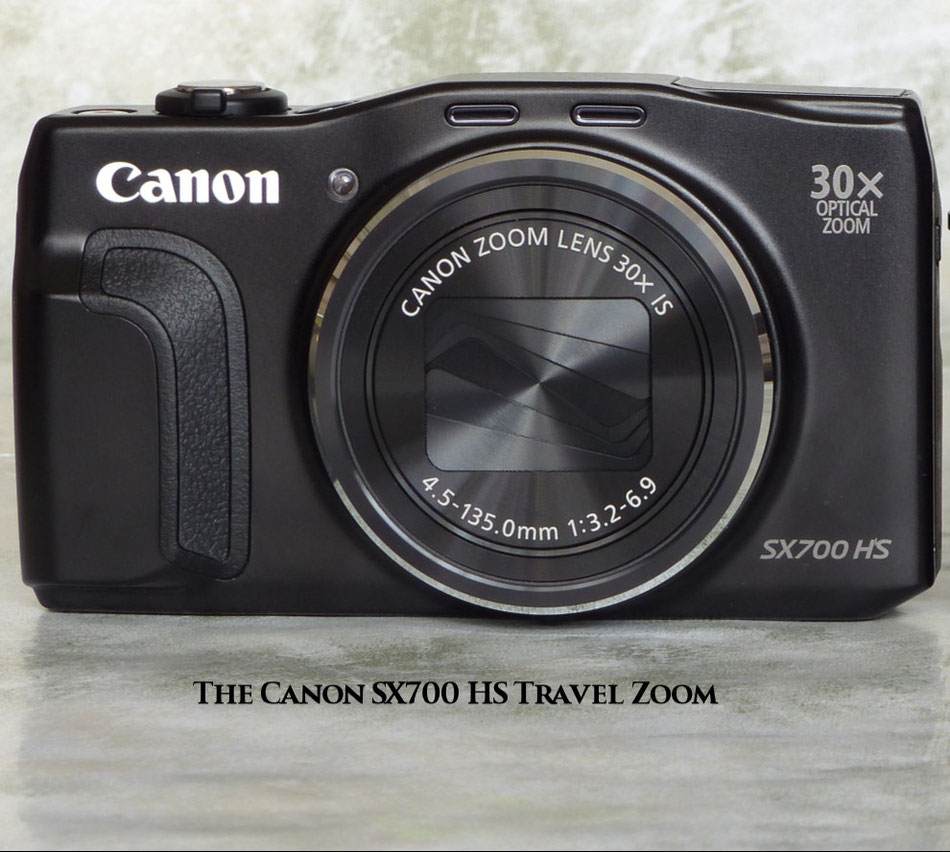
The Canon SX740 HS with 4K video Mode Review
August 2018 and Canon release the latest in the 700 series travel zooms the SX740 HS equipped with the ability to shoot 4K video.
The Canon PowerShot SX740 HS is a pocket super-zoom camera with a 40x / 24-960mm optical range, 20 Megapixel 1/2.3in sensor, 4k video, Wifi and Bluetooth.
Announced in July 2018, the SX740 HS represents a minor upgrade to the Canon SX730 HS, inheriting the same lens, sensor, flip-up selfie screen and wireless capabilities as before, but now employs the latest DIGIC 8 processor which additionally supports 4k video and burst shooting up to 10fps.
As with all of the latest super-zoom cameras, the key specification is the lens. The SX740 HS offering an impressive 40x optical zoom equivalent to 24-960mm.
The SX740 HS is the third generation in the SX700-series camera.
The sensor is unchanged from the previous two cameras, packing 20 Megapixels into a small 1/2.3in sensor, and as such it won’t deliver great quality at high ISOs.
Sadly Canon have still not implemented a RAW mode which would allow some image processing to try to squeeze out more detail and reduce noise.
The new feature on the SX740 HS is 4k video at 25 or 30fps, made possible by the presence of the DIGIC 8 processor.
Filming in the new 4k mode takes a 1:1 pixel 8 Megapixel crop from the middle of the sensor resulting in quite a severe reduction in the field-of-view.
This reduces the horizontal field-of-view by 1.35x reducing your chance of capturing a wide field. The positive is that this will allow the long lens to reach even further, though there will be more micro jitter at this extension when using it hand held. 1080p, on the other hand still uses the full sensor width though and is available up to 60p, and regardless of the quality the SX740 HS can capture 29min 59 sec clips.

The flip up "selfie" screen is ideal for those wanting to use this as a Vlogging camera but the crop at 4K means that you may have to use a longer extension rather than just holding the camera at arms length to get enough coverage. At this greater distance the audio from the internal mics will also suffer and there is no provision to add any external audio input.

Notice the repositioning of the mode control dial from the rear to the top (as on the SX730 HS) and the flip up screen which look bigger however it still has the same 3 inch LCD screen with a 922k dot resolution and of course does not feature touch control :(
The SX740 HS retains the 40x optical zoom introduced on the SX720 HS. The lens has a range of 24 to 960mm and a maximum aperture of f3.3-6.9. When zoomed out to the maximum 24mm wide angle position the SX740 HS can focus at 1cm to the subject - great if you want really close up shots.
The SX740 HS’s zoom lens when zoomed all the way in to 960mm equivalent it can be difficult to keep your subject in the frame – particularly if it’s moving around a lot. That makes wildlife and sports photography particularly challenging.
However Canon has come up with an ingenious solution in the form of the Framing Assist Seek button.
Holding this button down temporarily zooms out so you can get your bearings before releasing the button and zooming back to exactly where you were; it’s particularly useful for keeping track of moving subjects.
The SX740 HS is equipped with image stabilisation which shifts the lens elements to compensate for camera movement. It has around 5 stops of image stabilisation advantage.

The PowerShot SX740 HS retains the same movie options as the earlier SX730 HS and the SX720 HS before that. Based on a Pal system the values are 50p and 25p and will be 60p and 30p in NTSC regional setting. This is the first of the Canon Compacts to support 4K video recording albeit having a large crop factor (which could be handy for wildlife videos!)
It can record Full HD movies with stereo sound and control over the optical zoom while you’re filming. The best quality mode is 1080/50p with 1080/25p 720/30p. There’s a dedicated movie mode on the control dial, but you can actually start recording video from any mode by simply pressing the red record button on the top of the camera. Selecting movie mode from the control dial puts the screen into 16:9 mode for more accurate framing, unlocks the 50p option, and also allows selection of Short Clip mode from the Func.Set menu.
Canon recommends using an SD memory card rated at Class 6 or quicker for movies. A class 10 or U3 card for 4K videos.
The maximum recording time is when the file reaches 29min 59 sec or 4GB in size.
Once you start filming, exposure control is fully automatic. If you need to you can lock the exposure or adjust it in a +/-2EV range prior to filming.
Some of the Creative Effects can also be applied to video clips, although others are ignored. Press the video record button while Fisheye, Toy Camera or Soft Focus are selected and the camera will just ignore them and film as normal, but it will apply the Monochrome, Super Vivid, Poster or Miniature effects to video.
Sample ISO noise tests using the standard profile (click image for full size view)


Some real world sample images (click for full size)


Image Quality With Travel Zooms
It's easy to forget that at the low ISO of 80 the camera can give a surprising amount of detail and dynamic range.
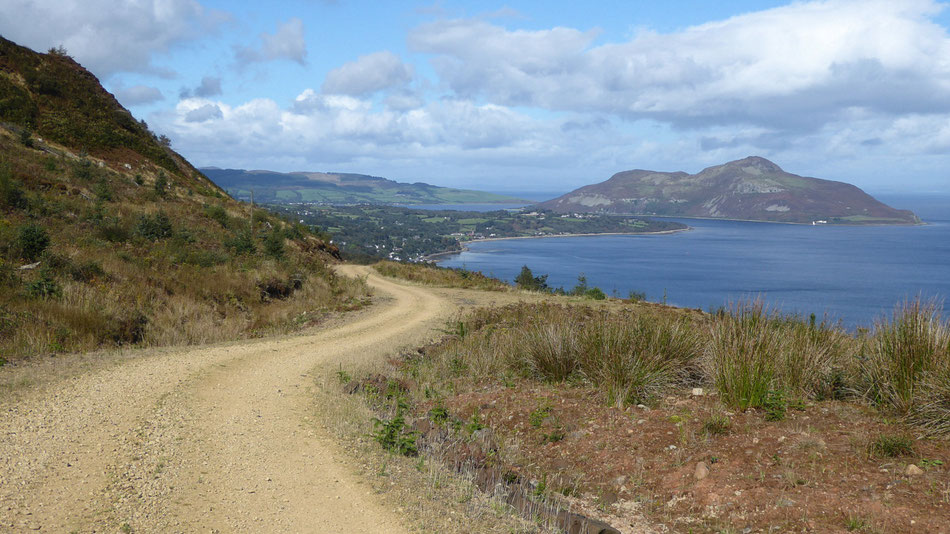
Here are a few shots from my recent visit to Arran, Scotland. Avocet? was at 834mm EFL


Alternative Charging For Your Travel Zoom with USB Power
More recent versions of the TZ/ZS travel zoom cameras now have the facility for USB charging. This is really a convenient way to recharge the camera battery on the go. Most airplanes, buses, coaches and trains now have USB charging ports available for customers and things like power banks and in car chargers are also available for those on the move. It seems such a sensible solution as we have all become so used to charging our mobile phones - so why not our cameras?
I like multifunctional devices, so if a device can fulfil more than one purpose then it is likely to grab my attention and end up being purchased over single function items.
An example of this would be USB powerbanks. If they have a torch built in then they are preferred over just USB only. My car emergency jump starter has a torch, USB and laptop charging facilities.
Now other devices are being fitted with the convenience of USB outputs. One such device is the portable Bluetooth speaker.
These have been gaining popularity as lithium ion batteries have been employed as their power source.

With these speakers it is now possible to charge your travel zoom cameras from them. The smaller ones have 2200mAh batteries and larger ones 4400mAh. The one illustrated above is the pinshow portable bluetooth speaker by easysmx.com and available on Amazon.
It is possible to get two complete camera battery charges from a fully charged speaker battery.
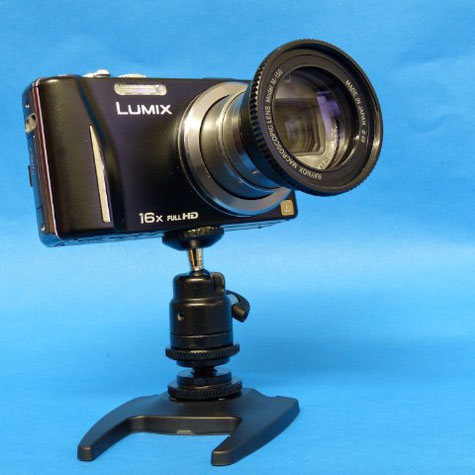
Using Raynox Close up lenses with Travel Zoom cameras
Quite often for illustration I need close up pictures. If using the TZ(ZS) cameras close ups can be achieved but only using the macro AF and at very close distances to the subject. Often lighting then becomes difficult. I needed a method which would allow me to use the camera with supplementary close up lenses to be able to use longer focal lengths and at distances more than a few centimetres away from the subject.

This is my working version of the system that I have developed to allow the use of the Raynox close up lenses on the travel zoom series.
Previously I have used 37mm filter rings glued to the front face of the lens to allow supplementary filters and lenses to be used.
In this case I needed a method which could be constructed easily, fitted quickly and gave good results.
Having purchased two Raynox lenses for use with my FZ200 and FZ330 I had the lenses and spring clip mounts to experiment with.
Heres' the construction in a little more detail.
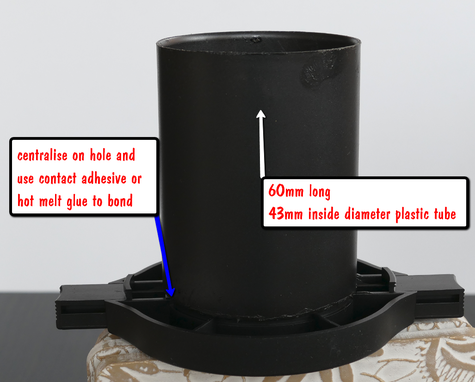
Basically a 43mm inside diameter tube 60mm long ( for the TZ70 - ZS50 or 50mm long for the TZ40 ZS30) is glued onto the rear of the Raynox spring clip.
For the tube I found that the cartridges used for applying door frame sealant, decorators filler, translucent silicone etc were the right diameter to fit over the extended lens of the TZ70(ZS50).
I measured and marked the 60mm length on the empty cartridge and then used a small saw to cut it off. Finally using a small metal file to smooth the edges and get the cut as parallel to the original edge as I could.
I used a contact adhesive to glue the tube to the rear of the spring clip allowing the both surfaces to become "tacky" before centralising the tube over the hole and applying firm pressure whilst it bonded. Alternatively hot melt glue could have been used to make the bond to the spring clip.

Once the adhesive had fully dried I applied a spray coat of matt black paint to the outside and inside of the tube to prevent light reflections affective the contrast of the images formed.

The adaptor is held over the extended lens by two elastic bands hooked over the two "wings" of the spring clip and then over the body of the camera.
Using the strongest lens the Raynox 250 the working distance is about 150mm (6 inch) from the front face of the Raynox lens to the subject
Using the Raynox 150 the distance increases to about 300mm (12 inches).
Autofocus is possible and with the camera allowed to autofocus with the half shutter release position and held there as you rock the camera backwards and forward to ensure you have the exact focus plane before fully depressing the shutter button
The 3 image sets below are with the Raynox 250 at x5, x10 and x22 zoom on the TZ70(ZS50) at 150mm working distance and the 2 image sets below are with the Raynox 150 at x5 and x22 zoom at 300mm working distance.
I would personally recommend the 150 lens as the 250 requires a closer working distance and depth of field becomes impossibly shallow at longer zoom settings.
I would advise keeping away from the longest zoom settings and keeping between x10 and x20 for best results.
To keep the lens from retracting I would turn off the sleep and economy modes whilst using this set up.


For comparison below is the image from the TZ70(ZS50) at the closest focus distance using the AF macro mode at x6 zoom and from a distance of 600mm (2 feet)

If you don't want to use the Raynox lenses then it is possible to use 52mm close up lenses (although I do recommend the Achromatic type)
The tube is the same 43mm inside diameter and 60mm long for the TZ70 or 50mm long for the TZ40. In the end of the tube glue, using contact adhesive or hot melt glue, a 43mm to 52mm step up filter ring.
The close up lens then can screw into the filter ring.
It could also be used for ND filters, variable ND Filter and circular polarising types.


Taken with alternative close up lens mounting.
A 52mm Sigma #2 achromatic lens distance 700mm lens to subject
x10 on TZ zoom

Taken with alternative close up lens mounting.
A 52mm Sigma #2 achromatic lens distance 700mm lens to subject
x25 on TZ zoom
Sample gallery of images taken with Sigma macro achromat lens on the TZ70 (ZS50) at distances of 60cm - 24 inches (click for full size)


Materials and tools required for the Raynox lens mount. A 43mm to 52mm step up ring would be needed for the alternative adaptor.

The materials and basic tools required to make the adaptor
(Raynox type)
The sealant cartridge or any other container 43mm inside diameter (deodorant sprays or plastic bottles may be the right size!)
Contact adhesive or hot melt glue gun to stick the tube on the rear of the Raynox mount
Marker pen to mark around the tube to enable a straight cut with the saw and 2 long elastic bands to apply some tension to hold the adaptor to the camera - mine were 75mm diameter

Dust spots INSIDE the TZ70 (ZS50) lens causing white "orbs" when shooting into the light.
Once again I have suffered an ingress of dust onto the inside of the front element of the lens of one of my travel zoom cameras.
I'm normally quite careful and keep the camera in a belt mounted pouch but somewhere along the line dust has accumulated inside the lens shutters and been sucked in as the lens extends.
Unfortunately it's not an easy job to strip this lens to get to this element. It's only going to be a problem with against the light shots or shots against dark backgrounds. Nevertheless it is going to be a nuisance. So far I have managed to strip and clean previous cameras when this has happened however I'm not even going to attempt this one, even with the service manual to help.
There's a long history of dust, particularly in the sensor area with previous models of this camera and there doesn't appear to be any progress being made by Panasonic to dust proof these designs.
I probably will not upgrade to any new TZ version in the future.
Update... these dust spots are unlikely to show on images except at full wide angle and close to the subject.
Quicker Manual Focus with the TZ70 (ZS50)

The TZ70 supports the large, multi function ring surrounding the lens barrel.
In the default programming of the camera functions during Manual focus (selected with the left navigation button) the front ring acts as the manual focus control. Whilst this does provide nice smooth control it can be too slow to select the precise focus point.
You have to go past and then back up to the focus point several times to get the exact point that you want. Whilst it is documented in the advanced user's guide for this camera it is not that clear that the rotation dial around the 4 navigation buttons can also be used for manual focus but providing a much quicker interface.
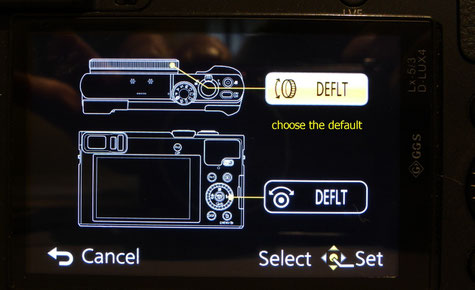
To get this mode you have to first hit the Qmenu button (bottom right of the camera back)
Once you have the Qmenu screen up on the LCD screen you need to select MF by stepping through the Qmenu items.

Using the right navigation button step through each of the menu items until you get the MF highlighted in Yellow.
Using your thumb on the ridges of the rotation dial surrounding the 4 navigation buttons you can quickly rotate the dial and affect the focus point as see on the display.
You will notice the scale shows the point of focus, the distance to the subject and the depth of field. The length of the arc in yellow shows the current depth of field available at this focal length, f stop and distance
If you use this method you could reprogram the front ring to be either continuous or step zoom when the camera is set for Manual focus.
MACRO WITH TRAVEL ZOOMS
If you want to take life size, or greater than life size images with the TZ series of cameras you're out of luck as the lens doesn't have a filter ring that you can attach a supplementary close up lens like the excellent Raynox 150/250 ones.
As proof of concept I attached the Raynox 150 the the TZ20 with some lightweight elastic bands (so as not to stall the lens zoom motor unnecessarily) to see how this worked.

Using the existing lens mount for the Raynox the two elastic bands lightly attach the lens to the TZ lens.
As this worked very well I decided to commit this TZ camera to being a dedicated macro system ( although it would still function as a normal travel zoom if I wished - with additional benefits of being able to mount 37mm filters now to the camera!

The first step was to use an old 37mm filter (a UV which I never use) remove the filter and retaining ring and then I machined off the back threads of the filter holder to leave just a few threads on the ring. I then extended the lens, removed the battery to keep the lens extended and then bonded the ring concentrically with the lens using "super glue"
The Raynox lens with 37mm to 43mm step step up ring mounted on the TZ20 lens

I tried the same proof of concept with the TZ70 (ZS50) camera and the resulting image is from that camera at a distance of about 6 inches away with a moderate amount of zoom

Having seen images taken in low light with this camera I decided to purchase one myself to see how good an image I could actually achieve with this camera.
It has the same optical zoom at the Panasonic Lumix TZ70 (ZS50) but has 16M pixels against the TZ70's 12.1M.
It could be argued in bright light the extra pixels could actually help the camera to create images with a lot finer detail but in low light could actually work against creating the best possible image quality due to the extra noise introduced.
I took it on on two separate days with the idea to test it in a variety of lighting contrasts and test the 60p video mode.
As the camera has a restricted aperture range I decided to operate the camera in P mode which allowed the camera to choose aperture, shutter speed and I additionally set ISO to auto to see how it compensated for varying focal lengths under the zoom operation.
The camera behaved exactly as I predicted it would, in terms of exposure determination. It kept the ISO at the lowest possible value before reducing shutter speed and or increasing the aperture. It generally set the aperture to the widest available for that zoom setting. It also changed ISO according to the amount of hand shake present when holding the camera and generally set a level consistent with the 1/focal length guideline. OIS worked very well in stabilising the resulting picture.

The quality of the images, even with the zoom set to maximum, was generally very good as seen from the image (right) taken at over 100 feet away. I didn't notice any chromatic aberration (colour fringes) on high contrast edges of the zoomed images.
I did have some issues with the autofocus. In about 5% of the images I took the autofocus appeared to have determined that even an out of focus image was in fact in focus and gave the focus lock symbol and the audible beep to confirm it. It seemed to be worse in macro AF mode when it would happily focus lock on a totally blurred image.
As the sun was very bright I never noticed this failure on the LCD screen at the time of shooting.
Another slight annoyance was the fact that the single area autofocus point could not be positioned away from the centre of the screen. You had to "focus and recompose" to get a subject that was off centre correctly focussed. I did not try the AF tracking mode as most of my subjects were static shots anyway.

An AF miss-fire!

I found the focus problem more noticeable in the macro AF mode and it was easier to set focus manually (although not easy) and then rock with the camera back and forwards to find the exact focus point.

At close up shots in particular you could see the centre to edge definition was falling away. In most cases it was un-noticed until I had a series of close up shots where the edges were noticeably different

Here at mid aperture the edge definition is slightly "soft" compared to the central area.


If you want to see the whole set of images I took with the camera they can be found on my Flickr page here: http://www.flickr.com/photos/35888903@N03/sets/72157651154266538/
The Panasonic Lumix TZ70 (ZS50) First Impressions.

Well I used the TZ70 for the first time on Monday and went to my usual camera testing lab - Manchester Museum of Science and Industry. In quite a few of the exhibition halls the light levels are so low, especially on overcast days, that it gives a fantastic testing ground for cameras in low light. Unfortunately the boiler was not firing to deliver steam to the Power Hall so I was unable to get any video clips of any of the engines in motion so I had to shoot just stills instead. I locked the camera iso at 400 and it was requiring about 1/20 second at f3.3 so this was the lens wide open at wide angle setting. Where possible I used a handrail to support the camera to brace the shot. After the museum on the way back to the rail station I managed to get a few urban shots and have the camera shoot at iso 80. I had planned to do more there but the lack of engines running meant that I changed my shot list. It was also bitterly cold so a walk around the Castlefield canal basin was also car parked! I must say the new EVF worked very well and it helped to give that third point of camera support for any shots where I held the camera up to my eye to take the shot.

A typical exposure in the Power Hall 1/13 sec f3.3 at iso 400

A brighter corner for the Garrett Loco 1/60 sec f3.3 iso 400

On the banks of the river Irwell flowing through Salford.

From one head shot to a self portrait. taken using the Lumix Image link program on my smartphone controlling the camera remotely.
My overall impression at this point wasn't bad. The EVF was certainly much better to use than the previous one on the TZ60 (ZS40). Grip and holding were very good and at no point did I feel that I needed to attach the wrist strap to prevent the camera slipping out of my fingers. I programmed the front lens ring for EV compensation however this turned out to be a bad move as I was constantly catching the ring and adding compensation when it wasn't needed. I've now set it back to control zoom. Overall it wasn't a bad shooting experience however a touch screen ( touch to focus/shoot) would have been a nice to have feature. The only way you can do this is via the Lumix link app on a smart phone. The image stabilisation held the image very steady in the viewfinder so it was much easier to frame up the subject and subsequently shoot the scene.
Following these tests I subjected the camera to a head to head with the TZ20, TZ30,TZ40, FZ200 and FZ1000 - my Camera Mega Test.

This was my test set up. Illuminated by a 2500 lux LED light source which was claimed to be 95 cri (colour rendering index) so the spread of R G and b light levels were fairly even. I left all the cameras for the test in AWB so I could see how well the camera had set the white operating point. All the digital options were turned off like intelligent resolution and ihdr etc. The FZ200 and FZ100 photostyles were set back to their central 0,0,0,0,0 setting so as not to bias the results. In the test I present the whole frame image and then one made at 1:1 crop (100%) from the frame.
This is where my disappointment set in as I had expected the higher iso's to be much better in terms of noise level due to the alleged new 12.1 megapixel sensor and processing pipeline.

With the 1:1 crop, noise was most noticeable and it degraded the image. It was slightly better than the TZ40 (ZS30) and the FZ200.

In my pre-amble to the release of this camera I posed the question was this a gamble by Panasonic in releasing this camera with the promise of lower noise in low light levels. I also said that
the 18 and 20 Megapixel 1/2.3 inch sensor cameras by Sony and Canon under adequate light levels would hold more effective image data and that this would be noticeable if the image was enlarged or
cropped compared to the 12.1 Megapixel sensor of the TZ70

The side by side comparison at ISO shows very little difference in the two files from the TZ70 and the Sony QX10 18.4 megapixel sensor

When you raise the ISO to 3200 it becomes obvious that the TZ70 has a lot more noise and jpeg artefacts. The QX10 image, although it does look smoothed, still contains a lot more image information and less noise which is causing a loss of contrast in the TZ70 image.

Don't get me wrong here the camera still produces some very excellent quality images and for the fact the lens was designed to resolve image detail on the previous 18 megapixel TZ60 camera then it provides more than enough resolution and contrast for this sensor.
At the time of writing the Adobe DNG converter does recognise the TZ70 (ZS50) camera RAW files so you have to use silkypix supplied with the camera or a generic RAW processor like Cyberlink Photodirector to process the files.
So whilst the camera may not live up to the marketing hype I'm sure it will be gain another successful travel zoom camera for Panasonic. It will be interesting to see what the TZ80 has next year!
THE NEW TZ70 (ZS50) From Panasonic, the new Flagship Travel Zoom for 2015

Well, I was surprised when I passed by my local camera shop today (Chorley Camera Centre) and saw the TZ70 on sale 2 days before the "official" release date. I have had one on pre-order from Amazon for a while now but when I spotted this I just had to have it!
What's so interesting about this new release in comparison to the almost same specification TZ60 from last year which I just didn't like and sent back!
Well the first thing that got my attention was the decision by Panasonic to "buck" the trend of ever increasing the pixel count on their sensors and go back to the "sweetspot" of 12.1 Megapixels. Is it a new MOS sensor or the 2012 version used in the TZ25 with better image processing? This could work in their advantage against the other manufacturers like Canon and Sony who are blazing ahead pushing even more pixels onto that tiny 1/2.3 inch sensor surface.
In theory the larger light gathering photodiodes output more voltage for the same light level and therefore don't need to be amplified as much to bring the white point up to enable the 255 digital value to be obtained from the A to D converter chip after the analogue sensor.
So in lower light levels this camera should exhibit lower noise and slightly higher dynamic range than the Sony and Canon offerings. On the other hand given bright lighting say over EV12 (cloudy bright) the Sony and Canon cameras will theoretically be able to use the higher resolution to give more details when viewed at 1:1 (100%) enlargement. So if you wanted to crop into an image the higher pixels will be an advantage! However most people are now only interested in displaying images on pc screens or posting on social media sites where resolution is really going to be noticed due to the high image compression used by the sites in displaying the images. Few people are making digital prints so pixel-dpi ratios aren't really a problem either.
The new model supports ISO 80 something that was commonplace with CCD sensors but ISO 100 - 160 seemed the usual base ISO in the CMOS sensor camera line up. It goes to show how much more light is being gathered that we can have so low system amplification - no doubt as a result of bsi technology implemented now in nearly all CMOS sensors.
The second thing was the supposed improvement to the 0.2 inch EVF now supporting 1160K dot from 200K dot in the previous version.
On the downside, for some users, maybe the decision to eliminate from this model the GPS facility probably to keep the profitability of the camera more in line with what Panasonic would like to see. However it's possible to record a GPS log with your smartphone and sync it over Wi-fi like other Lumix cameras!
Thankfully the same DMW-BCM13E 1250mAh Li-ion battery is retained in this version so that's also a great benefit for anyone upgrading from the TZ40-TZ60 predecessors.
Like the previous models now USB charging of the battery inside the camera is becoming the "norm" for travel zoom cameras and for me this is the most sensible option. I can do a splash and dash top-up during a coffee stop either from my portable powerbank which I always carry to recharge my smartphone when it begs for food or from the ever increasing number of cars fitted with usb charging docks and on public transport vehicles that also have USB mobile phone charging sockets.
If I go walking then I can also take the option to use my solar usb power bank to add a boost charge. This way i don't have to think about carrying a spare battery and worry if the one I have packed is still charged!

USB charging is ideal for me in a travel zoom camera as it offers many advantages over carrying a mains power pack and spare battery. A quick top up during a coffee stop or in the car from location to location is very convenient. I can also use solar power when walking and stopped for lunch (even in cloudy bright my solar powerbank still provides a sufficient level of charging current.
The camera charges at about 750mA so for a full charge 2 hours is needed to completely charge the battery

The TZ70 being charged from a solar panel with just the light from a desk lamp!
Well what are my first impressions of the new camera?
From an ergonomic point of view the new rubber grip on the front of the camera adds a re-assuring grip to the hold of the camera as I rarely have the wrist strap fitted.
The new EVF, whilst still really only a "peep hole", is certainly much better than the TZ60. It's still nothing like the experience of looking through a nice large bright EVF like on the FZ1000 for example. The main LCD has a 920K dot resolution with a 3 inch size so viewing the images is rather nice - if you can do it without full sunlight hitting it. I have a 3 inch magnifying hood which I often use in conjunction with these screens as it gives a fantastic view and highlights the slightest error in focus.
With this screen not having the touch interface it looks like I could very well use this hood on this camera with good effect - these cameras never get put in my coat pocket anyway - too much opportunity for the dreaded dust to make its way inside the camera. Talking of which I have been informed that dust on sensors is now to be expected (yes even from the factory) and is no longer covered under warranty!!!
User interface is very much like the TZ60 with little change in the menu system. One noticeable feature is the feature which retains the self timer between shots, something that really irritates me is having to set the 2 second timer for each exposure when the camera is tripod mounted, now the timer holds! Hurrah!
New to this camera is the option to create time lapse videos within the camera using an inbuilt intervolometer. It's limited to a minimum between shots of 10 seconds and uses the lens shutter which although does increase the camera shutter count isn't as bad as say a M4/3 camera where the whole sensor has to be covered with the mechanical shutter and that would really increase camera wear if you were to do a lot of say 3000 image sequence time lapse shots!

The time lapse recording menu on the TZ70
The lens range is the most important specification on a super-zoom camera, and following Panasonic's strategy of using the same range for two generations, the TZ70 shares the same optics as its predecessor. So the Lumix TZ70 sports the same 30x zoom as the TZ60 (ZS40) equivalent to 24-720mm in 35mm terms. I'm not a great fan of putting such a zoom range on this type of camera. Optical design compromises have to be made and I found on the TZ60 the long end of the lens became increasingly soft. I will suspect when I do the final testing with this camera it will also exhibit the same problem. However I know quite a few people are satisfied that they can get distant shots with this camera and are really pleased with the images they get, we all judge our images differently.
I will be doing some more extensive testing and reviews over the next couple of days and give my verdict after that. Here are some ISO test results from iso 80 and iso 800 under flat lighting conditions showing image and 1:1 crops. Click for full screen images


Random samples from the TZ70 (click for full size slide show)


The Panasonic Lumix DMC-TZ60 (ZS40) Travel Zoom Camera

Wide angle F4 @ ISO 100 shots
Just a few sample images which show the image quality of the TZ60 (ZS40) under ideal conditions. ISO 100, F4 and 24mm setting.
It's not bad in producing fairly well controlled images, however for me the badly implemented EVF, lens control ring, the loss of touch screen and loss of JPEG control (photostyles) mean my expectations have not been met with this new camera. I'm sure though, for the designated market, it will again be another hit travel zoom camera for Panasonic.


Panasonic Lumix DMC-TZ60 (ZS40) ISO Noise Tests
Using a controlled table top lighting set up, 1600 lux light level at the doll figure I ran an exposure set keeping the aperture fixed at F4.5 and varied the ISO from 100 to 1600. I stopped at 1600 as really ISO 3200 and the extended setting of 6400 are for real emergency use as the noise really becomes obtrusive. The first set of images are camera jpegs and the second set are RAW files processed with Silkypix at the default settings. I have included the ISO 3200 image in this set for completeness.


Panasonic Lumix DMC-TZ60 (ZS40) Low Light and "Difficult" Lighting Tests

In today's testing I wanted to put the TZ60 through low light (including some with high contrast localised sunlight through windows). part of the tests were carried out at the Manchester Museum of Science and Industry (MOSI) in the textile hall which has very poor daylight (1/25 sec F3.3 at ISO 1250) and in the Power Hall where I managed to get ISO 400. From my lens testing, although F3.3 has noticeable centre to edge fall off it was the only choice to keep shutter speeds hand holdable without raising the ISO any further.
Outside I tried to choose locations which had heavy shade so as to test response to both highlight and shadow detail. All the shots today were taken without the use of any i.Zoom feature ( as it confused the situation yesterday because some of the 1000mm plus shots looked "soft") and I limited the lens aperture to F4 as beyond this point the diffraction resolution limiting effects starts to kick in. Overall I think the camera responded quite well in these lighting situations, certainly the ISO 1250 shots are far superior to ISO 1250 from my FZ200 even though it has larger photosites. Some new fabrication technology to improve physical photosite size?


Panasonic Lumix DMC-TZ60 (ZS40) Dynamic Range Test

Today I went out to Blackpool, a local seaside town in Lancashire, England. It was a very bright, in not chilly day with a firm breeze blowing in off the sea. It was ideal lighting to push this small sensor to the limit as bright light, highlights and shadows don't normally work together. I deliberately set the EV at -1/3 and shot in Aperture priority mode selecting F4 at the widest angle and letting the camera zoom change the f stop as it increased in focal length. I used iISO today but set a limit of 400. I kept an eye on the ISO selected and it kept, sensibly to ISO 100. Video was shot using AVCHD at 50p.
I was prompted by other viewers that the manual gave the clue to setting the 2 second delay timer - the DISP button seems to be the key to extra functions now. Because of the extreme brightness it was necessary to use the EVF for every shot and clip however i did find I had to add addition shielding with my fingers around the viewfinder as light easily reflected into the viewfinder making equally impossible to see. Battery life was quite poor, I had to resort to using a back up USB powerbank after just 1 hour of use. As the camera uses internal USB charging it might be worth considering one of these units to power the camera if you are going to use the camera over a long period of time. I'll do a review of the one I have shortly.
All things considered I think the camera handled the contrast extremely well and even shots with the sun in the frame showed very little contrast flair. I also did a comprehensive lens test to determine which aperture gave the best resolution from wide angle to telephoto. I'll publish that test later.
Tomorrow I will do a low light video and stills test to see how the noise is controlled with the BSI sensor.


The New Panasonic Lumix TZ60 (ZS40) has arrived!


Well the TZ60 (ZS40) arrived today. I was going to do an unboxing video however I decided just to go out and get a few images through it just to see how it performed.
A few initial disappointments:
1. There is now no method to adjust the "photostyles" so you are stuck with whatever Panasonic determine as "standard" settings.
2. Self timer, although it is now non resetting, seems to be fixed at 10 seconds and I can't find any adjustment to shorten it to the usual 2 second one.
3. EVF is very small and only useful for composition, no soft eyepiece and no matter how you try to use it you end up with your nose flat against the LCD screen with the associated greasy mess! (for me anyway).
4. Manual focus via the control ring is very slow and if you overshoot you have a lot of backlash to take up before the focus begins to shift again (focus peaking is very weak to see in daylight)
5. Almost impossible to adjust the evf diopter with it up to your eye.
6. Adobe camera RAW or DNG doesn't support it yet.
As with the previous TZ40 it now has incamera charging so you have to keep an external powerpack ready to boost the charge during a day's shoot. Although you can tether a USB power pack and shoot using that if you wanted to in an emergency.
The good news is that the images are better than I first saw with the TZ40 and noise is pretty well controlled at ISO 800 even in very low light The fireplace image is ISO800 and a couple of seconds exposure. What I have noticed is that optical image stabilisation doesn't quite hold the 720mm image blur free at less than 1/125 second so the reciprocal rule of 1/720 applies here. So assuming we have a 3 stop advantage it would mean that 1/125 is at the extreme end of being able to hols an image. Today I noticed a lot of images with camera shake when using the full zoom. The exposures were of the order of 1/80 to 1/160 where the aperture drops to f6.1. I was using ISO 100 for all exposure tests today. It may mean using ISO 400 at full zoom in order to get more stable images. I will test this again tomorrow.
The grip is comfortable and gives confidence that it won't slip out of your hand.
1080p video looks very nice but in avchd the usual problems are seen if the camera moves. On a tripod the images are excellent.
There does appear to be EV correction in video mode however this has to be set before recording begins.
More detailed testing tomorrow.