 Graham's Photography Blog & Technical Reviews
An Easy Way To Remember Those F Stop Numbers
If you are new to cameras (digital or film) and find the F stop notation difficult to understand, or remember, then this little explanation might help.
The F stops (full increment not 1/2 or 1/3 rd) are based upon a geometric incremented pattern based upon the powers of the square root of 2 (which is 1.4)
This gives a geometric scale of f1.0 f1.4 f2.0 f2.8 f4 f5.6 f8 f11 f16 f22 f32 f45
You only need to remember the F1.0 and F1.4 values.
So begin with F1.0, two stops smaller is F2.0 (double the number), two more stops is F4 (double the number) two more stops f8. So you can see how the sequence works.
Each step in the progression is 1 F stop, either bigger moving to the left or smaller moving to the right.
It's the same with the f1.4 two stops smaller is f2.8 (double the number), two stops smaller is
f5.6 etc.
So for example if you are at an aperture value of f16 and want to open the aperture by 4 stops then 2 stops gives f8 (divide by 2) and 2 more gives f4 (again dividing by 2) ( or divide by 4 but half and half again might be easier for some)
There is a way to calculate the 1/2 and 1/3 stop values however you can't do this in your head! This rule for full f stops only requires that you can double, or half, a number.
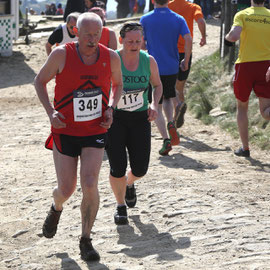
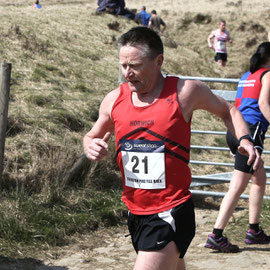
Rivington Pike Fell Race 19th April 2014, lessons to be learned!

Easter Saturday sees the annual Rivington Pike fell race. A gruelling run, distance: 5.2km / 3.2m
climb: 213m / 699 ft. The winning time this year 17min 18 second by number 169 Bob Hope.
The course record was set in 1981 and still stands by J Wild in 15mins 53 seconds.
I decided to try out some action photography to understand more fully the relationship of AI servo focus mode on Canon DSLR's.
Most of what I have read would suggest using just one central focus point and using the AI servo mode for this kind of work.
I had limited success using this mode as on quite a lot of images I missed the subject with this single point. The focus reverting to the background. My instinct would have to have used manual focus and a focus marker at a point where the runners would cross. I also was using burst mode and shooting RAW plus JPEG and found the camera buffer quickly filled leaving me an unresponsive shutter button until the buffer started to empty. I lost a few critical shots during this period.
On the way up the runners were strongly backlit so exposure was based on the shadow side and -1/3 EV and I just left the highlights to the mercy of the light. On the way down the runners were front lit with full sunshine which created strong contrast but allowed 1/2000 sec shutter speeds. So what did I learn from today? AI focus isn't that fast with some of my lenses and using just one AF point was not a good option. I would only shoot JPEG if I was to use high speed burst mode again and I also learned that spectators can be so indifferent to photographers. Quite often stopping right in front of me where I was clearly photographing the race!


Advanced Tutorial Dust Spot and Object Removal with Canon DPP
Take a look at the before and after images created within Canon DPP image edit program.
In the first pair of images, brightness/contrast adjusted, crop applied and the prominant ee logo removed
In the second pair the builders skip removed
In the final pair the rubbish bins removed
Obviously the more care/time you put into the cloning the better and
undetected the alterations will be.
In an upcoming Youtube video I'll show you how to apply these effects.
click for larger format image


Noise Reduction "plug in" for jpeg/RAW noise removal 01/01/2014
I was prompted to have a look at a noise reduction plug in from Topaz labs. This plug in will work with the majority of image editing programs so I thought I would test it against the editing program I most commonly use Corel Photo X2.
Here are 3 cropped images from an ISO 1600 image from the Panasonic Lumix FZ200, the original plus 2 processed files.
All these noise reduction programs work by bluring the noise and then applying some sharpening. Usually there is a facility to work on red or blue layers which normally contain the most luminance noise. Is the plug in worth it at £28?


DEPTH OF FIELD AND SENSOR SIZE
There have been a few recent comments on my Youtube channel from new users to the FZ200 camera concerned that the FZ200 only has an aperture minimum of F8 in stills and F11 in video. They were concerned that they were not going to get the necessary depth of field for close up shots etc as with the f22 setting on DSLR cameras. In my eBook I describe the reason why the FZ200 has far more depth of field at the equivalent focal length of a full or cropped frame sensor but i thought I would show some comparison shots from the FZ200 and the full frame Canon 5Dmk3. Both shot at 50mm focal length with and aperture of f2.8 and the focus on the robot figure.
As you can see from the FZ200 picture the depth of field is vast compared to the full frame shot of the 5D. This very narrow DOF (depth of field) is what the full frame shooters love and its either an advantage or disadvantage for small sensor cameras that the inherent depth of field is so large. So if you were one of the viewers who were concerned you wouldn't get sharp pictures with enough depth of field I hope this shows you can.


Converting a Compact Digital Camera to Shoot Infrared Part 2
After removing the infrared blocking filter from within the camera, the last phase of the conversion is to fix a infrared pass filter to the camera lens. The filter I chose was a 37mm 720nm cut filter available on Amazon. It could be directly mounted to the front of the lens however I decided to fix a 37mm filter ring to the camera to allow this filter to be removed. The filter ring I made by removing the UV glass and locking ring from the filter and then removed the back threads just leaving a thin ring section with the 37mm threads to accomodate the IR filter in its mount. I used expoxy resin to secure the ring to the bezel of the lens - ensuring it was concentric. In use I found it easier to switch the camera to the black and white mode to see the effect on LCD viewfinder. A sample of images shot using this combination shows the fantastic effects shooting in this mode delivers. ( the full video of this second part is at http://www.youtube.com/watch?v=13hNNn_OMKU )
Final images can be sepia or blue toned to accentuate the effect
IR Filter on Amazon UK http://www.amazon.co.uk/Generic-Infrared-720nm-Camera-Filter/dp/B00GTB29FS/ref=sr_1_2?ie=UTF8&qid=1390243996&sr=8-2&keywords=ir+filter+37mm
IR Filter on Amazon USA http://www.amazon.com/Pixco-Infrared-Thread-Filter-Olympus/dp/B00BIYBUK6/ref=sr_1_10?ie=UTF8&qid=1390306807&sr=8-10&keywords=37mm+ir+filter


Backlighting using translucent plastic sheet
Getting a bright white background free from shadows can be a tricky challenge. I was experimenting with backlight for copying some transparencies when i though this method might lend itself to other forms of tabletop/studio photography so i set up a still life shot to try this out.

This is the set up I tried with a piece of quite opaque translucent plastic sheet which I had previously purchased from a sign making company as an "offcut". I backlit this with the Yongnuo 160 LED light unit on full power at about 0.75 metres behind it. The main light was the 300 LED light unit from Yongnuo with diffuser fitted and on full power I held a silver reflector to the right of the subject to control the contrast. Exposure was 1/4 sec @ F16 ISO 125


Simple Flash Diffuser Works Great on Pop Up Flashes


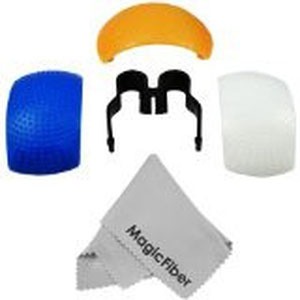
This simple design is a perfect way to add some softening to the harsh shadows created with the onboard popup flashes on bridge and some DSLR cameras. It offers a neat way of adding diffusion and looks a lot more "business like" than a piece of kitchen tissues taped over the flash.
It simply slides into the hot shoe and then you position the diffuser in line with the centre of the flash head.
As you can see from my 2 illustration pictures above - with and without the diffuser on my Panasonic FZ200 pop up flash the results are very good.
Available on Amazon UK for just £5.55 and will fit most cameras with a hot shoe and cobra flash head.
https://www.amazon.co.uk/dp/B00695N5HU?tag=httpwwwgrah07-21&camp=2902&creative=19466&linkCode=as4&creativeASIN=B00695N5HU&adid=0ZC4C70JSQ4TTAFQESXZ&
and on Amazon USA
http://www.amazon.com/dp/B007M7ICKE?tag=grasphoblo-20&camp=0&creative=0&linkCode=as4&creativeASIN=B007M7ICKE&adid=1NZGN1JETBEEZQE7CPPQ

A simple set up of 1 light from the front/side, left, with paper tissue diffuser, 1 LED torch backlighting the toy and a silver reflector to the right side to soften the shadows even more. Black paper roll as the backdrop. 1/3sec F8 at ISO 100 canon EOS M with 17-55 EFS lens on EFS-EOS M adaptor
Welding Mask Filters used for Long Time Exposure Photographs
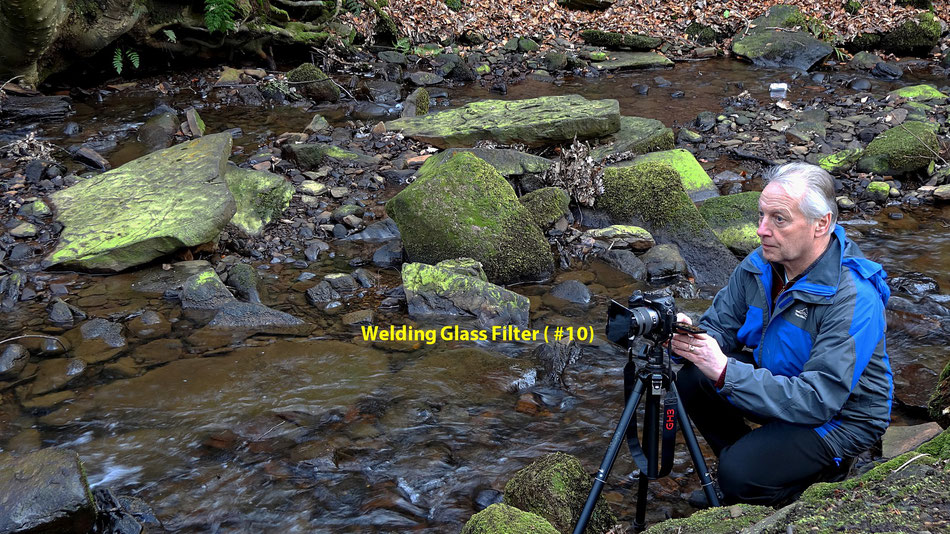

The cost of neutral density filters with sufficient density to give 30 second exposures are very cost prohibitive if you only want to shoot a few pictures in this mode. I have seen examples of images taken with the welding glass filters used for electric arc welding and they seemed to vary in both quality and colour rendition. The problem is that most of these filters are made up with a heavy green bias and this has to be "cancelled out" by doing a custom white balance setting. The problem is the tradition way of doing a white balance set procedure with the filter in place with result in such a low level of light intensity that the camera cannot perform the procedure.
I needed to find a way to be able to set accurate white balance with the filter in place. Normally the camera is pointed at a white or gray card to carry out the setting of the white balance point however in this instance i found it more effective to point the camera at the sun to get enough light to perform the operation. Once the white balance had been determined even after 60 second exposures the images were still neutral. The filters will just fit inside a normal 100mm square filter mount (if not a little tight) however you must ensure that the edges of the filter are sealed to prevent light leakage as this will cause magenta flair on the image. I used black duct tape to seal the edges. You must frame up and focus prior to installing the filter as there is not visible image on the LCD. I found manual focus and manual exposure the best way to execute this exposure. I needed 60 seconds at f8 and ISO 1600 to get good exposure with the lightest of the 3 filters (the number 10). I was using my GH3 which has the facility to turn off long exposure noise reduction so that I disn't have to wait the 60 seconds dark slide noise reduction exposure.
As these are not "optical quality" filters I was pleasantly surprised at the lack of any artifacts in the images.
So if you want some really long exposures in bright sunlight these might be a very cheap way for you to experiment.
I bought the set of 3 filters on Amazon and they cost just £3.15 on Amazon UK.
- Size 4¼" x 3 1/4" (108mm x 83mm)
Pentax re-introduces lens focus scales

The new range of Pentax K mount lenses have manual focus scales. Manual film camera users will probably remember this was the "norm" on just about every manual focus lens and the ability to be able to set the lens to give maximum depth of field using the "hyperfocal focus distance" - aligning the closest focus point with the aperture line engraved on the lens. This gave you a visual indication of the depth of field the lens would have at this aperture. Since digital cameras came on the scene autofocus seems to have become the most important factor for lens makers. It's nice to see Pentax actually crafting a series of quality lens like these, bringing back some of the "fun" to photography.
The Olympus OM-D E-M5 Micro four thirds camera

A new addition to my micro four thirds camera kit the Olympus OM-D E-M5. I bought the body only as I have quite a few M4/3 lenses.
In this shot I chose to use the 45-200mm Panasonic lens stopped down to F11 @200mm and shooting about 1.5 metres away. I have previously found this lens to be fairly soft at long telephoto, especially with wide aperture. Here I think it has earned a respectable report as the definition looks to be excellent. Coupled with the 16 Megapixels sensor in the M5 it should give some great results.
The camera itself has a lot of features ideally suited to stills photography however Olympus are not known for their expertise in video recording and this camera is no exception. It only supports 1080i at 60 frames per second derived from a 30p sensor output or 720p at 30 frames per second. I have yet to really fully test the camera in video mode, initial clips didn't look too great as there was an issue with image stabilisation which I have yet to resolve fully.
Using Automatic Extension Tubes for Close Up Photography with CSC's and DSLR's


Until recently the cost of a set of automatic extension tubes was probably prohibitive to all but the dedicated close up photography enthusiast. Better quality ones were often in the hundreds of pounds. For most of my close up work I had been using supplementary close up lenses and in particular a number 2 dioptre achromatic lens. This allowed me to reduce the working distance from the camera to the subject thus giving a larger image on the sensor. For lenses with small diameter optics (52mm) this is both practical and cost effective, however for larger lenses like the 77mm lens diameter of my 100-400mm zoom lens finding a decent quality optic was the like looking for the Holy Grail. I came across this set of extension tubes on Amazon and they were just £28 so I decided to take the chance and purchase a set to try them out.
They are not made from machined metal as with the professional grade tubes but the moulding quality of the plastic components looks very good. Mating surfaces are metal and look like an aluminium alloy. The interconnections from the front to the rear of the tube are set in plastic and the spring loaded pins seem to slide very freely and mate perfectly with both the camera body and lens mount.
Normally when using extension tubes the lens to sensor distance is increased. This has the resulting effect of reducing the light intensity. The fall off in light obeying the square law so doubling the lens distance from the sensor results in a 4 times reduction in light reaching the sensor. With manual tubes this "factor" had to be applied to the exposure system manually in order to achieve the correct exposure level at the sensor plane. With the automatic tubes there is feedback from the lens as to what aperture is being used so the camera exposure system can automatically meter the amount of light and make any necessary adjustments to shutter speed if using aperture priority mode. This offers significant advantage in being able to get consistently correct exposures. With the camera body able to communicate with the lens it is possible to have full aperture viewing for focussing and then stopped down aperture for the exposure cycle. This is a major advantage for DSLR shooters with only optical viewfinder. Previously the viewing of the composition and focus would be done with the lens stopped down and the image was very dim in the viewfinder.
Magnification depends upon the focal length of the lens and the amount of extension tube fitted between the lens and the camera body. Usually there is a chart supplied, or a mathematical formula given, to allow you to determine the magnification for any lens and tube combination.
Depth of field becomes extremely shallow at high magnification and it is essential to either use flash photography to illuminate the subject or use a tripod and slide plate to set the focus point accurately. Some close up photographers use "focus stacking" techniques to improve the overall depth of field in the final image. In this method a series of images with the camera moved incrementally close to the subject until fron to back sharpness has been achieved. The image sequence is then loaded into a "focus stacking" program which assembles these individual planes of focus into 1 image with deeper depth of field.